ACME the game company V2 V.1.
Vielen Dank für den Erwerb der FlyCamOne eco V2. Damit Sie von Anfang an viel Freude daran haben, bitten wir Sie, die nachfolgende Anleitung sorgfältig zu lesen: Lieferumfang: FlyCamOne eco V2 (Hauptplatine mit Videokopf und RX‐Kabel), Servoarm und Befestigungsschraube Aufbau Die FlyCamOne eco V2 kann über einen RC‐Empfänger gesteuert angeschlossen werden, oder aber mit einem optionalen LiPo‐Akku autark verwendet werden.
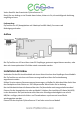
Falls notwendig, kann das Flachbandkabel an der Platine gelöst werden; lösen Sie dazu die graue Arretierung um einen Millimeter (1a/1b) und ziehen Sie das Kabel ab (2). Achten Sie beim Zusammenbau darauf, dass die Kontakte wie abgebildet nach oben zeigen. Achten Sie darauf, dass Sie durch den Einbau den Schwerpunkt des Flugmodells nicht verändern. Wenn Sie den Schwenkkopf der Kamera durch einen Servo (Art.‐No.
Flip 180° Halten Sie den Taster/Schalter für 10 Sekunden geschlossen um das Bild um 180° zu drehen. Die Drehung wird durch folgende Blinkfrequenz angezeigt: rot – rot – grün: regulär (Pilotensicht im Cockpit) grün – grün – rot: invers (hängend unter dem Modell) Auslesen der Daten: Die Fotos bzw. Videos können wie folgt ausgelesen werden: 1. Durch Anschließen eines Mini‐USB Kabels an die Platine und des PC 2.
Thank you for purchasing the FlyCamOne eco V2. To ensure that you´ll have a lot of fun with it right from the start, we recommend to read the following instruction carefully. Product Contents: FlyCamOne eco V2 (Main board with camera head and RX‐cable), servo arm und mounting screw. For the power supply, the FlyCamOne eco V2 can optionally be connected to a R/C receiver or a separate LiPo battery. Installation & Mounting Connect the RX‐cable with a free channel of your R/C receiver.
If necessary, the flat ribbon cable can be unfixed; for this please unlock the detent for one millimeter (1a/1b) and remove the cable (2). Make sure that the contacts are upturned (as pictured) while reassembling. The installation of the camera can cause a change of the center of gravity. If you want to move the pivot able camera head by a servo (Art.‐No.:AA4120), please remove the bulge at the inside of the head attachment at first. Then fix the servo arm with the little screw at the camera head.
Readout of data The photo and video files can be readout as follows: 1. By connecting the PCB via a mini USB‐cable to the PC. 2. By inserting the SD‐card into a card reader. Charging of connected batteries If a battery is connected to the camera, it can be charged by the USB‐port. Technical data Resolution: VGA 640x480pix USB: 1.1 Mini USB FPS: 30 voltage1: 3,7‐4,2V (LiPo‐battery) Focus: 0,3m ‐ ∞ voltage2: 4,5‐6V (RC‐System) weight: 16g Micro‐SD‐card: max.
Merci d’avoir acheté une FlyCamOne eco V2. Afin de vous assurer une utilisation conforme de ce produit, nous vous demandons de lire avec attention le manuel suivant. Contenu du kit: FlyCamOne eco V2 (Circuit imprimé avec la tête de la caméra et cordon RX), Bras de servo et vis de fixation. Pour une alimentation directe, la FlyCamOne eco V2 peut soit être connectée à un récepteur R/C soit être connectée à une batterie lipo optionnelle.
Si nécessaire, le câble peut être retiré; pour cela vous devez tirer celui‐ci d’un millimètre afin de l’extraire de sa prise puis le retire (1a/1b) comme illustré ci avant(2). Assurez‐vous de la bonne polarité lorsque vous procédez au remontage. L’endroit ou vous positionnerez la caméra dans votre modèle peut causer un changement du centre de gravité. Si vous souhaitez bouger la tête de la camera de manière mécanique, vous devez utiliser un servo de type standard (Art.‐No.:AA4120.
Lecture des données Les photos et les vidéos peuvent être lues comme indiqué ci après: 1.En connectant le circuit imprimé de la camera via le port mini USB à votre PC. 2. En insérant la carte SD dans un lecteur de cartes. Charge de la batterie connectée Si une batterie est connectée à la caméra, elle pourra être chargée via le port USB. Caractéristiques techniques Résolution: VGA 640x480pix USB: 1.
Gracias por haber comprado una FlyCamOne eco V2. Afín de asegúrale una utilización conforma de este producto, le invitamos a leer el siguiente manual. Contenido del kit: FlyCamOne eco V2 (Circuito impreso con la cabeza de la cámara y el cordón RX), Brazo de servo y tornillo de fijación. Para una alimentación directa, la FlyCamOne eco V2 puede ser conectada a un receptor R/C o a una batería lipo opcional. Instalación & fijación Conectar el cordón RX a un canal libre de su receptor R/C.
Afín de asegurarle la mejor cualidad de video y de sonido, le aconsejamos utilizar una tarjeta SD con una velocidad de grabación de al menos 4MB/sec. El cable puede ser tirado; Por eso, tiene que extraerlo al tirar sobre este de un milímetro afín de salirlo de su enchufe (1a/1b) como ilustrado antes (2). Asegúrese de la buena polaridad al remontar este último. El posicionamiento de la cámara en su modelo puede cambiar el centro de gravitad.
Leer los datos Las grabaciones pueden ser leídas como indicado aquí: 1. Al conectar el circuito impreso de la cámara vía el USD a su ordenador. 2. Al inserir la tarjeta SD en un lector de tarjeta. Cargo de la batería conectada Una batería conectada a la cámara puede ser cargada mediante el enchufe USB. Características técnicas Resolución: VGA 640x480pix USB: 1.
CE - Declaration Herewith we declare that this item is in accordance with the essential requirements and other relevant regulations of the directive 1999/5/EC. A copy of the original declaration of conformity can be obtained at the following address. Hiermit erklären wir das dieses Modell den grundlegenden Anforderungen und den anderen relevanten Vorschriften der Richtlinie 199/5/EG entspricht. Eine Kopie der Konformitätserklärung kann unter der nachfolgenden Adresse angefordert werden.