
Installation Manual
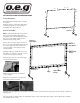

Note – Minor wrinkles in the screen will not be noticeable.
Warning – Do not set this product up without securing it to the ground using both the frame stakes and the guy wires.
Failure to follow these instructions could result in serious injury.
Warning – Do not use in windy conditions over 20 MPH. Damage could occur to the screen and or personal injury
could occur.
The screen should be removed from the frame after use. Constant exposure to the sun could damage the screen and will
cause it to wear out faster.
Cleaning the screen – The screen can be cleaned using mild soap and water.
Minimizing Wrinkles – Although most wrinkles in the screen will not be noticeable in use it is best to take care to neatly
fold or roll the screen before placing in its storage bag.
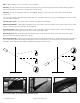
Front Projection – This is best for areas where it may not be dark enough for rear projection or there is background
light. Leave the black backing on the rear of the screen covering the back.
Rear Projection – Roll the black backing on the back of the screen to the base of the screen and secure it along the
bottom of the frame with the attached tie strings.
Rear Projection Tips – When setting up the projector for rear projection make sure to position the projector out of direct
line of sight of the viewer by raising or lowering the projector. If the projector is mounted low you may allow the black
backing to unroll and hang. This will block light from passing under the screen.
Copyright © 2012 Camp Chef1012-OS132-Instructions
For a setup video, go to www.outdoorcooking.com