
Product Manual


Cl156500, Cl156700
www.campbellhausfeld.com
5
2. Change sandpaper to a grit one to
two ranges finer.
3. Continue process by changing to
successively finer grits until desired
finish is obtained.
NOTE: Do not change from coarse grit to
very fine grit sandpaper in one step. Swirl
marks that might have been made with
the coarse grit will be difficult to remove.
Maintenance
1. Thoroughly inspect the tool for any
broken or damaged parts before each
use.
2. Periodically clean tool by using a
blow gun to remove dust and debris
around the pad and spindle area.
STORAGE
Lubricate air tool before storing. Follow
lubrication instructions in Pre-operation
section with an exception to step 4. Run
sander for only 2 to 3 seconds so more
oil will remain in air tool for storage.
TECHNICAL SERVICE
For information regarding the operation
or repair of this product, please call
1-855-504-5678.
REPLACEMENT PARTS
INFORMATION
For information regarding where to order
replacement parts, call toll free 1-855-
504-5678.
Please provide the following information:
• Model number
• Stamped code
• Part number and description
Address parts correspondence to:
Campbell Hausfeld
100 Production Drive
Harrison, Ohio 45030 U.S.A.
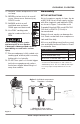
4. Connect the air tool to the air supply
and cover the exhaust port with a
towel (Refer to replacement parts
manual for tool features). Run the
tool in both the forward and reverse
directions, if applicable, for 20 to 30
seconds. Oil will discharge from the
exhaust port when air pressure is
applied.
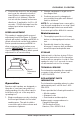
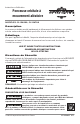
SPEED ADJUSTMENT
This sander is equipped with a speed
adjustment lever (See Figure 3). Slower
speeds will reduce sanding pad RPM’s to
obtain a finer finish on the work surface.
Faster speeds increase pad RPM’s to
allow coverage of work surface more
quickly. IMPORTANT: Air supply to tool
is not completely closed off when speed
adjustment is at lowest setting.
Operation
Random orbit sanders are designed so
the palm of one hand can guide tool
during sanding. Use the other hand to
hold the hose(s) out of the way while
operating tool.
1. Begin sanding process by selecting
the finest grit suitable for the initial
sanding pass. The grit should be
coarse enough to remove burrs and
excessive roughness.
Figure 3 - Speed adjustment
Speed
Adjustment
Lever