
User manual


Se deberán usar gafas de seguridad
durante la operación.
1. Asegúrese de que la broca del
taladro está fijada en el portabroca
en forma segura.
2. Configure el BOTÓN DE
AVANCE/RETROCESO para rotación
hacia la derecha.
Asegúrese de que el trabajo esté sujeto
en forma segura en una prensa de
tornillo o mordaza antes de comenzar
la operación de perforado. El trabajo
que está flojo puede girar y causar
lesiones corporales.
3. Ubique el centro exacto del orificio
a ser perforado y usando un
punzón, haga una pequeña muesca
en el trabajo.
4. Coloque la punta de la broca del
taladro en la muesca hecha con el
punzón, sostenga el taladro en
ángulo recto con respecto al trabajo
y encienda el motor.
El aplicar demasiada presión puede
causar que la broca se recaliente o se
quiebre, lo cual podría provocar
lesiones personales o que se dañen las
brocas.
Aplique presión pareja y constante
para que la broca continúe cortando.
Demasiada poca presión evitará que
la broca corte. Eventualmente, la
fricción excesiva creada por el
deslizamiento sobre la superficie
desafilará los bordes cortantes.
Siempre esté atento y contrarreste la
acción giratoria del taladro.
5. Si el taladro se ahoga o se atasca en
el orificio, suelte el gatillo
inmediatamente, retire del trabajo
la broca de perforación y determine
la causa del ahogo o el atasco.
!
PRECAUCION
!
PRECAUCION
!
PRECAUCION
!
ADVERTENCIA
14 Sp
Manual de Instrucciones y Lista de Piezas
No apriete y suelte el gatillo en un
intento por liberar un taladro ahogado
o atascado. Esto puede dañar el motor.
La dirección de rotación puede
revertirse para ayudar a liberar una
broca atascada. Asegúrese de
REAJUSTAR la dirección de rotación
antes de intentar seguir
perforando.
6. Reduzca la presión en el taladro
justo antes de que la broca corte a
través del trabajo para evitar astillar
la madera o que se ahogue en el
metal.
7. Cuando la broca haya penetrado el
trabajo por completo y esté girando
libremente, retírela del trabajo
mientras el motor aún está en
funcionamiento, luego apague el
taladro.
CÓMO PERFORAR MADERA
Además de las instrucciones
enumeradas bajo la sección
PERFORACIÓN GENERAL, lo siguiente
también se aplica:
1. Cuando utilice una broca helicoidal
en madera, retírela frecuentemente
del orificio para quitar las láminas
que se acumulan en las estrías. Esto
ayuda a evitar que el trabajo se
recaliente o se queme.
2. Si se utiliza un bloque de apoyo
para que la parte trasera del
trabajo no se astille, sujételo en su
lugar en forma segura. Si no se usa
un bloque de apoyo con brocas de
paleta o sierras para orificios, libere
presión tan pronto como la punta
de la broca atraviese el trabajo y
complete el orificio desde el lado
opuesto.
CÓMO PERFORAR METAL
Además de las instrucciones
enumeradas bajo la sección
PERFORACIÓN GENERAL, lo siguiente
también se aplica:
1. Use únicamente brocas helicoidales
de acero para alta velocidad, de
buena calidad y afiladas cuando
perfore metal.
AVISO
2. Comience a perforar con una
velocidad lenta y aumente
paulatinamente la velocidad a
medida que el taladro va cortando.
Cuanto más duro sea el material,
necesitará una velocidad más baja.
Cuanto más blando sea el material,
necesitará una velocidad más alta.
3. Cuando perfore un orificio grande,
es más fácil perforar primero un
orificio pequeño y después
agrandarlo al tamaño necesario.
4. El uso de un lubricante, como el
aceite, en la punta del taladro,
ayuda a mantener la broca fría,
aumenta la acción de perforación y
prolonga la vida útil de la broca.
5. Si es posible, perfore levemente la
posición donde va a taladrar
primero, para evitar que la mecha
del taladro patine.
Mantenimiento
MANTENGA LIMPIA LA
HERRAMIENTA
Limpie el polvo y los desechos de los
orificios y contactos eléctricos,
soplando con aire comprimido. Los
orificios de ventilación del motor y los
interruptores deben mantenerse
limpios y libres de materiales extraños.
No intente limpiarla introduciendo
objetos con punta a través de las
aberturas. Mantenga los mangos de las
herramientas limpios, secos y libres de
aceite o grasa. Use únicamente un
jabón suave y un paño húmedo para
limpiar la herramienta, evitando todos
los contactos eléctricos.
Ciertos agentes de limpieza y solventes
son nocivos para los plásticos y otras
piezas aisladas. Algunos de éstos
incluyen gasolina, aguarrás, solvente
para laca, solvente de pintura,
solventes de limpieza con cloro,
amoníaco y detergentes de uso
doméstico que contengan amoníaco.
Nunca use solventes inflamables ni
combustibles cerca de las
herramientas.
SERVICIO TÉCNICO
Para obtener información con relación
al funcionamiento o reparación de
este producto, sírvase llamar al
1-800-424-8936.
El servicio de la herramienta debe ser
realizado sólo por personal de
reparaciones calificado. El servicio o
mantenimiento realizado por personas
no calificadas puede provocar riesgo de
lesiones.
!
PRECAUCION
3
DG190300CK
www.chpower.com
Operation
FORWARD/REVERSE BUTTON
This Drill is equipped with a
forward/reverse lever which is used to
change the rotation of the chuck. Do
not attempt to change the rotation
unless the chuck is completely stopped.
Moving the
Forward/Reverse
Button while chuck is rotating can
damage the tool.
For forward rotation, firmly press in on
the lever marked FWD. For reverse
rotation, firmly press in on the lever
marked REV.
TRIGGER LOCK
To activate trigger lock, move the
forward/reverse lever so it is centered
in the handle.
INSERTING BITS
Unplug tool. Rotate the chuck sleeve
counterclockwise (viewing from chuck
end), and open chuck to approximate
drill bit diameter. Insert a clean bit up
to the drill bit flutes for small bits, or
as far as it will go for large bits. Close
chuck by rotating the chuck sleeve
clockwise and securely tighten by
hand.
Do not use the
power of the drill
to loosen or tighten bit while holding
chuck. The spinning chuck will cause
friction burn or hand injury.
!
CAUTION
NOTICE
REMOVING CHUCK
Unplug tool. Open chuck all the way.
Turn left-hand-threaded screw inside
chuck clockwise, and remove it . Insert
the short arm of a 3/8" hex key wrench
and close jaws on flats of wrench.
Strike long arm of wrench sharply
counterclockwise, remove wrench and
unthread chuck from spindle.
INSTALLING CHUCK
To install chuck, reverse “Removing
Chuck” procedure. Always keep the
spindle threads, chuck threads, and
securing screw free of debris.
GENERAL DRILLING
The front end of
the Drill may be
made “live” if the tool drills into live
wiring in the wall. TO PREVENT
ACCIDENTAL ELECTRICAL SHOCK, HOLD
DRILL ONLY BY THE SOFT GRIP HANDLE.
Safety glasses must be worn during
operation.
1. Be sure drill bit is securely gripped
in chuck.
2. Set FORWARD/REVERSE BUTTON for
clockwise rotation.
Make sure work is
held securely in a
vice or clamped in place prior to
starting drilling operation. Loose work
may spin and cause bodily injury.
3. Locate exact center for hole to be
drilled and using a center punch,
make a small dent in work.
4. Place tip of drill bit in dent made by
center punch, hold drill square with
work, and start the motor.
Applying too
much pressure may
cause the bit to overheat or break,
resulting in bodily injury or damaged
drill bits.
Apply steady, even pressure to keep
drill bit cutting. Too little pressure
will keep the bit from cutting.
Eventually, the excessive friction
created by sliding over the surface
will dull the cutting edges.
Always be alert
and brace yourself
against the twisting action of the drill.
5. If drill stalls or becomes jammed in
the hole, release trigger
immediately, remove drill bit from
work and determine cause of
stalling or jamming.
!
CAUTION
!
CAUTION
!
CAUTION
!
WARNING
!
WARNING
Do not squeeze
trigger on and off in
an attempt to free a stalled or jammed
drill. This will damage the motor.
The direction of rotation may be
reversed to help free a jammed bit.
Be sure direction of rotation is
RESET before attempting to
continue drilling.
6. Reduce the pressure on the drill just
before the bit cuts through the
work to avoid splintering wood or
stalling in metal.
7. When bit has completely
penetrated work and is spinning
freely, withdraw it from the work
while the motor is still running,
then turn off drill.
DRILLING WOOD
In addition to the instructions listed
under GENERAL DRlLLlNG, the
following also apply:
1. When using a twist drill in wood,
frequently withdraw it from the hole
to clear away chips which build up in
the flutes. This helps prevent
overheating and burning work.
2. If a backing block is used to keep
back of work from splintering,
clamp it securely in place. If a
backing block is not used with
spade bits or hole saws, ease up
pressure as soon as bit point breaks
through work, and complete the
hole from the opposite side.
DRILLING METAL
In addition to the instructions listed
under GENERAL DRlLLlNG, the
following also apply:
1. Use only good quality sharp high
speed steel twist bits when drilling
metal.
2. Start drilling with slow speed and
gradually increase speed as drill cuts.
The harder the material, the slower
the speed required. The softer the
material, the faster the speed.
3. When drilling a large hole, it is easier
to first drill a smaller hole and then
enlarge it to the required size.
4. The use of a lubricant, such as oil,
on the drill point helps keep the bit
cool, increases drilling action and
prolongs drill bit life.
5. If possible, punch the drilling
position first to prevent drill bit run
away.
NOTICE
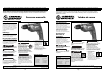
1. Chuck
2. Trigger
3. Power Cord
4. Lock on
5. Forward/ Reverse lever
1
3
2
5
4
Funcionamiento
(Continuación)