CSI Web Server Revision: 7/13 C o p y r i g h t © 2 0 1 1 - 2 0 1 3 C a m p b e l l S c i e n t i f i c , I n c .
License for Use This software is protected by United States copyright law and international copyright treaty provisions. The installation and use of this software constitutes an agreement to abide by the provisions of this license agreement. Campbell Scientific grants you a non-exclusive license to use this software in accordance with the following: (1) The purchase of this software allows you to install and use the software on one computer only.
Limited Warranty The following warranties are in effect for ninety (90) days from the date of shipment of the original purchase. These warranties are not extended by the installation of upgrades or patches offered free of charge. Campbell Scientific warrants that the installation media on which the software is recorded and the documentation provided with it are free from physical defects in materials and workmanship under normal use.
Table of Contents PDF viewers: These page numbers refer to the printed version of this document. Use the PDF reader bookmarks tab for links to specific sections. 1. CSI Web Server Administrator...................................2 1.1 1.2 Status....................................................................................................2 Configuration .......................................................................................3 1.2.1 Edit Root Permissions..................................
Table of Contents ii
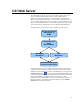
CSI Web Server The CSI Web Server allows you to view your RTMC projects using a web browser. Included with the CSI Web Server are the CSI Web Server Administrator and the Web Publisher. The CSI Web Server Administrator allows you to configure the web server, check the status of the web server, set up user accounts and passwords, and easily browse to sites running on the web server.
CSI Web Server The CSI Web Server supports the following target browsers at the indicated version or later: Chrome 10 Firefox 4 Internet Explorer 9 Opera 11 Safari 5 NOTE 1. If firewalls exist between your web server (i.e., a PC running CSI Web Server or a web-enabled datalogger) and the target audience of your website(s), the firewalls will need to be configured to allow incoming traffic on the port being used by the web server.
CSI Web Server The trash can icon ( website. NOTE 1.2 ) next to each website can be used to remove the Only sites published to the web server’s root directory and immediate subdirectories of the root directory will be shown. Sites cannot be published to deeper subdirectories. Configuration 1.2.1 Edit Root Permissions The Edit Root Permissions button is used to create or edit the root .csipasswd file.
CSI Web Server Private Key File – Specifies the name of the PEM encoded file that contains the HTTPS private key. The TLS/SSL stack used by the web server supports only AES128 or AES256 encryption for the private key file. Private Key Password – Specifies the password used to decrypt the TLS/SSL private key. It will be ignored if a private key is specified that is not encrypted. Certificate File – Specifies the name of the PEM-encoded file that contains the x509 HTTPS certificate. 1.2.
CSI Web Server 2. Web Publisher The Web Publisher allows you to publish your RTMC project to the web. In addition, the Web Publisher has display settings that allow you to show other tabs such as data browsing and network status. The Web Publisher supports two kinds of websites: PC websites and Datalogger websites. PC Website - PC websites run on the CSI Web Server. The CSI Web Server supports any number of websites and lets you control user access rights for each website.
CSI Web Server 2.1 Creating Websites To create a website, press the Add button and select either Add PC Website or Add Datalogger Website. Fill in the settings as described below. After filling in the desired settings, press the Publish Website button to publish the content. Web Server Settings Host Address - Specifies the address where you will be publishing your website. The address can be a domain name or IP address in the form XXX.XXX.XXX.
CSI Web Server account with “all” access is called the Root User ID. For more information on security, see Section 3, Web Security. Root Password – The root password is the password associated with the root user ID that has been given “all” access to publish websites to the web server. Remote Folder – The remote folder controls where a website will be published relative to the web server’s root directory. By default, the CSI Web Server’s root directory is C:\Campbellsci\CsiWebServer.
CSI Web Server Default Poll Interval - When accessing a website from an Internet browser, data is polled. This means that we have to ask the web server if it has any new data to be displayed. The default poll interval is set to 10 seconds. If you are displaying slower data, you should change this setting to match your data interval. If you have really fast data, you will have to do some testing to find an acceptable poll interval.
CSI Web Server 2.2 Managing Websites To remove a website, select the website in the Websites list and press the Remove button. To rename a website, select the website in the Websites list and press the Rename button. The settings from the website that is currently selected in the Websites list can be copied to a new website by pressing the Copy button. This can be useful when multiple websites will have similar settings, such as when you want to publish the same RTMC project to multiple dataloggers.
CSI Web Server For PC Websites, there is a default .csipasswd file which includes two users: Username: admin Password: admin Access Level: All Username: anonymous Password: Access Level: Read Only If a root .csipasswd file has not been created, this default .csipasswd file will be used for the root directory and any remote folder that does not include its own .csipasswd file, The CSI Web Server Administrator is the preferred method of creating and editing .csipasswd files.
CSI Web Server The .csipasswd File Editor dialog box that is opened when the keys icon is pressed has the following fields: Realm - The name given to this realm. (A realm is a collection of user names and their access levels.) The name will be used in the prompt the browser displays when asking the user for a user name and password. User Names - Shows the users that are currently defined in this realm. Press Add User to add a new user.
CSI Web Server All – Allowed to view data, make changes to writeable values in a datalogger’s Public or Status table or a virtual data source, set a datalogger’s clock, use the API FileControl command, and publish websites. After defining the desired user names and access levels, press Apply to apply the changes. You can also press Cancel to discard the changes. Press Read file to read a .csipasswd file into the Website .csipasswd File Editor. Press Save File to save the contents of the Website .
CSI Web Server and access levels you want to be available and press the OK button. Press the Publish Website button to publish the website and send the new password file. When you press the OK button on the Website .csipasswd File Editor dialog box in Web Publisher, this file is stored to your computer. When you press the Publish Website button, this file will be sent to the datalogger and will overwrite the current .csipasswd file.
CSI Web Server When querying through the CSI Web Server, that data source is specified as source_name:station_name.table_name.field_name. (Note the station_name applies only to LoggerNet Server data sources.) For example, the data source for the PTemp field in a CR1000's Public table in a LoggerNet Server data source would be: Uri=Server:CR1000.Public.PTemp When querying the datalogger directly, the data source is specified as table_name.field_name.
CSI Web Server Backfill – The interval, in seconds, for the backfill (e.g., 3600 would be 1 hour). Format NOTE The Format is the format in which to return the data. Options are HTML, JSON, TOA5, TOB1, XML. If a value of json is specified for the format parameter and the web server has a large data set to send, the web server may choose to break the data into multiple requests by specifying a value of true for the more flag in the JSON output.
CSI Web Server http://192.168.12.55/?command=dataquery&uri=OneMin.TempF&format =html&mode=since-record&p1=14400 • To return all records since one hour ago: http://192.168.12.55/?command=dataquery&uri=OneMin.TempF&format =html&mode=backfill&p1=3600 BrowseSymbols The BrowseSymbols command is used to return all the sources in an RTMC project, all the stations in a server data source, all the tables in a datalogger or database, all the fields in a table, or all the elements of an array.
CSI Web Server Examples CSI Web Server In these examples, you are accessing data through the CSI Web Server at address 192.168.4.14. The RTMC project is published to the remote folder Weather. • To return all data sources in a project: http://192.168.4.14/weather/?command=browsesymbols&format=html • To return all stations in the LoggerNet server data source: http://192.168.4.
CSI Web Server Datalogger In these examples, you are directly accessing the datalogger at 192.168.12.55. • To return all tables in a datalogger: http://192.168.12.55/?command=browsesymbols&format=html • To return all fields in the Public table: http://192.168.4.14/?command=browsesymbols&uri=Public&format=html • To return all the elements in the Flag array, which is part of the Public table: http://192.168.4.14/?command=browsesymbols&uri=Public.flag&format= html 4.
CSI Web Server 5 Read only 6 Invalid table name 7 Invalid fieldname 8 Invalid fieldname subscript 9 Invalid field data type 10 Datalogger communication failed 11 Datalogger communication disabled (LoggerNet data sources only) 12 Blocked by datalogger security 13 Invalid table definitions (LoggerNet data sources only) 14 Invalid device name (LoggerNet data sources only) 15 Invalid web client authorization Results codes marked as (LoggerNet data sources only) are applicable only when the
CSI Web Server • To check the clock of the CSI Web Server: http://192.168.4.14/weather/?command=clockcheck&format=html • To check the clock of the CR1000 in the LoggerNet server data source: http://192.168.4.14/weather/?command=clockcheck&URI=Server:CR1000 _ip&format=html Datalogger In this example, you are directly accessing the datalogger at 192.168.12.55. • To check the clock of the datalogger: http://192.168.12.
CSI Web Server 6 Communication with the station failed (LoggerNet data sources only) 7 Communication with the station disabled (LoggerNet data sources only) 8 Blocked by datalogger security 9 Invalid station name (LoggerNet data sources only) 10 LoggerNet device is busy (LoggerNet data sources only) 11 Specified URI does not reference a LoggerNet station (LoggerNet data sources only) Results codes marked as (LoggerNet data sources only) are applicable only when the API is being used with a CSI w
CSI Web Server URI The URI can be specified as URI=source_name:station_name. For direct datalogger access, the URI can be omitted. Expr Specifies the path and file pattern for the desired file to be returned. Path determines the drive on the datalogger, i.e., CPU:, USR:, or CRD:. The file pattern can incorporate the use of wildcards. If the path is omitted or invalid, or a file matching the pattern does not exist, an Unrecognized Request response will be returned.
CSI Web Server Format The Format is the format in which to return the list of files. Options are HTML, JSON, and XML. ListFiles returns the following, formatted in a table: Path The path of the file or directory, relative to the URL. Is Directory A Boolean value that indicates whether or not the returned object is a directory. Size An integer that provides the size of a file in bytes, or the number of bytes free in a directory.
CSI Web Server FileControl The FileControl command allows you to perform actions on files that are located on one of the datalogger's drives. Note that FileControl can only be used when accessing a datalogger directly and not through the CSI Web Server. The command has the following parts: 24 File The name of the file on which to perform the file control operation. This command is optional for Actions 7, 8, 9, 11, and 12. File2 The name of the second file required for the command.
CSI Web Server specified by File, and mark the same file as the program to be run on power up. Format 14 Stop the currently running program, delete its associated data tables, and run the program specified by File without affecting the program to be run on power up. 15 Move the file specified by File2 to the name specified by File.
CSI Web Server Example Datalogger In this example, you are directly accessing the datalogger at 192.168.12.55. • To set a program named tc-fast.cr1 on the datalogger's CPU drive to run on power up: http://192.168.12.55/?command=filecontrol&file=CPU:tcfast.
Campbell Scientific Companies Campbell Scientific, Inc. (CSI) 815 West 1800 North Logan, Utah 84321 UNITED STATES www.campbellsci.com • info@campbellsci.com Campbell Scientific Africa Pty. Ltd. (CSAf) PO Box 2450 Somerset West 7129 SOUTH AFRICA www.csafrica.co.za • cleroux@csafrica.co.za Campbell Scientific Australia Pty. Ltd. (CSA) PO Box 8108 Garbutt Post Shop QLD 4814 AUSTRALIA www.campbellsci.com.au • info@campbellsci.com.au Campbell Scientific do Brasil Ltda. (CSB) Rua Apinagés, nbr.