LNDB Revision: 7/10 C o p y r i g h t © 2 0 1 0 C a m p b e l l S c i e n t i f i c , I n c .
License for Use This software is protected by United States copyright law and international copyright treaty provisions. The installation and use of this software constitutes an agreement to abide by the provisions of this license agreement. Campbell Scientific grants you a non-exclusive license to use this software in accordance with the following: (1) The purchase of this software allows you to install and use the software on one computer only.
Limited Warranty The following warranties are in effect for ninety (90) days from the date of shipment of the original purchase. These warranties are not extended by the installation of upgrades or patches offered free of charge. Campbell Scientific warrants that the installation media on which the software is recorded and the documentation provided with it are free from physical defects in materials and workmanship under normal use.
LNDB Table of Contents PDF viewers note: These page numbers refer to the printed version of this document. Use the Adobe Acrobat® bookmarks tab for links to specific sections. 1. Introduction..................................................................1 1.1 Supported Databases.................................................................................1 1.2 Supported Operating Systems...................................................................1 2. Getting Started...........................
LNDB Table of Contents 8. Exporting Data ...........................................................22 8.1 8.2 8.3 8.4 8.5 8.6 8.7 8.8 Database Selection ................................................................................. 23 Export From........................................................................................... 23 Export Into ............................................................................................. 24 Check for Missing Records...............................
LNDB 1. Introduction LNDB moves data from one LoggerNet server into a single database. The two main components of LNDB are LNDB Manager and LNDB Engine. LNDB Manager is used to set up a database and select the datalogger data tables that will be stored in the database. It also provides tools to monitor the LNDB Engine and to review the database data. LNDB Engine runs as a service and sends the selected data from the LoggerNet data cache to the database.
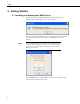
LNDB 2. Getting Started 2.1 Installing and Starting the LNDB Service The first time you open LNDB, the following error message will occur indicating that the LNDB Engine Service is not running. Once you press OK, the LNDB Engine Service Manager will open. This utility is used to install LNDB as a service and to enable/disable that service as required. NOTE You must have administrative rights on your computer in order to run the Service Manager.
LNDB You can choose to install the service under the Local System account or under a User account. Note that a User account is most likely necessary if you are using Windows Authentication in SQL Server. In most other cases, the Local System account can be used. If User account is chosen, you will be asked to provide a username and password. Once the application is installed as a service, press the Start button on the LNDB Engine Service Manager window to start the service.
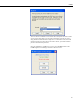
LNDB You can then press the Close button to close the LNDB Engine Service Manager. Once LNDB is installed as a service, you can open the LNDB Engine Service Manager from the File | Configure LNDB Engine Service menu item or by double-clicking on the LNDB Engine Status Label on the Status Bar. 2.2 Selecting a LoggerNet Server The Login to LoggerNet Server dialog box comes up automatically after LNDB is installed.
LNDB The User Name and Password fields are required only if your server administrator has set up security on your system. Each time you start the client, you will be prompted to enter this information. However, you can save the login information by selecting the Remember username and password check box, or you can select the Automatically login to this server check box to skip this window and use the information from the last session. NOTE All information must be saved for the LNDB Engine.
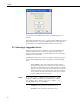
LNDB SQL Server Compact is an embedded database that just requires the selection of a filename. The default location of the database will be \LNDB.sdf. LNDB does not support any encryption or security options on the SQL Server Compact database. When selecting the database within the LNDB Manager, the database will be created when the OK button is pressed. 2.3.2 SQL Server To configure a connection to SQL Server you must select a SQL Server instance.
LNDB 2.3.3 MySQL The MySQL connection is an ODBC connection. You must use the Windows ODBC Data Source Administrator to configure the database connection. Currently only system data sources are supported and show in the Data Source combo box. The Login ID and Password may be optional. They will be set to blank in the connection string. It has been found that when set to blank, the login id and password configured in the system data source are used.
LNDB 3. Selecting Datalogger Tables The first tab on the main screen is Setup. From this screen, you select the datalogger tables for which you would like to move data into the database. The right side of the screen changes depending upon whether a station or a table is highlighted in the left tree as described below. If you check a station in the left tree, all final storage tables for the station are selected. This includes all tables except Public, Status, ports_and_flags, and __inlocs__.
LNDB 3.1 Station Setup When a station is highlighted in the left tree, the Station Setup screen is shown. On the Station Setup screen, tables can be enabled/disabled for storage by selecting/deselecting the check boxes next to the table names. A conflict exists for a table when datalogger columns do not match database columns. If in "Stop Storing Data" mode (see Section 4.0 Options) and conflicts exist, an icon is placed next to the table with the conflict.
LNDB 3.2 Table Setup When a table is highlighted in the left tree, the right side contains the Table Setup screen. Clicking the Store in database check box will enable storage for the table. The datalogger columns and database columns are listed side by side. If the database table does not currently exist, the name of the column that will be created is listed next to the datalogger column.
LNDB 4. Options The Tools | Options menu item can be used to set the options for LNDB. The following options are available: When Tables Change This tab allows you to determine what will happen when table definitions change. You can choose from the following options: Stop Storing Data Storing data to the database for the individual table stops if table definitions change. You must manually resolve the change.
LNDB 5. Resolving a Conflict A conflict exists for a table when datalogger columns do not match database columns. If in "Stop Storing Data" mode (see Section 4 Options), the conflict must be manually resolved by selecting the table in the left tree of the Setup tab and then pressing the Resolve… button on the Table Setup screen. (Alternately, you can select the datalogger in the left tree of the Setup tab, right click on the table name on the right side of the screen, and select Resolve.
LNDB 5.1 Archive Database Table If Archive Database Table is selected, the database table name is shown with the action stating that the table will be renamed to a specific new name. Press the Archive Table button to archive the table.
LNDB 5.2 Modify Database Table If Modify Database Table is selected, each column that has a conflict is shown with the proper action displayed. Each action is done when you click the Execute Actions button.
LNDB 6. Checking Status and Reviewing Data The function of the Setup Tab of LNDB’s main screen is described in Section 3. The other tabs on the main screen can be used to check the status of LNDB and to review LNDB’s data. The Status Bar at the bottom of the LNDB main screen can also be used to quickly check the status of the LNDB engine, database, and LoggerNet server. All of these functions are described below. 6.1 Status Tab The Status tab shows the storage status for each datalogger table.
LNDB Stopped - Conflict: The table has a conflict and storage has stopped. Blank - Not storing data for this table. Last Error - The last database error (insert error, error creating a database table, or error retrieving the start conditions) for the given table. This value is only reset when you restart the engine. The Status columns can be sorted. When you click a column other than the Database Table column, the grouping of tables by station is removed and the records are sorted.
LNDB 6.2.1 Deleting or Archiving Tables All database tables except the meta tables (LNDBStationMeta, LNDBTableMeta, and LNDBColumnMeta) can be removed by clicking the Delete button or archived by clicking the Archive button. If a meta table is selected, the Delete and Archive buttons are grayed out. When you archive a table, you are asked for an archive name. The default name is _arch. Basename is the first part of the name before the first "_arch".
LNDB The Significant Events tab shows significant messages. The messages can be paused by clicking the Pause Messages button. Up to 400 messages are displayed, after which the oldest is removed when new messages are added. If you close down LNDB Manager and reopen it, the messages are not lost. Clicking the Clear Messages button permanently removes the messages. They are not shown again the next time LNDB Manager is started.
LNDB 6.5 Log Files LNDB creates three log file types that are stored at \logs. For each log file type, there can be up to ten 1MB files. Once the tenth log file reaches 1 MB, the oldest file will be overwritten with new messages. The three log file types are: Significant.log - Contains the Significant Event messages. (See Section 6.3 Significant Events Tab.) State.log - Contains all of the Status Messages. (See Section 6.4 Status Messages Tab.) _Failed Inserts.
LNDB LN Connection Status Label - Shows the LoggerNet host and port (if not the default port 6789) and whether the connection is not connected, connecting, or connected. You can use the Status Bar as an alternative to LNDB's File menu. Doubleclick on any of the Status Bar labels to bring up the corresponding dialog box (i.e.
LNDB 7.2 Import From The Filename field is used to indicate the file from which data is to be imported. Only table-based data files are supported and can be imported. Press the browse button (…) to browse to the desired file. 7.3 Import Into The Database Table combo box is filled with all tables from the selected database. Select the table into which the data should be imported. 7.4 Data File Columns vs.
LNDB 8. Exporting Data The DBExport utility, launched from LNDB's Tools | Export Data menu item, can be used to export data from a database table into a data file.
LNDB 8.1 Database Selection When launched for the first time, DBExport launches the database selection dialog which allows you to select the database from which to export data. The database selection dialog is identical to the one used in LNDB. If you select Remember and Automatically Login, the login information is only remembered for DBExport.
LNDB 8.3 Export Into Filename The Filename field is used to indicate the file to which data should be exported. Press the browse button (…) to browse to the desired file. File Format The File Format is used to select the format in which the data file should be saved. Select the desired option from the list box: TOACI1 Data is stored in a comma separated format. Header information for each of the columns is included. TOA5 (ASCII Table Data) Data is stored in an ASCII comma separated format.
LNDB 8.4 Check for Missing Records Select an option from this list box to determine whether DBExport checks for missing records. No Checking DBExport does not check for missing records. Check Time DBExport checks for missing records based on the data timestamps and the interval entered in the Table Interval field. Check Record Number DBExport checks for missing records based on the record number sequence. Check Both DBExport checks for missing records based on both data timestamps and record numbers.
LNDB 8.5 Export Once the database table, data file, and other options are set, press the Export button to begin the export. While exporting is in process, you can press the Abort button to abort the export. While export is in process, a progress bar will be displayed. Note that the displayed percentage is based on the Start and End date/times selected and the timestamp of the record currently being processed.
LNDB 8.6 Select Columns When the Select Columns button is pressed, the Select Columns dialog box appears. The Available Columns field will list all of the available data columns in the selected database table that are not currently included for export. To choose a column to be exported, highlight it and press the right arrow button or, alternately, double-click the column name. This moves the column heading into the Selected Columns field.
LNDB 8.7 Array Compatible CSV Options When File Format is set to Custom_CSV, the browse button next to the field can be pressed to open the Array Compatible CSV Options dialog box. This dialog box is used to customize the output file produced by DBExport. It is most often used to produce output files from table data dataloggers that are similar to those created by mixed array dataloggers. If an array ID is desired, select the Include Array ID check box and enter a value into the field.
LNDB 8.
LNDB Source Name Designates the name that will be used for the database in QuickReports. Type The type of database. Choose a type from the drop-down list. QuickReports supports the same database types as LNDB: SQL Server Compact SQL Server MySQL The remaining information changes depending on the database type as described below: SQL Server Compact The only additional information needed for a SQL Server Compact database source is the database file to be used.
LNDB SQL Server To select a SQL Server database source you must select a SQL Server instance. The list of published SQL Server instances is shown in the Data Source combo box. You can also type into the Data Source combo box, because the desired server might not be published. Windows Authentication or SQL Server Authentication can be selected. Windows Authentication does not require a username and password, but rather uses Windows user accounts to authenticate valid users.
LNDB MySQL The MySQL connection is an ODBC connection. You must use the Windows ODBC Data Source Administrator to configure the database connection. Currently only system data sources are supported and show in the Data Source combo box. The Username and Password may be optional. They will be set to blank in the connection string. It has been found that when set to blank, the login id and password configured in the ODBC Data Source Administrator are used.
LNDB This window allows you to designate a title for your report, select the data table that will be used for the report, select the columns of data that will be displayed, and select the date range that will be displayed. Title Specify the title to be displayed at the top of the report. Data Table Indicates the data table from which to display data values. Use the Browse button to open the Data Source Browser and select a table.
LNDB NOTES By default, the Data Grid can display a maximum of 5000 records. If your selected date range exceeds 5000 records, you will only see 5000 records in the Data Grid with a note at the bottom indicating “Max Records Exceeded”. In order to view all of the records in your date range, you will need to use the Data Grid’s property sheet to increase Max Records. (See Customizing Your Report below for more information on using property sheets to customize your report.
LNDB 9.4 Generating Your Report Once you have set up your report and customized the components, you save and generate the report by selecting File | Save and Generate Report from the QuickReports menu. The report is saved as a *.rtmq file. When a report is generated you will see a preview of the report. From the toolbar on the Report Preview window you can print the report or export it to an Acrobat (PDF) file.
LNDB 10. Troubleshooting Database already opened by a different user The "Database already opened by a different user" error can occur if Windows UAC (User Account Control) is on, an application with standard rights connects to the database first, and then a second application run as an administrator attempts to connect. With UAC on, the SQL Server CE database determines that the second application is being run by a different user.
Appendix A. Data Type Mapping Datalogger data types are mapped into database data types differently depending on the type of database as described below.
Appendix A. Data Type Mapping MySQL Datalogger Data Type A-2 MySQL Data Type IEEE4 FLOAT FP2 FLOAT Long INT UINT2 SMALLINT UNSIGNED String TEXT Boolean BIT(1) Bool8 BIT(1) Nsec DATETIME Notes MySQL FLOAT data type only stores 6 digits of precision. The datalogger stores 7. MySQL DATETIME does not support subsecond information.
Appendix B. SQL Commands LNDB requires you to have rights to the following commands based on the database type: SQL Server Compact No security available. SQL Server Command Usage Alter Used to add columns to existing data tables Create Table Creates meta and data tables Drop Delete tables (only initiated by user in LNDB Manager). Also used when creating a temporary meta table during an archive. Delete Deletes meta table records. (Never deletes data table records.
Appendix B.
Campbell Scientific Companies Campbell Scientific, Inc. (CSI) 815 West 1800 North Logan, Utah 84321 UNITED STATES www.campbellsci.com • info@campbellsci.com Campbell Scientific Africa Pty. Ltd. (CSAf) PO Box 2450 Somerset West 7129 SOUTH AFRICA www.csafrica.co.za • cleroux@csafrica.co.za Campbell Scientific Australia Pty. Ltd. (CSA) PO Box 444 Thuringowa Central QLD 4812 AUSTRALIA www.campbellsci.com.au • info@campbellsci.com.au Campbell Scientific do Brazil Ltda.