
User guide
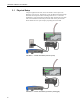
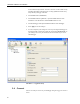
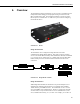
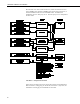
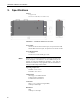

Table Of Contents
- Revision and Copyright Information
- Limited Warranty
- Assistance
- Precautions
- Table of Contents
- 1. Introduction
- 2. Cautionary Statements
- 3. Quickstart
- 4. Overview
- 5. Specifications
- 6. Configuring the NL200/201
- 7. Operation
- 8. Applications
- 9. Troubleshooting
- 10. Attribution
- Appendix A. Glossary
- Appendix B. Cables, Pinouts, LED Function, and Jumper
- Appendix C. NL200/201 Settings
- Appendix D. Sending a New OS to the NL200/201
- Campbell Scientific Companies

NL200/201 Network Link Interface
• Click OK.
• Click Connect.
• Configure the NL200/201 as needed for your application.
• Click Apply to save your changes.
6.2 Configuring the NL200/201 via Network Connection
The NL200/201 must have an IP address before connecting via a
network connection. If the address cannot be obtained via DHCP,
you will need to configure your NL200/201 via USB the first time
it is set up.
• Ensure the NL200/201 is powered and connected to your network.
• Launch DevConfig.
• Under Device Type, select NL200.
• Check the box labeled Use IP Connection.
• Click the Browse button next to Communication Port.
• Select the NL200/NL201 to be configured from the resulting pop-up
window.
• Enter nl200 in the TCP Password box. (nl200 is the default administrative
password. It can be changed via the DevConfig Deployment/NL200 tab.)
• Click OK.
• Click Connect.
• Configure the NL200/201 as needed for your application.
• Click Apply to save your changes.
6.3 Configuring the NL200/201 via Telnet
The NL200/201 must have an IP address before connecting via
Telnet. Configuration via Telnet is not available in bridge mode.
• Ensure the NL200/201 is powered and connected to your network.
• Create a Telnet session with the device over port 23.
• Input the NL200/201 Admin Password (default password is nl200).
• Type help to see a list of the functionality available when connected to the
NL200/201 through Telnet.
NOTE
NOTE
10