
User guide
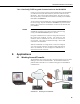


Table Of Contents
- Revision and Copyright Information
- Limited Warranty
- Assistance
- Precautions
- Table of Contents
- 1. Introduction
- 2. Cautionary Statements
- 3. Quickstart
- 4. Overview
- 5. Specifications
- 6. Configuring the NL200/201
- 7. Operation
- 8. Applications
- 9. Troubleshooting
- 10. Attribution
- Appendix A. Glossary
- Appendix B. Cables, Pinouts, LED Function, and Jumper
- Appendix C. NL200/201 Settings
- Appendix D. Sending a New OS to the NL200/201
- Campbell Scientific Companies

NL200/201 Network Link Interface
8.1.1 Configuring the NL200/201
• Connect to the NL200/201 in DevConfig (see Section 6, Configuring the
NL200/201).
• On the NL200 tab:
o Set Bridge Mode to disable.
o Set Use DHCP to disable.
o Input the IP Address, Network Mask, and Default Gateway. These
values can be provided by your network administrator.
• On the Network Services tab:
o Make note of the PakBus/TCP Server Port.
8.1.2 Configuring the Datalogger
The datalogger must first be configured for internet
communication (i.e., through an NL115, an NL120, a second
NL200/201, or a cellular modem).
• Connect a serial cable from the PC COM port to the datalogger’s RS-232
port.
• Open DevConfig. Select the device type of the datalogger (CR800,
CR1000, or CR3000), the appropriate Communication Port, and Baud
Rate. Press Connect to connect to the datalogger.
• On the Network Services tab:
o Under PakBus TCP Client Connections, input the NL200/201’s IP
address and PakBus TCP Server Port.
• Press Apply to save the changes and then close DevConfig.
9. Troubleshooting
This section covers some common problems that might be encountered when
using the NL200/201. This is not comprehensive but should provide some
insight and ability to correct simple errors without a call to Campbell Scientific
technical support.
When your Campbell Scientific software cannot establish a link to a remote
datalogger that is connected to the NL200/201, do the following:
1. Check all your power connections.
• Your NL200/201 and any hub and/or router being used must be
connected to power. Check power indicator lights to make sure your
devices are powered.
NOTE
24