OBS-Mobile 11/09 C o p y r i g h t © 2 0 0 7 - 2 0 0 9 C a m p b e l l S c i e n t i f i c , I n c .
License for Use This software is protected by United States copyright law and international copyright treaty provisions. The installation and use of this software constitutes an agreement to abide by the provisions of this license agreement. Campbell Scientific grants you a non-exclusive license to use this software in accordance with the following: (1) The purchase of this software allows you to install and use the software on one computer only.
Limited Warranty The following warranties are in effect for ninety (90) days from the date of shipment of the original purchase. These warranties are not extended by the installation of upgrades or patches offered free of charge. Campbell Scientific warrants that the installation media on which the software is recorded and the documentation provided with it are free from physical defects in materials and workmanship under normal use.
OBS-Mobile Table of Contents PDF viewers note: These page numbers refer to the printed version of this document. Use the Adobe Acrobat® bookmarks tab for links to specific sections. Section 1. Operations..................................................1-1 1.1 1.2 1.3 1.4 1.5 1.6 1.7 1.8 1.9 1.10 1.11 1.12 1.13 1.14 1.15 1.16 1.17 1.18 Software Installation .......................................................................... 1-1 Running OBS-Mobile ....................................................
OBS-Mobile Table of Contents ii
Section 1. Operations 1.1 Software Installation Insert the CD and select “Install OBS-Mobile”. Follow the installation wizard to install the software. The main purpose of this section is to explain how to program and operate the OBS-3A with OBS-Mobile.
Section 1. Operations FIGURE 1-2. Designating Your Own File Name and Destination Data received from OBS-3A while it is connected to the Archer will be stored in this file (see FIGURE 1-3). FIGURE 1-3.
Section 1. Operations 3. Connect the OBS-3A to the Archer with the test cable (FIGURE 1-4). MCIL-8-MP 6 to 18 V Battery DB-9 (RS-232/485) FIGURE 1-4. Connections and Wiring of Field Cable 4. Click Connect/Disconnect to get a “connect” synchronize the OBS-3A clock with your PC by clicking and .
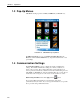
Section 1. Operations 1.3 Pop-Up Menus OBS-Mobile has Pop-up menus for Files, and OBS-3A (see FIGURE 1-5). FIGURE 1-5. OBS Mobile Pop-Up Menus The OBS-3A menu allows you to set Serial Port Settings, Retrieve and Restore Coefficients, Erase Flash Memory, and put the instrument into a low power Sleep. 1.4 Communication Settings The Serial Port Settings is used to configure the Archer communication settings. The default communication settings are: 115 kbs, 8 data bits, no parity, no flow control.
Section 1. Operations FIGURE 1-6. Dialog Box for Changing Baud Rate 1.5 Testing Sensors 1. Before daily operations and deployments, verify the instrument clicking Survey. Select all installed sensors and click Start Survey. Click Open Plot to view the data . 2. Wave your hand in front of the OBS sensor; the turbidity signal on the top plot of FIGURE 1-7 will fluctuate and data will scroll. 3.
Section 1. Operations FIGURE 1-7. Test Data Sample FIGURE 1-8.
Section 1. Operations 1.6 Water-Density and Barometric Corrections Since depths are estimated from pressure measurements, it is important to set the water temperature and salinity so the OBS-3A can correct for water density and calculate depth in meters or feet (this will not affect temperature or salinity measurements). Also, the sensor measures absolute pressure so another correction must be made for barometric pressure. Be sure to do this while the OBS-3A is at the surface.
Section 1. Operations length or the 2048 / rate. Note: the product of the rate and the duration cannot exceed 2048. Rate: Rate is the frequency of sampling for the duration of measurements. All sensors are sampled at the same rate, typically 2, 5, 10, or 25 times per second (Hz). For example, a rate of 25 Hz for a 60-second duration will produce a sample with 1500 measurements for each sensor. When wave statistics are chosen, the rate must be selected in the Wave Setup box.
Section 1. Operations interval that will show the changes in turbidity and water depth that you wish to investigate. Rate sets the number measurements per second, in Hz, taken during a sample. The quicker turbidity and depth change, the higher the sampling rate should be to get a stable average value for a sample. Finally, Duration sets the period of time for measurements and how long sensor outputs will be averaged.
Section 1. Operations 3. Click Start Survey and check data flow in data window. 4. A file for logging data was created when you started the OBS-Mobile. You can review data at any time with Open or import the log file directly into an Excel spreadsheet for post-survey processing and plotting (see Section 1.
Section 1. Operations 1.12 Cyclic Sampling This mode is for logging data at regular time intervals such as 1, 10, 15, 30, etc. minutes for example. 1. Barometric Correction. Be sure to do this while the Request OBS-3A is at the surface. Doing so when the instrument is submerged will result in large depth errors. 2. and select sensors, statistics, depth units (meters or feet), Click water temperature, and salinity. Selection of temperature and salinity only affects the depth calculation.
Section 1. Operations 1.13 Data Retrieval 1. Remove dummy plug and connect OBS-3A to PC with test cable. 2. Run the OBS-Mobile (see Section 1.2). 3. Check the Data Window to verify the instrument is transmitting data. 4. Click file. 5. Highlight the data with the start and end times you want. 6. Click Browse, select a destination and file name. Then click Retrieve to download the data. 7. Wait for the progress bar to disappear and examine data as a plot or test file (Section 1.16—Graphing).
Section 1. Operations 1.15 View Data 1. Click and select a file to view. 2. Click to view data. 1.16 Graphing 1. Click and select a file to view. Click the Plot Settings button. 2. Use the x-axis time scale to set the amount of data you need on the graph. 3. Click to view the plot. 1.17 Excel Spreadsheets To make an Excel spreadsheet from OBS-3A data, start Excel and set file type to All. Open a data file and select Delimited in Step 1 of 3 of the Text Import Wizard.
Section 1. Operations 1.18 Erasing Data Memory To erase the flash data memory, do the following: 1) Click on the OBS-3A pop up menu. 2) Select “Erase Flash Memory.” 3) The erased-block-interval counter will be displayed every 100 blocks. There are 8192 blocks and the process takes ~ 1/2 hour.
Section 2. Troubleshooting This section will help you isolate problems that can be easily fixed such as cable-continuity, processor reset, and battery replacement from serious ones such as sensor, computer and electronic malfunctions, and damaged mechanical parts that will require our help. The problem symptoms are shown with underlined, bold text. FIGURE 2-1. Component locations Unit does not communicate with the Archer. There are several possible causes for this symptom. 1.
Section 2. Troubleshooting 4. The OBS-3A and the Archer are not set to the same baud rate or communication protocol (e.g. RS-232, USB, RS-485). • Check Serial Port Settings on the OBS-3A tab. The default baud rate is 115.2 kb. If the Archer is not set to this speed, follow the steps in Section 1.4 to set it. • If the OBS-3A still fails to respond, try changing Archer baud rates until communication is established (e.g. 57.6, 38.4, and clicking 19.6, 9.6 kb, etc.).
Section 2. Troubleshooting Bright sun near the surface ( < 2 meters) or black-colored sediments cause erroneous OBS readings. Do not survey in shallow water between 10:00 and 14:00 local time and avoid areas with suspended black mud. Changing the water temperature in the setup dialog box does not change the temperature measurement. This is normal. Temperature inputs only change the water density correction used to convert pressure to depth.
Section 2.
Campbell Scientific Companies Campbell Scientific, Inc. (CSI) 815 West 1800 North Logan, Utah 84321 UNITED STATES www.campbellsci.com • info@campbellsci.com Campbell Scientific Africa Pty. Ltd. (CSAf) PO Box 2450 Somerset West 7129 SOUTH AFRICA www.csafrica.co.za • cleroux@csafrica.co.za Campbell Scientific Australia Pty. Ltd. (CSA) PO Box 444 Thuringowa Central QLD 4812 AUSTRALIA www.campbellsci.com.au • info@campbellsci.com.au Campbell Scientific do Brazil Ltda.