
Manual


SR50 Sonic Ranging Sensor
25
1. If the sensor is in operation, always disconnect the SR50 from the
datalogger before disassembling.
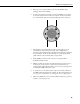
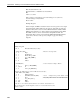
2. To remove the transducer housing, undo the four Phillips screws which
are located at the bottom end of the sensor (These are the screws which
are countersunk most into the housing identified by the arrows below).
3. The transducer and mount should now fall out. This will expose the
desiccant that is in the transducer housing. These small packs of
desiccant contain indicating silica gel which turns from blue to pink when
they are unable to absorb any more moisture. Look through the small
plastic window on the desiccant packs to inspect them.
4. With a Phillips screwdriver remove the two screws that hold the
aluminum end plate in place.
5. Pull the end disk out and disconnect the attached wires at the connector.
At this point you may inspect or replace the desiccant inside of the
cylinder. If the Address/Option jumpers do not need to be changed, then
reassemble the SR50 in the reverse order.
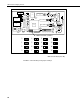
6. To obtain access to the address/option jumpers, unscrew the cylinder of
the SR50 from the lid and slide the cylinder off. The internal jumpers are
now exposed to set the address or to change the sensor's output options.
7. When reassembling the sensor ensure that all the O-rings are properly set
in place to ensure a proper seal.