
Specifications
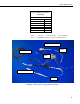

CC640 Digital Camera
recommended to place the switch in the Auto position when images are being
triggered by either the external input or the self-timed mode.
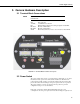
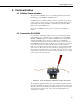
3.3 Snap Button
The Snap button is used to manually take a picture. The power switch needs to
be set to the On position for the Snap button to operate.
When the Snap button is pressed the LED will slowly flash 2 times, indicating
successful initiation of an image acquisition.
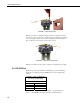
3.4 Setup Button
The Setup button performs 2 functions. It toggles the video output on or off
and it places the camera in setup mode. The power switch will need to be in
the On position for the Setup Button to operate.
When the Setup Button is pressed the LED will slowly flash once.
Pressing the Setup button will force the camera to its default BAUD rate
(115,200) on the RS-232 port for about 40 seconds so that the Device
Configuration Software can be used to configure the camera. Image
acquisitions will also be placed on hold for the same time period. To indicate
that the camera is in Setup mode the LED will briefly flash once per second.
If no configuration communication occurs during the 40 seconds, the camera
will exit setup mode and resume its normal operating mode. The LED will
flash once every 5 seconds.
Pressing the Setup Button will toggle the video output on or off. The video
output is used to focus and target the camera in conjunction with a normal
television or video monitor. The video output will remain on until the setup
button is pressed to toggle it off. The video output will be turned off when the
camera enters its quiescent mode, 5 minutes after the camera’s power switch
has been placed in the Auto position.
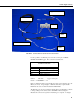
3.5 Video Output
The video output connector provides an analog video signal for the purpose of
focusing and targeting the camera. The video output can be configured to
NTSC (National Television System Committee) or PAL (Phase Alternating
Line) using the Device Configuration Software. NTSC is the standard used in
North America and PAL is the standard that is used in most European
countries. Consult your monitor owner’s manual for display information.
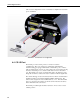
The video output can be turned on and/or off by pressing the Setup Button
when the power switch is in the ON position.
During every image acquisition sequence the video output will be momentarily
activated when the image is acquired, allowing the operator to view the image
that is being captured.
6