INSTRUCTION MANUAL CS106 Barometric Pressure Sensor Revision: 10/14 C o p y r i g h t © 1 9 9 5 - 2 0 1 4 C a m p b e l l S c i e n t i f i c , I n c .
Limited Warranty “Products manufactured by CSI are warranted by CSI to be free from defects in materials and workmanship under normal use and service for twelve months from the date of shipment unless otherwise specified in the corresponding product manual. (Product manuals are available for review online at www.campbellsci.com.) Products not manufactured by CSI, but that are resold by CSI, are warranted only to the limits extended by the original manufacturer.
Assistance Products may not be returned without prior authorization. The following contact information is for US and international customers residing in countries served by Campbell Scientific, Inc. directly. Affiliate companies handle repairs for customers within their territories. Please visit www.campbellsci.com to determine which Campbell Scientific company serves your country. To obtain a Returned Materials Authorization (RMA), contact CAMPBELL SCIENTIFIC, INC., phone (435) 227-9000.
Precautions DANGER — MANY HAZARDS ARE ASSOCIATED WITH INSTALLING, USING, MAINTAINING, AND WORKING ON OR AROUND TRIPODS, TOWERS, AND ANY ATTACHMENTS TO TRIPODS AND TOWERS SUCH AS SENSORS, CROSSARMS, ENCLOSURES, ANTENNAS, ETC. FAILURE TO PROPERLY AND COMPLETELY ASSEMBLE, INSTALL, OPERATE, USE, AND MAINTAIN TRIPODS, TOWERS, AND ATTACHMENTS, AND FAILURE TO HEED WARNINGS, INCREASES THE RISK OF DEATH, ACCIDENT, SERIOUS INJURY, PROPERTY DAMAGE, AND PRODUCT FAILURE.
Table of Contents PDF viewers: These page numbers refer to the printed version of this document. Use the PDF reader bookmarks tab for links to specific sections. 1. Introduction ................................................................. 1 2. Cautionary Statements ............................................... 1 3. Initial Inspection ......................................................... 1 4. Quickstart .................................................................... 1 5. Overview ...........
Table of Contents Figures 7-1. 7-2. 7-3. 7-4. 8-1. CS106 jumper set to shutdown mode .................................................. 6 ENC100 is a very small enclosure that can house one CS106 ............ 7 CS106 wiring diagram......................................................................... 8 Connector key attached to 5-pin screw terminal plug connector......... 9 Point slope graph ............................................................................... 11 7-1. 8-1.
CS106 Barometric Pressure Sensor 1. Introduction The CS106 measures barometric pressure for the range of 500 to 1100 mb. This range equates to from below sea level (as in a mine) to over 15,000 feet above sea level. Designed for use in environmental applications, the CS106 is compatible with all Campbell Scientific dataloggers. . NOTE 2. 3. This manual provides information only for CRBasic dataloggers. It is also compatible with many of our retired Edlog dataloggers.
CS106 Barometric Pressure Sensor 2 2. The Short Cut installation should place a Short Cut icon on the desktop of your computer. To open Short Cut, click on this icon. 3. When Short Cut opens, select New Program. 4. Select Datalogger Model and Scan Interval (default of 5 seconds is OK for most applications). Click Next.
CS106 Barometric Pressure Sensor 5. Under the Available Sensors and Devices list, select Sensors | Meteorological | Barometric Pressure folder. Select CS106 Barometric Pressure Sensor. Click to move the selection to the Selected device window. Enter the Sea Level Elevation Correction. The default units for the sea level elevation correction is meters; this can be changed by clicking on the Elevation Correction Units box and selecting Feet.
CS106 Barometric Pressure Sensor WARNING 5. 7. Select any other sensors you have, then finish the remaining Short Cut steps to complete the program. The remaining steps are outlined in Short Cut Help, which is accessed by clicking on Help | Contents | Programming Steps. 8. If LoggerNet, PC400, RTDAQ, or PC200W is running on your PC, and the PC to datalogger connection is active, you can click Finish in Short Cut and you will be prompted to send the program just created to the datalogger. 9.
CS106 Barometric Pressure Sensor 6.2 Accuracy Total Accuracy***: ±0.3 mb @ 20 °C ±0.6 mb @ 0 to 40 °C ±1 mb @ –20 to 45 °C ±1.5 mb @ –40 to 60 °C Linearity*: ±0.25 mb @ 20 °C Hysteresis*: ±0.03 mb @ 20 °C Repeatability*: ±0.03 mb @ 20 °C Calibration Uncertainty**: ±0.15 mb @ 20 °C Long-Term Stability: ±0.
CS106 Barometric Pressure Sensor 7. Installation 7.1 Jumper Settings The CS106 can be operated in one of two modes: shutdown and normal. The mode is selected by a jumper located underneath the plastic cover of the barometer. When the jumper is not installed, the CS106 is in shutdown mode and the datalogger turns the CS106 on and off with a control port or excitation channel; to use the excitation channel the datalogger must be able to provide an excitation voltage of 5 Vdc.
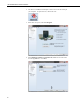
CS106 Barometric Pressure Sensor atmosphere, a backplate for mounting the CS106, and hardware for mounting the ENC100 to a tripod, tower, or pole. FIGURE 7-2. ENC100 is a very small enclosure that can house one CS106 Remember that for the sensor to detect the external ambient pressure, the enclosure must vent to the atmosphere (i.e., not be ‘hermetically sealed’). Enclosures purchased from Campbell Scientific properly vent to the atmosphere.
CS106 Barometric Pressure Sensor 7.3 Wiring 7.3.1 Datalogger Connection To wire an Edlog datalogger, see an older manual at www.campbellsci.com/old-manuals, or contact a Campbell Scientific application engineer for assistance. Before connecting the barometer to the datalogger, a yellow warning label must be removed from the pigtails. The warning label reminds the user of the importance of properly connecting the barometer to the datalogger. Wiring is shown in FIGURE 7-3 and TABLE 7-1.
CS106 Barometric Pressure Sensor TABLE 7-1. Signal and Ground Connectors for CS106 Wire CS106 Terminal Datalogger Single-Ended Measurement Datalogger Differential Measurement Blue VOUT S.E. Input High Side of Diff Input Yellow AGND Black GND CR9000(X) G (Other Dataloggers) (CR9000(X) G (Other Dataloggers) Green EXT TRIG Control port (use to turn power on/off) Control port (use to turn power on/off) Red SUPPLY 12 Vdc 12 Vdc Shield Shield WARNING Low Side of Diff.
CS106 Barometric Pressure Sensor 7.4 Programming Short Cut is the best source for up-to-date datalogger programming code. Programming code is needed, • • when creating a program for a new datalogger installation when adding sensors to an existing datalogger program If your data acquisition requirements are simple, you can probably create and maintain a datalogger program exclusively with Short Cut.
CS106 Barometric Pressure Sensor 8. Operations 8.1 Multiplier and Offset Calculation The multiplier and offset in the VoltSE() CRBasic instruction convert millivolts to millibar or hPa. The output from the sensor is 0 to 2.5 V or 0 to 2500 mV and the sensor’s operating range is from 500 to 1100 mbars (hPa). Equation 1 uses these values to calculate the multiplier: Multiplier m = 1100−500 2500−0 = 600 2500 = 0.24 (1) The offset is the barometric value at sea level (see Eq 2).
CS106 Barometric Pressure Sensor 8.3 Long Lead Lengths There is a 0.06 mV/foot voltage drop in the CS106 signal leads. This voltage drop, in long lead lengths, will raise the barometric reading by approximately 1.44 mb per 100 feet. For lead lengths greater than 20 feet, use the differential instruction (VoltDiff()) to measure the CS106. 8.
CS106 Barometric Pressure Sensor 9. Maintenance and Calibration Since the sensor is semi-sealed, minimum maintenance is required: 1. Visually inspect the cable connection to ensure it is clean and dry. 2. Visually inspect the casing for damage. 3. Ensure that the pneumatic connection and pipe are secure and undamaged. The external case can be cleaned with a damp, lint-free cloth and a mild detergent solution. Vaisala recommends recalibration every two years under normal use.
CS106 Barometric Pressure Sensor 14
Appendix A. Importing Short Cut Code This tutorial shows: • • How to import a Short Cut program into a program editor for additional refinement How to import a wiring diagram from Short Cut into the comments of a custom program A.1 Importing Short Cut Code into a Program Editor Short Cut creates files that can be imported into CRBasic Editor. These files normally reside in the C:\campbellsci\SCWin folder and have the following extensions: • • • • • • • .DEF (wiring and memory usage information) .
Appendix A. Importing Short Cut Code mark) begins each line. This character instructs the datalogger compiler to ignore the line when compiling the datalogger code.
Appendix B. Example Programs B.1 CR1000 Program Using Sequential Mode This CR1000 program uses the sequential mode, which is the simplest mode and can be used for most meteorological applications. Although the example is for the CR1000, other CRBasic dataloggers, such as the CR6, CR200(X), CR800, CR850, CR3000, and CR9000(X) are programmed similarly. In the example, the CR1000 measures the CS106 once an hour.
Appendix B. Example Programs B.2 CR1000 Program Using Pipeline Mode Although this example is for the CR1000, other CRBasic dataloggers, such as the CR6, CR200(X), CR800, CR850, CR3000, and CR9000(X) are programmed similarly. In the example, the CR1000 measures the CS106 once an hour in a program that runs at 1 Hz. In order to keep the CR1000 running in a pipeline mode, the measurement instruction is placed outside the “If” statement.
Campbell Scientific Companies Campbell Scientific, Inc. (CSI) 815 West 1800 North Logan, Utah 84321 UNITED STATES www.campbellsci.com • info@campbellsci.com Campbell Scientific Centro Caribe S.A. (CSCC) 300 N Cementerio, Edificio Breller Santo Domingo, Heredia 40305 COSTA RICA www.campbellsci.cc • info@campbellsci.cc Campbell Scientific Africa Pty. Ltd. (CSAf) PO Box 2450 Somerset West 7129 SOUTH AFRICA www.csafrica.co.za • cleroux@csafrica.co.za Campbell Scientific Ltd.