Electric Mini Tank – Water Heaters ME10 ME25 ME40 ME60 Installation and Operating Instruction Manual V01.
Table of Contents Important Safety Instructions 3 General Information 3/6 Technical Data 4-5 Technical Description 6 Installation Instructions 7 Plumbing Connections 7 Temperature & Pressure Relief Valve 8 Filling The Water Heater 9 Electrical Connections 10 Instructions For Use 10 - 11 Maintenance Instructions 11 - 14 Troubleshooting Warranty Schematic Disassembly & Parts List 15 16 - 17 18
Important safety instructions Warning : When using electrical appliances, safety precautions to reduce the risk of fire, electric shock or injury to persons should be followed, including: 1. Read all these instructions before using this water heater. 2. This water heater must be grounded. Connect only to properly grounded outlet. See “Grounding instructions” found on page 10. 3. Install or locate this water heater only in accordance with the provided installation instructions. 4.
Technical Data Model Capacity Gallons ME10 ME25 ME40 ME60 1.3 2.5 4.0 6.0 110-120 110-120 110-120 110-120 Voltage Vac Power at 120 Vac Watts 1440 1440 1440 1440 psi 150 150 150 150 Max. Water Pressure Weight (empty) lbs.
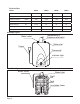
Dimensions C A B Model ME10 ME25 ME40 ME60 A (inch) 12 1/2” 14 1/2” 19 1/4” 18” B (inch) 11” 11 3/4” 11 3/4” 15 3/4” C (inch) 10” 10 3/8” 10 3/8” 15 1/2” Schematic Construction Wiring Diagram Page 5
General Information Cont. The ME10, ME25, ME40 and ME60 are designed to operate at 150 psi maximum water pressure. Install a pressure reducing valve if your water pressure is greater than 80 psi. Caution: The manufacturer cannot be responsible for the damage caused by improper installation or by failure to follow instructions in this manual. Comply with the Installation Instructions before connecting to electrical outlet.
Installation instructions ME10 / ME25 / ME40 / ME60 The installation must be completed by a licensed professional. All state and local codes must be adhered to. The manufacturer will not be liable for any damages because of failure to comply with these installation instructions or because of improper installation performed by an unqualified installer.
Temperatures and pressure relief valve: Caution : Install the Temperature/Pressure Relief Valve supplied with the water heater! Install a discharge pipe from the temperature/pressure relief valve terminating at a sink or drain. Do not cap or plug the end of the discharge pipe. The discharge pipe must be unobstructed and full sized.
Closed system thermal expansion: Periodic discharge of the T/P relief valve or failure of the element gasket may be due to thermal expansion in a closed water supply system. The water utility supply meter may contain a check valve, back flow preventer or water pressure reducing valve which will create a closed water system. During the heating cycle of the water heater, the heated water expands causing pressure inside the water heater to increase.
Electrical connections To be certain that all of the air is out of the water heater, open the hot water faucet on your fixtures until constant water flows from them. If air remains in the tank, the element will be damaged when the electric cord is plugged in. Connect the water heater to a grounded outlet. The water heater is fitted with a power cord that is intended to plug into a grounded 110-120 V/AC receptacle. Adhere to all pertinent State and local codes.
Setting the thermostat: The water heater is equipped with an adjustable thermostat that once set will automatically control water temperature. The red indicator lamp remains illuminated while the water is being heated. If the water in the tank is at the desired temperature the lamp will not be illuminated. The temperature adjusting knob will increase the temperature by turning the knob clockwise and decrease the water temperature by turning the knob counter clockwise.
Maintenance instructions cont. Warning : Before servicing or cleaning the water heater, disconnect the power cord from the electrical outlet. Note : For most maintenance operations, the water heater will need to be drained. In all cases before draining first unplug the power cord. Draining and removing the water heater: 1. Unplug the water heater. 2. Open a hot water faucet to let hot water run out. Allow water to flow until water is no longer hot. 3. Turn off the cold water supply to the water heater. 4.
Descaling the heating element cont. 3. To descale manually, let element dry and then using a non metallic brush similar to a tooth brush; brush the residue from the element. Avoid damaging the surface of the element. 4. Reinstall the element and gasket. 5. Refill tank with water before pluging in the power cord. Replacing the heating element : 1. Unplug and drain the water heater (see prior instructions). 2. Remove heating element noting original positions of all connections. 3.
Resetting the high limit switch : For various reasons the high limit safety shut off switch will occasionally shut the water heater down. This shut down will occur when water temperatures exceed 190°F. Power is automatically turned off to the heating element. The shut off device may activate as a result of a power outage or an electrical storm. Note : Do not attempt to reset the high limit switch without first allowing the water heater to cool down the high temperature water inside the heater.
Troubleshooting Problem: Water does not get hot 1. Make sure the power supply is on and working. 2. If light does not come on, check that the reset button is pushed in; follow steps from previous section. 3. If the indicator light is illuminated, but water temperature does not get hot at the sink, test for a plumbing crossover as follows; shut off cold water supply to water heater and open hot water tap. There should be no water flowing.
Camplux Mini Tank Water Heaters – Limited Six (6) Years Warranty Coverage Junsky America, Inc. (hereinafter “Junsky”) warranties this water heater to the Owner (hereinafter “Owner”) of the water heater at the original installation location against defects in material and workmanship for the periods specified below. Warranty Period 1.
Exclusions Cont. 3. The Manufacturer shall not be liable for any water damage arising, directly or indirectly, from any defect in the water heater component part(s) or from its use. 4.
Schematic Disassembly ME10 / ME25 / ME40 / ME60 Parts List ME10 / ME25 / ME40 / ME60 No. Qty. No. Name of Part 1 Name of Part Tank Component 1 20 Back Cover 1 2 Thermostat 1 3 Temp.
How the owner can secure service assistance or make a warranty claim 1. Owner should contact the dealer who sold the water heater covered by this warranty or 2. Owner should submit the warranty claim directly to Junsky at the address listed below, and they will arrange for the handling of the claim. 3.