Instruction Manual RB2200 Caution: Please read this manual carefully before using this product
Safety Warning 1. 在装配和使用吸尘器前请阅读本说明书。 This cleaner is for domestic use only commercial use will void warranty When using your Vacuum, basic safety precautions should always be observed, including the following: Read all instructions before using this vacuum. WARNING: To reduce the risk of fire, electrical shock, or injury: 1. Do not leave vacuum cleaner unattended when it is plugged in. 2. Do not immerse the vacuum cleaner into water or other liquids. 3.
13. Do not use without all filters in place. Use ONLY filters and accessories provided by GODFREYS. Failure to do so will void the warranty. 14. Turn off all controls before plugging or unplugging vacuum cleaner into electrical outlet. 15. Use extra care when vacuuming on stairs. 16. Do not pick up flammable or combustible materials (lighter fluid, gasoline, kerosene, etc.) or use in the presence of explosive liquids or vapor. 17. Do not pick up toxic material (chlorine bleach, ammonia, drain cleaner, etc.
Names of Parts and Components 6 5 7 4 3 8 2 9 1 10 -3-
1. Power plug 2. Cord rewind pedal 3. Cyclone dust container 4. Hose 5. Accessory bracket 6. Handle 7. Air escape pushbutton 8. Metal extension pipe 9. Switch Pedal 10. Air outlet grill and HEPA filter 11. Floor tool Accessories: 1. Crevice nozzle Figure (1) 2.
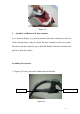
Assembly Instructions 1. Before assembling the cleaner, please check the packing, the vacuum cleaner and accessories for any signs of damage .Do not use damaged appliance it could be dangerous. Confirm all parts and components for the cleaner are received by referring to Parts and Components List. 2. Please remember do not connect to power before assembly. Assembly of hose 1.
Figure (4) 2. Assembly and Removal of dust container As is shown in Figure (4), place the bottom of the dust container on the base of the machine body, and press down the dust container to lock in to place. To remove the dust container, press down the handle of the dust container and pull away from the cleaner. Assembly of accessories 1.
Assembly of metal extension pipe and floor tool Insert the handle into the metal extension pipe, then insert the other end of the metal extension pipe into the floor brush, and adjust to the pipe to desired height. Handle Pipe Floor Tool Figure (6) Operation Instructions How to start 1. Pull out the mains cable to the yellow mark insert the power plug into the power socket, and press down the power switch button. 2. The yellow mark on the power cord indicates its desired length.
Suction Control To reduce the suction slide the suction control up as is shown in Figure (7). Suction Control Figure (7) Protective devices for motor 1. A temperature limiter switches the vacuum cleaner off automatically if it gets too hot. This can occur if for instance hose, pipe or filters are blocked. Switch the vacuum cleaner off immediately using the switch on the cleaner Disconnect the power plug from the wall outlet 2.
Maintenance of the Cleaner 1. Switch off cleaner and disconnect power before any maintenance 2. Empty dust container after every use 3. Clean front filter every 3 months by washing it in mild dishwashing solution and rinse well. Dry for 24 to 36 hours before refitting to the cleaner refer to (Fig 10) Replace filter every 6 months 4. Wash dust container assembly every 6 months. It must be completely dry for 2 to 3 days before reassembling back to gather. Storage of the Cleaner 1.
Cleaning of the Dust Container Empty dust container after every use 1. To remove the dust container refer to Fig 4 2. To empty the dust container Place the container over the rubbish bin press down the releasing button at the bottom of the dust container as is shown in Figure (9). And tap the container gently to release the fine dust Figure (9) Cleaning of front filter for motor: Warning: please make sure the power supply to the cleaner has been disconnected before carrying out the following steps: 1.
Figure (10) Replacement of HEPA Filter HEPA is installed behind the air outlet grill. It is not washable When the surface is clogged by dust the filter should be replaced by a new one to maintain good suction (Figure 11) and to prevent over heating and cutting out Figure (11) Replace this filter every 6 months to 12 months depending on the usage.
Fault Treatment 1. Check whether the power plug is inserted securely; pull out the plug and then reinsert it in the power The cleaner cannot operate. socket; 2. Check whether the power socket is turned ON 3. Check whether the switch on the cleaner is in “ON” position. Poor suction. 1. Check whether the floor brush, the hose and the pipes Getting too hot. are blocked, and remove any blockage immediately; Cleaner stopped 2. Check filters clean or replace filters Refer to when in use.