
Service manual


49
8.1 SETTING THE CORRECT COMBUSTION
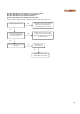
1) Switch the main power off to the boiler by placing the
toggle switch in the ‘OFF’ position
2) Switch the main power on to the boiler and adjust set
point so that boiler begins ignition sequence.
3) Observe the boiler as it goes through its startup cycle
and operates at high fire.
4) Insert the combustion measurement probe into the
stack when high fire operation is observed. Check to
see that fan is running at maximum fan speed using
the control panel.
5) The combustion values should reside in the range
listed in Table 31. If combustion values are not within
this range refer to Section 10.2 Gas Valve Adjustment
Procedure to correct this issue.
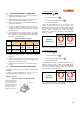
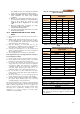
Table 19: Combustion Values
Natural Gas Propane
CO
2
CO CO
2
CO
Max.
Fire
8.5% - 9.0%
<100
9.5% -
10.0%
<100
PPM PPM
Min.
Fire
8.0% - 8.5%
<100
9.0% - 9.5%
<100
PPM PPM
6) When the combustion values are satisfied record these
values as Camus requires these for warranty
purposes.
7) Remove the combustion measurement device and
switch the main power off to the boiler by placing the
toggle switch in the ‘OFF’ position.
8) Replace the flue temperature sensor back to its proper
location.
8.2 GAS VALVE ADJUSTMENT PROCEDURE
If adjustment of the gas valve is required use the following
procedure.
In order to perform adjustments to the gas valve the
DynaMax HS must be firing before proceeding.
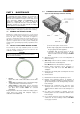
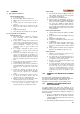
DM 080 – 250, 260
Figure 56: Venturi & Gas Valve Assembly
To adjust the high-fire setting
1) Press the button
2) Select Test and press
3) Select Forced Rate and press
4) Select Set High Fire
Locate the input adjustment screw on the side of the
venturi. Turn the screw 1/8 turn in either way for each
adjustment to keep track of the adjustments. After adjusting
the screw wait a moment for the combustion levels to
stabilize before attempting to make any further
adjustments. Continue this procedure until combustion
levels are satisfied.
Increase CO2
Decrease CO2
High Fire
Adjustment
Counter-
Clock Wise
Clockwise
Select Stop Test to return to normal operation or the boiler
will return to normal operation after 5 minutes
To adjust the low fire setting
1) Press the button
2) Select Test and press
3) Select Forced Rate and press
4) Select Set Low Fire
The DynaMax HS should respond immediately and fire at
minimum fan speed. This screw is covered with a cap,
which can be removed using a Torx 40 screwdriver. When
the correct combustion values are achieved replace the
screw cap back on to the gas valve.
Increase CO2 Decrease CO2
Low Fire
Adjustment
Clockwise
Counter-
Clock Wise
Select Stop Test to return to normal operation or the boiler
will return to normal operation after 5 minutes
Gas Valve
Venturi
Low
-
fire adjustment screw
(use Torx 40 for adjustment,
clockwise increases CO
2
)
High
-
fire adjustment screw
(use slotted screwdriver for
adjustment, counter-
clockwise increases CO
2
)