
Installation Sheet

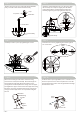

Remove the fixture from the box. Use the small box to hold
the fixture. Spread the rings evenly.
Install 2pcs of “A1” to the fixture by tightening the screws.
A1
A1
SAFETY PRECAUTIONS:
12/13
CHANDELIER
1. TURN OFF ELECTRICAL POWER BEFORE STARTING INSTALLATION OF LIGHT FIXTURE.
2. THIS PRODUCT MUST BE INSTALLED IN ACCORDANCE WITH THE APPLICABLE INSTALLATION CODE BY A PERSON
FAMILIAR WITH THE CONSTRUCTION AND OPERATION OF THE PRODUCT AND THE HAZARDS INVOLVED.
3. CONNECT THE GROUND WIRES (BARE COPPER OR GREEN) FROM YOUR FIXTURE TO THE GROUND
WIRE (BARE COPPER OR GREEN) OR GROUND SCREW IN THE ELECTRICAL OUTLET BOX.
Phillips
Screwdriver
Wire Cutters
Pliers Wrench
ICH282B05
L
I
G
H
T
I
N
G
&
F
A
N
S
E
C
L
A
I
R
A
G
E
S
&
V
E
N
T
I
L
A
T
E
U
R
S
TOOLS AND MATERIALS REQUIRED:
!
INSTRUCTIONS PERTAINING TO RISK OF FIRE OR INJURY TO PERSONS
READ ALL INSTRUCTIONS
IMPORTANT SAFETY
INSTRUCTIONS
SAVE THESE INSTRUCTIONS
QUESTIONS OR CONCERNS CONTACT CANARM AT:
1-800-265-1833 (English) / 1-800-567-2513 (French)
Monday through Friday 8:00 AM to 5:00 PM E.S.T.
Wiring supplies
as required by
the Canadian
Electrical Code
and/or the
Quebec
Electrical code
INSTALLATION:
Step 1 Step 2
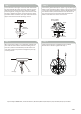
Step 3
Step 4
Box
Box
Top Circle
A1
A1
Box
A1
Use the cable tie supplied to hold the 2 joints temporarily
for easy installation.
Position the tab to the hole on the ring.
A1
A1
Box
A1
Cable
Tie
Step 1
Step 2
1of 3