Washing machine Instructions for use
Introduction Contents Please read these instructions for use carefully and all other information enclosed with the washing machine. Keep all documentation in a safe place for future reference or for any future owners.
General delivery notes Please check that the following items are delivered with the appliance: - Instruction manual - Certificate of guarantee - Inlet hose Check that no damage has occurred during transit, and if so, call your nearest Authorised Technical Support Service agent. M) N.B! If the appliance is installed on a carpeted floor ensure that the ventilation holes on the base of the appliance are not obstructed.
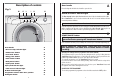
Description of controls Door handle Press the finger-bar inside the door handle to open the door. Fig. 1 M G L I H N DOOR SECURITY indicator light E D C B The “Door Security” indicator light is illuminated when the door is fully closed and the machine is ON. When "Start/Pause" is pressed on the machine with the door closed the indicator will flash momentarily and then illuminate. P F A B If the door is not closed the indicator will continue to flash.
The option buttons should be selected before pressing the "Start/Pause" button. D FAST WASH button Press the button to select or deselect this function. Pressing this button reduces the time of the wash programme by a maximum of 50 minutes depending on the programme and the temperature selected. The "Super Rapid" button can be used for washing loads of 1 to 8 kg. This option may only be utilised on COTTONS and SYNTHETICS programmes.
I Spin speed indicator light When you set a program, the maximum possible spin speed will be automatically shown by the relevant indicator light. Choosing a smaller spin speed by the appropriate button, the relevant indicator light will go on. L TIME TO END indicator light In order to manage your time better, this washing machine features an indicator light system that keeps you constantly informed on the remaining cycle time. Indicator light 90: Remaining time above 60 minutes.
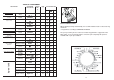
TABLE OF PROGRAMMES PROGRAM FOR: PROGRAMME SELECTOR ON: WEIGHT MAX kg TEMP. °C CHARGE DETERGENT 2 Resistant fabrics 1 Cotton, linen Whites 90 White 8 90° ● ● Cotton, mixed resistant Whites with Prewash 60 + prewash 8 60° ● ● Cotton, mixed Fast coloureds 60 Soiled * 8 60° ● ● 8 40° ● ● Please read these notes 8 30° ● ● 8 - When washing heavily soiled laundry it is recommended the load is reduced to 4 kg maximum.
Programme selector For the various types of fabrics and various degrees of dirt the washing machine has 4 different programme bands according to: wash cycle, temperature and length of cycle (see table of washing cycle programmes). 1 RESISTANTS FABRICS The programmes have been designed for a maximum wash and the rinses, with spin intervals, ensure perfect rinsing. The final spin gives more efficient removal of water.
Detergent drawer Detergents, washing aids and amounts to use P The detergent drawer is split into 3 compartments: Choice of detergent General purpose detergents - the compartment labelled "1" is for prewash detergent; - - the compartment labelled " " is for special additives, fabric softeners, fragrances, starch, brighteners etc; - - the compartment labelled "2" is for main wash detergent. NOTE: Some Detergents are Difficult to utilise.
Dosages Only use detergents which are suitable for use in a washing machine. You will obtain the best results from your wash with the minimum use of chemical products and the best care for your laundry if you take into consideration the degree of soiling as well as the type of detergent to choose. The amount of detergent to use depends on: - water hardness: depending on the hardness of the water and the type of detergent used, it is possible to reduce the amount of detergent.
Main wash Sorting the laundry - It is recommended you wash only items which are machine washable with water and detergent and not dry-clean items. - If you need to wash rugs, bedspreads or other heavy items, it is best not to spin them.
Cleaning and routine maintenance Do not use alcohol-based scourers and / or thinners on the outside of your washing machine, just a wipe with a damp cloth will suffice. The washing machine needs very little maintenance: - Cleaning the drawer compartments. - Cleaning the filter. - Cleaning the door glass. Cleaning the drawer compartments Even if it is not strictly necessary, it is good to clean the compartments for bleaching detergents and additives occasionally.
Investigating malfunctions What might be the cause of… Defects you can remedy yourself MALFUNCTION CAUSE REMEDY 1. Does not work on any programme Plug not in socket. Not switched on. Power failure. Fuse blown. Door open. Plug it in. Switch on. Check. Check. Close door. 2. Does not fill with water See cause 1. Tap turned off. Programme selector not correctly positioned. Fill hoses are kinked Check. Turn on tap. Position programme selector correctly. Straighten fill hoses 3.
SETTING UP + INSTALLATION 1 Remove the polystyrene base and place the machine near its permanent position (diagram 1). Carefully cut through the hose retaining clip at the rear of the appliance (diagram 2). Remove the 4 fixing screws marked (A) and remove the 4 spacers marked (B) (diagram 3). 2 Cover the 4 holes using the caps provided in the instruction booklet pack (diagram 4). Fig. 2 3 4 Technical data 8 kg 0,05 ÷ 0,8 MPa ■ Max.
Note: we recommend you keep the braces and screws to immobilise the machine for future transit. The Manufacturers will not be responsible for any possible damage to the machine caused by not following the rules relating to releasing the mechanism. The user is responsible for all costs of installation. Note: it is advisable to turn off the tap after each wash to isolate the washing machine from the water supply.
NOTES ...................................................................................................................................................................................................................... ...................................................................................................................................................................................................................... ..........................................................................
This appliance is marked according to the European directive 2002/96/EC on Waste Electrical and Electronic Equipment (WEEE). By ensuring this product is disposed of correctly, you will help prevent potential negative consequences for the environment and human health, which could otherwise be caused by inappropriate waste handling of this product. The symbol on the product indicates that this product may not be treated as household waste.