
User Manual


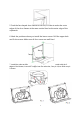

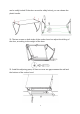
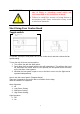
Table Of Contents

7
8. Connect the air-outlet board and the air-outlet tube (Vent Hose) which will
need to feed through to the outside of the building. Rigid kits, if preferred, can
be obtained from either the retailer who supplied the hood, or DIY Stores and
Builders Merchants.
9. Door installation: The door should be no less than 16mm thick, 385-700mm
high, and weigh no more than 7KG. Pull out the movable fan-shaped door
frames by the plastic handle, and place the fan-shaped door frames one on left
and one on right.
10. Mark the installation position of the door and the size of the fixed screws. If
the upper edge of the door is not as high as the upper edge of the cupboards,
please adjust the size accordingly. Mark the positions of the screws on the door,
and make sure the size is as accurate as 569±1.
11. Take down the fan-shaped door frames,then fix the left and right fan-
shaped door frames with the connected plate by 4pcs ST3.5*8mm countersunk
self-tapping screws.See pic below.Fix the fan-shaped door frames on the door
with screws. Make sure the frames are symmetrical. Install the door into the
cooker hood, the two sides of the door can be pulled to the end and the door