
Installation Guide


STEP TWO
STEP FOUR
STEP THREE
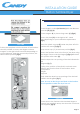
Positon the template onto the reverse of the furniture
door.It is possible to mount the hinges & closure
magnet on the right or left-hand side depending on
your requirments. Mark the screw hole positions, the
drill out these positions (fig 3).
Fix the hinges in palce (on the door) with the 4 screws
provided (A) (fig 4).
Fix the magnet (B) in place using screw (C) (fig 4).
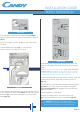
Mount the plate (D) on the right or left - hand
side, depending on your installation requirements
(fig 5).
Place the plastic support (E) under the plate & fix it in
position with screw (F) (fig 5).
Snap mount cap (G) in the lower position (fig 5).
Mount the furniture door to the front of the dryer using
the hinges. Place under the hinges (I) (fig 6) and then
fix in position with screw (H).
Slide the dryer into an opening of the size indicated in
the
diagram (fig 7).
Option 2 the position of the plinth is set back more
than 55 mm from the front of the furniture. Note:
components
-hinges
-supports
Firstly, slide the dryer into an opening of the size indi-
cated in the diagram (fig 7).
Fix the door to the furniture with standard hinges &
support (not supplied) & stop the door with a std hook
(not supplied) (fig 8).
Note; As soon as the hinges are fixed on the furniture
it is not possible to slide the dryer in & out.
INSTALLATION GUIDE
Built-in Tumble Dryer
Page 2