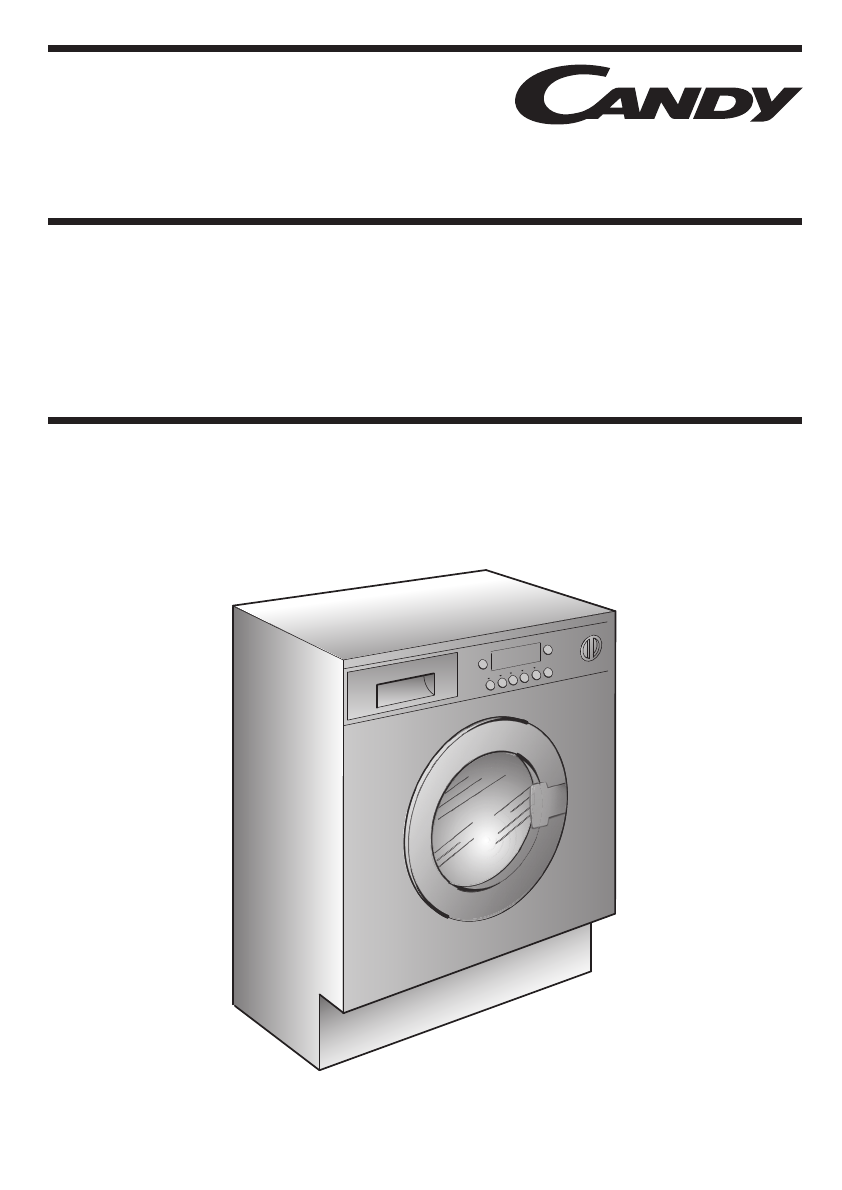
Washer Dryer Instructions for use CDB754 854DN D CDB
Introduction Please read these instructions for use carefully and all other information enclosed with the washing machine. Keep all documentation in a safe place for future reference or for any future owners. This appliances is intended to be used in household and similar applications such as: - staff kitchen areas in shops, offices and other working environments; - farm houses; - by clients in hotels, motels and other residential type environments; - bed and breakfast type environments.
Contents Page Introduction General delivery notes Safety notes Quick start Description of controls Programme Table Programme selector Detergent drawer Detergents, washing aids and amounts to use Useful advice for the user The main wash Drying Automatic washing/drying cycle Drying cycle Cleaning and routine maintenance Investigating malfunctions Technical data Setting up + installation 2 4 4 5 6 14 16 19 20 22 23 25 26 27 29 30 32 33 BEFORE SWITCHING ON THE APPLIANCE MAKE SURE IT IS CORRECTLY INSTALLED A
General delivery notes On delivery check that there is the following with the appliance: – Instruction manual – Certificate of guarantee – Caps – Inlet hose and check that no damage has occurred during transit, and if so, call your nearest Authorised Technical Support Service agent (see Customer Service) Safety notes. Note: for any cleaning or maintenance procedure for the washing machine A) Pull out the plug B) Turn off the tap C) Candy equips all its appliances with earthing.
M) N.B! If the appliance is installed on a carpeted floor ensure that the ventilation holes on the base of the appliance are not obstructed. N) If the appliance is not running properly or breaks down, switch it off, turn off the tap and do not tamper with the appliance. Consult only the Authorised Technical Support Service for possible repair and ask them to use original spare parts. Failure to comply with the above can compromise the safety of the appliance.
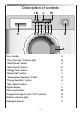
Description of controls IB M L Rapid + 59 Min D S L CIA PE S Rapid 14-30-44 Min Jeans P DE FGHC N A Door handle "Door Security" indicator light "Start/Pause" button "Stain Vanish" button "Allergy Care" button "Delay Start" button "Temperature Selection" button "Drying Selection" button "Spin Speed" button Digital display Stain Level button Programme selector with “OFF” position Buttons indicator light Detergent drawer 6 + Pre F R 120’ 90’ 60’ 30’ OFF G CS RI DETECTOR 90 60 40 30 20 I
“KG DETECTOR” (Function active only on Cotton and Synthetics programmes) Through every wash phase “KG DETECTOR” allows to monitor information on the wash load in the drum.
Door handle To open the door turn the handle in the manner illustrated in fig. “DOOR SECURITY” indicator light A B The “Door Security” indicator light is illuminated when the door is fully closed and the machine is ON. When "Start/Pause" is pressed on the machine with the door closed the indicator will flash momentarily and then illuminate. If the door is not closed the indicator will continue to flash. A special safety device prevents the door from being opened immediately after the end of the cycle.
The option buttons should be selected before pressing the "Start/Pause" button. D “STAIN VANISH” Button By pressing this button, which can only be activated in the Cotton cycles, the sensors in the new system come into operation. They affect both the selected temperature, keeping it at a constant level throughout the wash cycle, and the mechanical function of the drum. The drum is made to turn at two different speeds at crucial moments.
It is possible to cancel the delay start by taking the following action: Press and hold the button for 5 seconds until the display will show the settings for the programme selected. At this stage it is possible to start the programme previously selected by pressing the “START/PAUSE” button or to cancel the process by setting the selector to the OFF position and then selecting another programme.
would like to set. To prevent damage to the fabrics, it is not possible to increase the speed over that which is automatically suitable during the selection of the program. It is possible to modify the spin speed without to pausing the machine. Note: The machine is fitted with a special electronic device, which prevents the spin cycle should the load be unbalanced. This reduces the noise and vibration in the machine and so prolongs the life of your machine.
6 7 { { 5 { 4 Auto 3 Kg DETECTOR 2 { 90 60 40 30 20 120’ 90’ 60’ 30’ { 8 1 6) KG DETECTOR indicator Available on Cotton and Synthetic cycles, during the first 4 minutes of the cycle the intelligent sensor will weigh the laundry and adjust the cycle time, water and electricity consumption accordingly.
M “STAIN LEVEL” button By selecting this button (active only on COTTON and MIXED FIBRES programmes) there is a choice of 3 levels of wash intensity, depending on how much the fabrics are soiled. Once the programme has been selected the indicator light will automatically show the minimum level required for that programme. Pressing the button increases the duration of the wash cycle, and adjusts the wash settings accordingly.
TABLE OF PROGRAMMES PROGRAMME SELECTOR ON: PROGRAM FOR: WEIGHT RECOMMENDED MAX TEMP. kg °C MAX TEMP.
+ 59 Min G + Pre F S Rapid 14-30-44 Min CIA PE LS CS RI D R IN OFF B A Y Rapid Jeans Please read these notes When washing heavily soiled laundry it is recommended the load is reduced to 4 kg maximum. Information for the test laboratories (Ref. EN 50229 Standards) Washing Use the programme ** with the maximum degree of soiling selected, maximum spin speed and a temperature of 60°C. Programme recommended also for test with a lower temperature.
Programme selector For the various types of fabrics and various degrees of dirt the washing machine has different programme bands according to: wash cycle, temperature and lenght of cycle (see table of washing cycle programmes). COTTON WITH PRE WASH The Cotton programme is designed for maximum washing and rinsing efficiency. With spin cycles in between, the programme guarantees the laundry is rinsed perfectly. The final spin cycle ensures laundry is spun dry as much as possible up to the maximum speed.
SPECIAL “HAND WASH” This washing machine also has a gentle Hand Wash programme cycle. This programme allows a complete washing cycle for garments specified as “Hand Wash only” on the fabric care label. The programme has a temperature of 30°C and concludes with 3 rinses and a slow spin. SPECIAL “RINSE” PROGRAMME This programme carries out three rinses with a intermediate spin (which can be reduced or excluded by using the correct button). It can be used for rinsing any type of fabric, eg.
“SHIRTS” PROGRAMME This programme allows a complete washing cycle for shirts. The main wash and the rinse gives best results thanks to the rotation rhythms of the drum and to the water levels. The programme has a maximum temperature of 40°C and concludes with 3 rinses and a short spin. DRYING Note: Dispensers used for concentrated powders and liquid detergents must be removed from the drum before commencing the tumble drying programmes.
Detergent drawer P The detergent drawer is split into 3 compartments: - the compartment labelled "I" is for prewash detergent; - the compartment labelled " " is for special additives, fabric softeners, fragrances, starch, brighteners etc; - the compartment labelled "II" is for main wash detergent. NOTE: Some Detergents are Difficult to utilise. Ensure to use an in drum dispenser if recommended by the detergent Manufacturer. Note: only put liquid products in the compartment labelled “ ”.
Detergents, washing aids and amounts to use Choice of detergent General purpose detergents - - Powder detergents, for a thorough wash, with bleaching agent, particularly suitable for use in hot wash programmes (60°C and over), for heavily soiled and stained laundry. Liquid detergents, particularly suitable for grease stains, such as greasy skin marks, cosmetics and oil. These detergents are not suitable for washing stained laundry, as they do not contain bleach.
Dosages Only use detergents which are suitable for use in a washing machine. You will obtain the best results from your wash with the minimum use of chemical products and the best care for your laundry if you take into consideration the degree of soiling as well as the type of detergent to choose. The amount of detergent to use depends on: - water hardness: depending on the hardness of the water and the type of detergent used, it is possible to reduce the amount of detergent.
Useful advice for users Tips on using your domestic appliance in the most environmentally-friendly and economical way Do a full load in your washing machine To prevent any possible waste of energy, water or detergent we recommend that you put a full load in your washing machine, not exceed the recommended maximum load size.
Main wash Sorting the laundry - It is recommended you wash only items which are machine washable with water and detergent and not dry-clean items. - If you need to wash rugs, bedspreads or other heavy items, it is best not to spin them.
The correct way to wash Preparing the laundry A) Select the laundry. Loading the laundry B) Open the porthole. C) Put the laundry in the washing machine. Close the porthole again, ensuring that no items of laundry are obstructing the lock. Putting detergent in machine D) Open the drawer, choose the detergent and put in the correct amount, according to the manufacturer’s instructions and the advice on page 20. Add any other laundry aids (see page 20). Close the drawer again.
DRYING DON’T DRY GARMENTS MADE FROM FOAM RUBBER OR FLAMMABLE MATERIALS. IMPORTANT: THIS DRYER CAN ONLY BE USED FOR LAUNDRY WHICH HAS BEEN WASHED AND SPIN DRIED. WARNING: Indications given are general, therefore some practice is needed for the best drying results. We recommend setting a lower drying time than indicated, when first using, so as to establish the degree of dryness required. We recommend not to dry fabrics that fray easily, such as rugs or garments with a deep pile, to avoid air duct clogging.
Automatic washing/drying Warning: only a maximum 5 kg of dry laundry can be loaded otherwise the dried laundry will be not satisfactory. WASHING: Open the drawer, choose the detergent and put in the correct amount. Refer to the list of washing programmes according to fabrics to be washed (e.g. very dirty cotton) and without pressing Start button, prepare wash as described: Turning the selector knob, the required programme is activated. The display will show the settings for the programme selected.
Drying cycle The correct way to dry: - Open door. - Fill with up to 5 kg - in case of large items (e.g. sheets) or very absorbent items (e.g. towels or jeans), it is a good idea to reduce the load. - Close door. - Turn programme dial to cotton. Select the degree of dryness that you require. This ranges from Extra Dry ( ) for bath towels and bathrobes, through Cupboard Dry ( ) for items that will be put away without ironing, to iron dry ( ) that leaves the laundry suitable for ironing.
Table of drying times (in minutes): PROGRAMME Extra Cupboard Iron COTTON MIXED Min 1 Kg Max 5 Kg Min 1 Kg Max 3,5 Kg from 30’ from 30’ from 30’ to 230’ to 220’ to 170’ from 30’ from 30’ from 30’ to 170’ to 150’ to 80’ The time remaining shown on the digital display will show the time remaining for a full load. However, this will be corrected during the cycle once the appliance assesses the weight and dampness of the laundry. USEFUL TIPS: Do not dry unwashed items in the washer dryer.
Cleaning and routine maintenance Do not use alcohol-based scourers and / or thinners on the outside of your washing machine, just a wipe with a damp cloth will suffice. The washing machine needs very little maintenance: - Cleaning the drawer compartments. - Cleaning the filter. - Cleaning the door glass. Cleaning the drawer compartments Even if it is not strictly necessary, it is good to clean the compartments for bleaching detergents and additives occasionally.
Investigating malfunctions What might be the cause of… Defects you can remedy yourself MALFUNCTION CAUSE REMEDY 1. Does not work on any programme Plug not in socket. Not switched on. Power failure. Fuse blown. Door open. Plug it in. Switch on. Check. Check. Close door. 2. Does not fill with water See cause 1. Tap turned off. Programme selector not correctly positioned. Fill hoses are kinked Check. Turn on tap. Position programme selector correctly. Straighten fill hoses 3.
Note: The use of environmentally-friendly, phosphate-free detergents can have the following effects: - waste water from rinsing may be cloudier because of the presence of zeolites held in suspension, without the rinse performance being adversely affected; - presence of white powder (zeolites) on laundry after washing, which is not absorbed by the fabric and does not alter the colour of the fabric. - The presence of foam in the final rinsing water is not necessarily an indication of poor rinsing.
Fig. 2 Technical data 7 kg 5 kg 0,05 ÷ 0,8 MPa Max. load of dry laundry Max. load of dry laundry for drying Water pressure Measurements Width Depth Height 60 cm 54 cm 82 cm NB: For specifications regarding electrical data, see the data panel on the front of the washing machine (porthole area) - as shown in diagram above. Appliance complies with European Directives 73/23/EEC and 89/336/EEC, replaced by 2006/95/EC and 2004/108/EC, and subsequent amendments.
SETTING UP + INSTALLATION 1 Remove the polystyrene base and place the machine near its permanent position (diagram 1). Carefully cut through the hose retaining clip at the rear of the appliance (diagram 2). Remove the 3 fixing screws marked (A) and remove the 3 spacers marked (B) (diagram 3). 2 Remove the screw (C). A spacer will fall inside the machine. By tilting the machine, remove the above mentioned spacer. Cover the 4 holes using the caps provided in the instruction booklet pack (diagram 4).
Note: we recommend you keep the screws to immobilise the machine for future transit. The Manufacturers will not be responsible for any possible damage to the machine caused by not following the rules relating to releasing the mechanism. The user is responsible for all costs of installation. Water connection The appliance must be connected to the water mains using new hose-sets. The old hose-sets should not be re-used. The machine has an inlet hose with 3/4" B.S.
Note: it is advisable to turn off the tap after each wash to isolate the washing machine from the water supply. The appliance must not be installed behind a lockable door, a sliding door or a door with a hinge on the opposite side to that of the washer dryer. For the washing machine to function properly the terminal end of the discharge hose (mouth) must be at a minimum of 50 cm and a maximum of 85 cm from the ground.
EN GB INSTRUCTIONS FOR INSTRUCTIONS FOR MOUNTING DOOR MOUNTING DOOR Drill holes in the door using the cardboard Drill holes in the door template as indicated in using the cardboard Fig. 1 to mount the hinges template as indicated in and magnet in Fig. 1closure to mount the hinges the or left-hand andright closure magnet in position to the rightaccording or left-hand your requirements. position accordingThe to position of the hinges your requirements. The refers to of thethe upper edge.
IT Mount the door with Montare porta with hinges byla screwing corredata dithe cerniere screws (L) to front of avvitando lemachine. viti (L) sul the washing frontale della lavabiancheria. NOTE: You are advised to mount the door so that it Nota: Ètowards consigliabile opens the left, in montare porta con il the samela direction as the senso di apertura washing machine verso load sx comefor è more l’apertura door loading dell’oblò per dare space. migliore spazio al caricamento dei panni.
The manufacturer declines all responsibility in the event of any printing mistakes in this booklet. The manufacturer also reserves the right to make appropriate modifications to its products without changing the essential characteristics.
This appliance is marked according to the European directive 2002/96/EC on Waste Electrical and Electronic Equipment (WEEE). By ensuring this product is disposed of correctly, you will help prevent potential negative consequences for the environment and human health, which could otherwise be caused by inappropriate waste handling of this product. The symbol on the product indicates that this product may not be treated as household waste.