EN
Thank you for choosing a Candy dish washer. We are confident it will assist you loyally in washing your daily dishes in full safety. Contents 1. GENERAL SAFETY RULES 2. WATER CONNECTION Carefully read this manual for correct and safe appliance use and for helpful tips on efficient maintenance. 3. LOADING THE SALT 4. ADJUSTING THE UPPER BASKET (ONLY ON SOME MODELS) Only use the dish washer after carefully reading these instructions.
l This appliance is intended to be used in household and similar applications such as: − Staff kitchen areas in shops, offices and other working environments; − Farm houses; − By clients in hotels, motels and other residential type l Children should be supervised environments; to ensure that they do not play − Bed and breakfast type with the appliance. environments.
l Make sure carpets or rugs do The manufacturer declines all not obstruct the base or any of responsibility for any damage the ventilation openings. to people or property due to non-earthing of the machine. l After installation, the appliance must be positioned so that the l Ensure that the dishwasher plug is accessible. does not crush power cables. l In general it is not advisable to use adaptors, multiple plugs and/or extension cables.
there is a water softening device installed in the home there is no need to add salt to the water softener fitted in the dishwasher. By marking this product, we confirm, under our own responsibility, full compliance of this product with all relevant safety, health and environmental requirements l If the appliance breaks down or stops working properly, switch it under European legislation. off, turn off the water supply and do not tamper with it.
2. WATER CONNECTION l If the dishwasher is connected to new pipes The appliance must be connected to the water mains using new hose-sets. The old hose-sets should not be reused. or to pipes which have not been inuse for a long time run water through for a few minutes before connecting the inlet hose. In this way no deposits of sand or rust will clog up the water inflow filter. l The inlet and drain hoses can be directed to left or right.
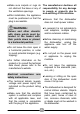
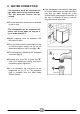
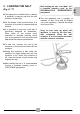
A device located on the supply tube that stops water flow if the tube deteriorates; in this case, a red mark will appear in the window "A" and the tube must be replaced. To unscrew the nut, press the one-way lock device "B". All the dishwashers are equipped with an overflow safety device which, if water exceeds normal levels due to malfunctions, automatically blocks water flow and/or drains excess quantities. 4 SOME MODELS may include one or more of the following features: B l WATERBLOCK (fig.
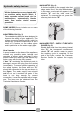
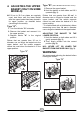
Connecting the outlet hose l The outlet hose should disharge into a l The hose can be hooked over the side of standpipe, making sure that there are no kinks (fig. 6). the sink, but it must not be immersed in water, in order to prevent water from being syphoned back to the machine when this is in operation (fig. 6Y). l The standpipe must be at least 40 cm above floor level and it must have an internal diameter of at least 4 cm.
After loading the salt, YOU MUST run a complete washing cycle, or the PRE-WASH/COLD RINSE/REFRESH programme. (Fig. A "1") l The appearance of white stains on dishes is generally a warning sign that the salt container needs filling. l The salt dispenser has a capacity of between 1.5 and 1.8 kg and, for efficient use of the appliance, it should be refilled from time to time . l On the bottom of the machine there is a container for the salt for regenerating the softener.
4. ADJUSTING THE UPPER Type "B": (ONLY MODELS WITH EASY CLICK): BASKET (ONLY ON SOME 1. Remove the upper basket; 2. Hold the basket on both sides and lift it MODELS) upwards (fig. 1). l If 29 cm to 32.5 cm plates are regularly used, load them onto the lower basket after the upper basket has been placed in its upper position, as detailed below (according to the model): Type "A": 1. Turn front blocks "A" outwards; 2. Remove the basket and remount it in the upper position; 3.
example of loading see fig. 1, 2 e 3. Using the upper basket Upper basket (fig. 1) l The upper basket is provided with mobile racks hooked to the sides of the basket, which can be regulated into 4 positions. l In the lowered position (A-A1) the racks may be used for such items as: tea and coffee cups, kitchen knives and ladles. Also glasses with stems may be safely hung on the ends of the racks. Upper basket (fig.
l Place the cutlery in the plastic cutlery holder with the handles pointing upwards. l Place the cutlery holder on the lower basket (fig. 4 and 5), making sure that the cutlery does not get in the way of the rotating arms. Cutlery basket (fig. 6) The cutlery basket is made with two detachable parts which will enable various loading options. The two parts can be detached by sliding the left section away from the right section. The top of cutlery basket can be removed, for enable various loading options.
EN 7. LOADING THE DETERGENT (Fig. A "2") The detergent It is essential to use a detergent that is specifically designed for dishwashers either in powder, liquid,gel or tablet form. After pouring the detergent into the container, close the lid, firstly pushing (1) and then pressing on it (2) until you hear the click. Unsuitable detergents (like those for washing up by hand) do not contain the proper ingredients for use in a dishwasher, and stop the dishwasher from working correctly.
8. TYPES OF DETERGENT l read carefully and follow the manufacturer’s Detergent tablets l the effectiveness of detergents containing instructions given on the packaging; Detergent tablets of different manufacturers dissolve at different speeds, for this reason, during short programmes, some detergent tablets may be not fully effective, because they are not completely dissolved. If these products are used, is recommended to choose longer programmes to guarantee the complete use of the detergent.
9. LOADING THE RINSE AID EN (Fig. A "3") The rinse aid The rinse aid, which is automatically released during the last rinsing cycle, helps the dishes to dry quickly and prevents spots and stains forming. Filling the rinse aid container. The rinse aid container can be found to the left of the detergent container (fig. A "3"). To open the lid, push the reference mark and, in the same time, pull the tab of opening. It is always advisable to use rinse aid that is specifically designed for dishwasher.
10. CLEANING THE FILTERS (Fig. A "4") The filter system consists of: A. A central container that traps the larger particles; B. A micro filter, located beneath the gauze, that traps the tiniest particles ensuring a perfect rinse; C. A flat gauze that continuously filters the wash water. l To achieve excellent results every time, the filters should be checked and cleaned after each wash. l To remove the filter unit, simply turn the handle anticlockwise (fig. 1).
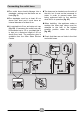
How to get really good wash results. l Before placing the dishes in the dishwasher, remove any remaining food (bones, shells, pieces of meat or vegetables, coffee grounds, skin of fruit, cigarette ash, thoothpicks etc. to avoid blocking the filters, water outlet and washing arm nozzles. l If the dishes are not very dirty or if the baskets are not very full select an ECONOMY programme, following the instructions in the program list. What not to wash.
12. CLEANING AND MAINTENANCE Do not use tools that can deform the spray heads. (Fig. A “5”) l To clean the dishwasher outside, do not use solvents (degreasing action) neither abrasives, but only a cloth soaked with water. l The dishwasher does not require special maintenance, because the tank is selfcleaning. 3) when you have finished, refit the rotor arms in the same position, remembering to re-align the arrow and screw into position.
If the machine is not going to be used for some time, it is advisable to follow these rules: 4. fill the rinse aid container; 6. keep the inside of the machine clean; 1. do an empty wash with detergent in order to clean the machine of any deposits; 7. If the machine is left in places where the temperature is below 0°C any water left inside the pipes may freeze. Wait until the temperature rises above zero and then wait for about 24 hours before. 2. pull out the electric plug; 3.
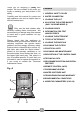
L "TABS" Light M "EXPRESS" Light N "Wi-Fi" light D Display E "EXPRESS" option button F E+G CHILD LOCK 20 Fuse / Power input / Supply voltage Water supply pressure (MPa) Capacity with pans and dishes Place settings (EN 50242) 120 Depth with door open (cm) 117 59,8x82x58 WITHOUT WORKTOP 13 8 people See rating plate Min. 0,08 – Max. 0,8 9 people 15 117 59,8x81,8 ÷ 89,8x57 HALF-INTEGRATED TECHNICAL DATA (See rating plate) 60x85x60.
WARNING In the event that the machine remains switched on without selecting or starting any program, after 5 mins. the dishwasher will switch off automatically. ON/OFF button l To turn the appliance on and off, press the ON/OFF button (for at least 3 seconds). Next time you switch on the appliance At the end of the cycle, remember to switch off the appliance using the ON/OFF button, then remove the plug and close the water supply.
l To adjust the SOFTENER see the specific Chapter of the manual. l To adjust the BUZZER see the specific paragraph. l To adjust the MEMO FUNCTION see the specific paragraph. "AUTOMATIC" programmes Models with Smart Loading Sensor The "Auto Daily Wash" programme, thanks to an algorithm that analyses the degree of dirtiness of the dishes in real time, automatically sets the ideal temperature and washing time , optimising water and electricity consumption Models with dirt sensor (Only on some models).
"PERFECT RAPID ZONE" (only on some models) Proceed as follows to change or cancel a running program: The "Perfect Rapid zone" is identified by the left side of the tub, in which two extra washing arms will be activated during Rapid programs (ZOOM 39’ and Rapid 24') and programs (UNIVERSAL, SANITISING, UNIVERSAL PLUS and ECO PLUS) to provide an extra washing force, more water, in that zone. l Keep the Start/Reset button pressed for at least 3 seconds.
"EXPRESS" button (only on some models). This button enables average energy and time savings of 25% (according to the cycle selected), reducing the wash water temperature and the drying time during the final rinse. This option is recommended for evening washing when perfectly dry dishes are not needed immediately. For better drying, leave the dishwasher door slightly ajar to promote natural air circulation in the dishwasher. "SMART DOOR" button " (AUTOMATIC DOOR OPENING) (only on some models).
l The delayed start and the selected programme will be cancelled. dashes will appear on the display. l Press the "START DELAY" button ("0:30” will appear on the display). Two l At this point, to set off the dishwasher, a l Press the button again to increase the new programme and any option buttons must be selected, as indicated in the "PROGRAMME SETTINGS" paragraph. delay (on each press the delay is increased by 30 mins., up to a maximum of 23:30.
l Turn on the dishwasher by holding the "ON/OFF" button down for about 3 secs. l Hold down the "Progr." and "ON/OFF" buttons for about 5 secs. l The message "SETTINGS" will appear on the display and the indicator lights of the "SMART DOOR/EXPRESS" and "TABS" buttons will be on. The Progr./Options/Start Delay options are enabled, and by pressing these buttons you can simulate the product's functioning without starting a wash.
l After this, only the "ON/OFF" button will work. l "CHILD LOCK OFF" will appear on the programme phase indicator lights will flash 3 times. Switching off the machine with the "ON/OFF" button, the next time the machine is switched on, the child lock will be deactivated. l The key lock can be cancelled by simply pressing the two "SMART EXPRESS" buttons again. DOOR/ 27 EN display.
Successful enrollment 16. REMOTE CONTROL (WI-FI) This appliance is equipped with Wi-Fi technology that allows the machine to be remote controlled via an app. l The message "CONNECTED" will appear on the display once, after which the message "REMOTE CONTROL" will appear and the "Wi-Fi" indicator light will be steady on. l You can now check the machine from the Pairing the machine with the app App. l Download the Candy simply-Fi app onto your device.
"Wi-Fi" indicator light l To exit remote control, press “Progr. 3sec l Indicates the connection status of the WiFi” again for 3 secs. product to the home Wi-Fi network. It can be: l When no cycle is under way: - FIXED ON: remote control enabled. The Wi-Fi indicator light will start to flash slowly and the message "REMOTE CONTROL OFF" will appear on the display. The display will then show the last programme completed by the machine (or the "ECO" programme). - SLOW FLASHING: disabled.
17. PROGRAMME LEGEND Programme Description P1 ECO Programme for normally soiled tableware (the most efficient in terms of its combined energy and water consumption for that type of tableware). Programme standardised to EN 50242. P2 INTENSIVE Once a day - for heavily soiled pans and any other items that have been left all day for washing. P3 NIGHT Quietest washing cycle. Ideal for functioning by night and for taking advantage of reduced energy fares.
"IMPULSE" programmes Washing temperature (°C) Average wash duration ¹ (min.
18. WATER SOFTENER UNIT Depending on the source of the supply, water contains varying amounts of limestone and minerals which are deposited on the dishes leaving whitish stains and marks. The higher the level of these minerals present in the water, the harder the water is. The dishwasher is fitted with a water softener unit which, through the use of special regenerating salt, supplies softened water for washing the dishes. The degree of hardness of your water can be obtained from your water supply company.
If you believe the dishwasher is not working correctly, consult the quick guide provided below with some practical tips on how to fix the most common problems. If the malfunction continues or recurs, contact the Technical Assistance Centre. BUG REPORTS l Models with a display: errors are reported by a number preceded by the letter "E" (e.g. Error 2 = E2) and a short audio signal. l Models without a display: an error is shown by a sequence of flashes of every LED.
Only models without a display If malfunctions or faults occur when a programme is running, the indicator light that corresponds to the selected cycle will blink rapidly, and an intermittent audio signal will sound. In this case, turn the dishwasher off by pressing the "ON/OFF" button. After checking to make sure the water supply is open, that the drain pipe is not bent and that the siphon or filters are not clogged, set the selected program again.
5. Spray arms are not heard to rotate 6. On electronic appliances without a display: one or more indicator lights flashing quickly CAUSE Excessive amount of detergent Item prevents arms from rotating Filtering plate and filter very dirty Water supply tap turned off Switch off the appliance. Turn on the tap. Re-set the cycle.
N.B.: Should any of the above situations result in a bad wash performance or insufficient rinsing, remove dirt deposits from the dishes by hand since the final drying cycle hardens the dirt, making it difficult to remove with a subsequent wash. If the malfunction continues, contact the Technical Assistance Centre, quoting the model of the dishwasher. This is found on the plate on the upper section of the inside of the dishwasher door, or on the warranty.
l WEEE This appliance is marked a cording to the European directive 2012/19/EUon Waste Electrical and Electronic Equipment (WEEE). WEEE contains both polluting substances (which can cause negative consequences for the environment) and basic components (which can be re-used). It is important to have WEEE subjected to specific treatments, in order to remove and dispose properly all pollutants, and recover and recycle all materials.
A. WIRELESS PARAMETERS Wi-Fi Specifications (Wi-Fi) A B C 802.11 b/g/n 2,412 GHz. - 2,484 GHz. 802.11b, DSSS 1 Mbps = +19.5 dBm 802.11b, CCK 11 Mbps = +18.5 dBm 802.11g, OFDM 54 Mbps = +18.5 dBm 802.11n, MCS7 = +14 dBm 802.11b = 1024 bytes, -80 dBm D E 802.11g = 1024 bytes, -70 dBm 802.11n = 1024 bytes, -65 dBm Specifications (Bluetooth) NFC Wi-Fi (One Fi/Smart Fi) Bluetooth v4.2 ISO/IEC 14443 Type A and NFC Forum Type 4 802.11 b/g/n 2,412 GHz. - 2,484 GHz.
fkhldsk
- CDPN D - 19.