HU RO EL PL CS
Děkujeme za výběr pračku značky Candy. Jsme si jisti, ž e vám pomůže vyprat oblečení, každý jemný kousek každý den. Životní prostředí Tento spotřebič je označen v souladu s Evropskou směrnicí 2012/19/EU o odpadních elektrických a elektronických zařízeních (OEEZ). OEEZ obsahují jak znečišťující látky, které mohou způsobit negativní dopady na životní prostředí, tak základní komponenty, které mohou být znova použity.
l Tento spotřebič je určený pro použití v domácnosti a podobných místech: − Zaměstnanecké kuchyně v prodejnách, kancelářích nebo jiném pracovním prostředí; − Na farmách; − Klienty hotelů, motelů a jiných ubytovacích zařízení; − V místě pro výdej snídaně. Jiné použití tohoto spotřebiče mimo domácího prostředí nebo pro typické domácí činnosti, jako je komerční využití odborníky nebo zkušenými uživateli, je vyloučeno z výše uvedených aplikací.
l Po instalaci musíte pračku umístit l Nevystavujte pračku dešti, tak, aby zůstala zástrčka snadno přímému slunečnímu záření ani jiným povětrnostním vlivům. přístupná. l Maximální kapacita suchého l V případě závady pračku vypněte, prádla závisí od modelu (viz zavřete ventil přívodu vody a ovládací panel). nemanipulujte se spotřebičem. Ihned kontaktujte nejbližší servisní středisko a používejte pouze l K nahlédnutí popisu výrobku originální náhradní díly. Nedodržením navštivte stránku výrobce.
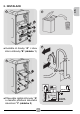
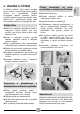
1 CS 2. INSTALACE 3 4 l Uvolněte 4 šrouby "A" z obou klínů a 4 šrouby "B" (obrázku 1). 2 max 100 cm min 4 cm l Připevněte zpětně 4 šrouby "A" a nasaďte přiložené dekorační zakončení "C" (obrázku 2).
jehož průměr musí být větší než průměr hadice (obrázku 4). 5 l V případě potřeby použijte zaoblenou svorku, která zajistí dokonalejší zpevnění a podpěrku odtokové hadice. V případě, ž e váš model má k dispozici: l Potřebujete-li pračku přemístit, stačí otočit ovládací páčkou pojízdného podstavce směrem doprava a spotřebič posunout. Po přemístění uveďte páčku do původní polohy. l Nastavte správnou rovnováhu spotřebiče pomocí předních koleček (obrázku 5).
Připojení vody CS 6 l Připojte hadici k přívodu vody, používejte pouze dodané hadice (obr. 6). NEOTEVÍREJTE VODOVODNÍ VENTIL. l Některé modely mohou obsahovat jednu nebo více z následujících funkcí: l HOT&COLD (obr. 7): nastavení připojení 7 vody pro horkou a studenou vodu pro vyšší úsporu energie. Připojte šedou hadici k ventilu studené vody a červenou k ventilu horké vody.
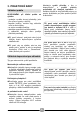
Následuje rychlá příručka s tipy a doporučeními o použití pracích prostředků při různých teplotách. V každém případě si vždy přečtěte pokyny na pracím prostředku pro jeho správné použití a dávkování. 3.
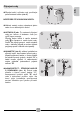
Čištění zásobníku na prací prostředek a ostatních přihrádek K čištění vnějších částí pračky použijte vlhkou utěrku, nepoužívejte drsné prášky, alkohol ani rozpouštědla. Pračka nevyžaduje žádnou speciální údržbu: vyčistěte zásobník pracích prostředků a filtr; několik tipů o přemisťování pračky nebo dlouhodobém odstavení je popsaných níže. l Stiskněte tlačítko (A). l Přidržet stisknuté tlačítko zásobníkem směrem ven. a otočte l Vyjměte zásobník a vyčistěte jej.
5. PŘÍRUČKA RYCHLÉHO STARTU 6. OVLÁDACÍ PRVKY A PROGRAMY Tato pračka automaticky přizpůsobí hladinu vody podle typu a množství prádla. Tento systém nabízí skvělou úsporu energie a značnou redukci doby praní. A Volba programu l Zapněte pračku a zvolte požadovaný program. E l Nastavte teplotu praní a stiskněte požadované tlačítko „možností“. l Stisknutím tlačítka START/PAUZA spusťte praní.
Zavřete dvířka PŘED tlačítka START/PAUZA. stisknutím l Stisknutím spustíte zvolený cyklus. Po stisknutí tlačítka START/PAUZA spotřebič chvíli č eká, dokud začne fungovat. Otevření dvířek PŘIDÁNÍ NEBO ODEBRÁNÍ PRÁDLA POTÉ, CO BYL PROGRAM JIŽ SPUŠTĚN (PAUZA) Speciální bezpečnostní zařízení brání v otevření dvířek ihned na konci cylu. Po skončení cyklu počkejte 2 minuty a dokud nezhasne kontrolka “Uzamčení dvířek” před otevřením dvířek.
l Nejnižší povolená rychlost je 400 ot/min. Tlačítko ODLOŽENÉHO STARTU l Toto tlačítko umožňuje odložit spuštění pracího programu maximálně o 3, 6, 9 hodin. Pokud si přejete odložit spuštění programu, postupujte následujícím způsobem: - Zvolte požadovaný program. Stiskněte tlačítko jednou, abyste jej aktivovali. Opětovným stisknutím nastavte odložení o 3, 6, 9 hodinu. - Každým dalším stisknutím se odložení prodlouží o 3 hodinu až po 9. V případě dalšího stisknutí se odložený start zruší.
CS Tlačítko PRO PRANÍ ZA STUDENA l Stisknutím tohoto tlačítka je možné provádět veškeré cykly praní bez toho, aniž by se ohřívala voda a nebyly narušeny žádné jiné vlastnosti (množství vody, doba praní, rytmus praní, atd.). l Programy pro praní za studena se doporučují k praní veškerého druhu prádla, jež pouští barvy a pro praní záclon, přikrývek, zvláště jemných syntetických tkanin, malých koberců nebo nepříliš znečištěného prádla.
Tabulka programů TEPL.°C kg * (MAX.) PROGRAM Doporučená Max. Bílé + Pre 1) 5 5.5 6 6.5 7 60° 90° Bavlna ** 1) 5 5.5 6 6.5 7 30° 60° Vlna 1 1 1 1 1 30° 30° Ruční praní 1 1 1 1 1 40° 40° Máchání - - - - - - - Odstředění - - - - - - - Odčerpání - - - - - - - 3 3 3 3 3 30° 50° EcoMix 20° 5 5.5 6 6.5 7 20° 20° Rychlý 44 min. 3 3 3 3 3 30° 40° Rychlý 30 min. 2 2 2 2 2 30° 30° Směsné 1) 14 PRAC.
Nadměrné dávkování pracího prostředku může způsobit nadměrnou tvorbu pěny. Pokud spotřebič zjistí přítomnost nadměrného množství pěny, může uskutečnit cyklus odstředění nebo prodloužit trvání programu a zvýšit spotřebu vody. ** STANDARDNÍ PROGRAM PRO BAVLNU PODLE (EU) Č. 1015/2010 A Č. 1061/2010. ( ) Pouze se zvolenou možností PŘEDPÍRKY (programy s možnou volbou PŘEDPÍRKY). 1) Pro uvedené programy můžete nastavit trvání a intenzitu praní pomocí tlačítka STUPEŇ ZNEČIŠTĚN.
Výběr programů K praní různých typů látek a různého stupně znečištění obsahuje pračka specifické programy pro splnění každé potřeby praní (viz tabulka). Bílé + Pre Pro perfektní praní. Konečné odstředění při maximální rychlosti nabízí účinnější odstranění pracích prostředků. Bavlna 30/40/60°C Tento program je vhodný pro praní běžně znečištěné bavlny a je to nejúčinnější program ohledně spotřeby energie a vody pro praní bavlněného prádla.
l Doporučené množství (spodní ryska). Otevření/zavření bubnu l Otevřete dvířka pračky. Označuje doporučenou předepírce a praní. l Otevřít buben stlačením tlačítka (A),a hladinu při l Max. Označuje nejvyšší povolenou hladinu, která se nesmí překročit. zároveň druhou rukou uchopit dvířka. l Vložte prádlo jednotlivě do bubnu a příliš Důležité: ho nestlačujte. Je třeba dbát na doporučenou váhu prádla podle tabulky programů. Přetížená pračka dostatečně nevypere a prádlo bude pomačkané.
7. SERVISNÍ STŘEDISKO A ZÁRUKA Pokud máte pocit, že pračka nefunguje správně, viz část níže pro možné užitečné tipy k odstranění běžných problémů. Problém Pračka nefunguje/nespustí se Pračka vodu Pračka vodu nenapouští nevypouští Voda na podlaze pod pračkou Pračka neodstřeďuje Silné vibrace během odstředění Pokud se zobrazí nebo bliká konkrétní číslo závady Možná příčina a praktické řešení Ujistěte se, zdaje správně připojená. Ujistěte se, zda je zapnutá.
Záruka Na výrobek se vztahují záruční podmínky uvedené na záručním listě spotřebiče. Záruční list musí být vyplněný a uložený na bezpečném místě, k předložení v případě opravy pro Candy servisní středisko. - tmavější voda z máchání: je to z důvodu potlačení zeolitů, které nemají negativní vliv na účinek máchání. - bílý prášek (zeolit) na prádle na konci praní: je to normální, prášek nebyl absorbován látkou a nezmění její barvu. Registrujte váš spotřebič! Neztrácejte čas.
Dziękujemy za dokonany wybór przy zakupie pralki Candy. Jesteśmy przekonani, że będzie ona Waszym wartościowym sprzymierzeńcem w codziennym, bezproblemowym praniu bielizny, nawet najdelikatniejszej. Rejestracji zakupionego przez Ciebie produktu możesz dokonać na stronie www.registercandy.com, co daje możliwość szybszego dostępu do pełnych usług, zarezerwowanych wyłącznie dla najwierniejszych klientów.
l Urządzenie to przeznaczone jest do użytku domowego i w podobnych warunkach, dla przykładu: − w strefach wypoczynku, na terenie sklepów, w biurach lub innych miejscach pracy; − w gospodarstwach agroturystycznych; − dla klientów hoteli, moteli lub innych podobnych centrach pobytowych; − w ośrodkach typu Bed & Breakfast. Użytkowanie sprzętu odmienne niż typowe dla domowego, jak na przykład profesjonalne użytkowanie przez osoby przeszkolone i specjalistów, jest zabronione także w miejscach wyżej opisanych.
l Przy montażu urządzenie l Nie ciągnąć przewodu zasilania powinno być umieszczone w lub samego urządzenia w celu sposób umożliwiający dostęp do odłączenia wtyku z gniazda kontaktu zasilania. elektrycznego. l Maksymalny wsad prania l Nie pozostawiać pralki na działanie suchego zależy od modelu pralki deszczu, słońca czy innych (patrz panel sterowania). czynników atmosferycznych.
2. INSTALACJA 1 PL 3 l Odkręcić 4 śruby "A" obu obejm i 4 śruby "B" (rysunku 1). 4 2 l Umieścić ponownie 4 śruby "A" i założyć dostarczone osłony "C" (rysunku 2).
wysokości minimum 50 cm, a maksimum 75 cm nad podłogą. (rysunku 4). l W razie potrzeby, użyć dołączonego zakrzywionego akcesoria, aby zapewnić lepsze zamocowanie węża odprowadzającego wodę. 5 l Pralka powinna zostać podłączona do sieci wodociągowej przy pomocy nowego węża, dostarczonego wraz z urządzeniem (wewnątrz bębna). Nie należy używać do tego celu węża starego.
Połączenie hydrauliczne 6 l Podłączyć przewód wody do kranu z PL wodą używając w tym celu wyłącznie rurkę dostarczoną z pralką (rys. 6). NIE ODKRĘCAĆ KRANU. l Poszczególne modele mogą posiadać niektóre z poniższych funkcji: l HOT&COLD (rys. 7): możliwość połączenia do sieci wody ciepłej i zimnej dla większej oszczędności energii. Podłączyć szary przewód do kraniku z zimną wodą i czerwony przewód do kranu wody gorącej.
Jaką wybrać temperaturę prania? 3.
4. CZYSZCZENIE I RUTYNOWA KONSERWACJA Czyszczenie pojemnika na środki piorące z jego przedziałami K čištění vnějších částí pračky použijte vlhkou utěrku, nepoužívejte drsné prášky, alkohol ani rozpouštědla. Pračka nevyžaduje žádnou speciální údržbu: vyčistěte zásobník pracích prostředků a filtr; několik tipů o přemisťování pračky nebo dlouhodobém odstavení je popsaných níže. l Nacisnąć przycisk (A). l Z wciśniętym przyciskiem, obrócić l Wyjąć i wymyć pojemnik.
5. SKRÓCONA INSTRUKCJA OBSŁUGI 6. STEROWANIE I PROGRAMY Nasza pralka posiada system automatycznego dostosowania poziomu wody do rodzaju i ilości prania. System ten prowadzi do zredukowania zużycia energii i znacznego skrócenia czasu prania. A Wybór programu l Włączyć pralkę i wybrać potrzebny program. E l Zmienić ewentualnie wartość temperatury prania i załączyć potrzebne opcje. l Nacisnąć przycisk START/PAUZA, aby B C D F uruchomić program prania.
PL Pokrętło wyboru programów należy ustawić w pozycji OFF po zakończeniu każdego programu lub przed wyborem i uruchomieniem kolejnego programu prania. UWAGA: Nie dotykać wyświetlacza podczas podłączania pralki do zasilania, ponieważ przez pierwsze klika sekund pralka przeprowadza kalibrację systemów. Dotknięcie wyświetlacza spowoduje błąd i w takiej sytuacji należy odłączyć pralkę od zasilania i powtórzyć operację. Przycisk START/PAUZA Drzwiczki należy zamknąć PRZED naciśnięciem przycisku START/PAUZA.
l Aby całkowicie skasować wirowanie, Funkcje dodatkowe należy wybrać przed naciśnięciem przycisku START/PAUZA. W przypadku wyboru funkcji niekompatybilnej z danym programem, wskaźnik funkcji najpierw miga a następnie gaśnie. naciskać ten przycisk aż do zgaśnięcia trzech światełek wskazujących prędkość. l Pożądaną prędkość można wybrać w dowolnym momencie programu.
Przycisk PRANIA NA ZIMNO l Po wcisnięciu tego przycisku pralka PL wykonuje wszystkie fazy prania bez podgrzewania wody; pozostałe ustawienia nie ulegają zmianie (poziom wody, czas, rytm prania, itp.). l Programy prania na zimno zalecane są w przypadku tkanin o nietrwałych kolorach, firan, narzut, wyjątkowo delikatnych tkanin syntetycznych, dywaników lub tkanin mało zabrudzonych.
Tabela programów TEMP.°C kg * (Maks.) PROGRAM Zalecana Maks. Białe + Pre 1) 5 5.5 6 6.5 7 60° 90° Bawełna ** 1) 5 5.5 6 6.5 7 30° 60° Wełna 1 1 1 1 1 30° 30° Ręczne 1 1 1 1 1 40° 40° Płukanie - - - - - - - Wirowanie - - - - - - - Wypompowanie - - - - - - - Mieszane 3 3 3 3 3 30° 50° EcoMix 20° 5 5.5 6 6.
Dodanie zbyt dużej ilości środka piorącego może spowodować nadmierne pienienie. Jeśli pralka wykryje nadmierne pienienie może pominąć wirowanie lub wydłużyć program i zwiększyć pobór wody. ** STANDARDOWE PROGRAMY DO PRANIA BAWEŁNY ZGODNIE Z ROZPORZĄDZENIAMI KOMISJI (UE) nr 1015/2010 i 1061/2010. ( ) Tylko kiedy włączona jest opcja PRANIA WSTĘPNEGO (dotyczy tylko programów z dostępną opcją PRANIA WSTĘPNEGO).
Pralka posiada specjalne programy umożliwiające pranie rożnych rodzajów tkanin przy różnych stopniach zabrudzenia (patrz tabela). Płukanie Program trzech płukań przy średniej prędkości wirowania (odpowiednim przyciskiem płukanie można wyłączyć lub zmniejszyć jego prędkość). Program do płukania wszelkiego rodzaju tkanin, na przykład po praniu ręcznym. Białe + Pre Program do prania tkanin białych. Ostatnie wirowanie jest przeprowadzane przy maksymalnej prędkości.
Otwieranie/Zamykanie bębna l Otworzyć pralkę. l Otworzyć bęben naciskając przycisk (A) i jednocześnie umieszczając drugą rękę na pokrywie. Ważne l Wkładać odzież do bębna pojedyńczo, nie l Nie stosować środka piorącego w płynie wciskając. Przestrzegać ładunków zalecanych w “Tabeli programów”. Przeładowanie pralki spowoduje, ż e wyniki prania będą gorsze, a tkaniny bardziej pogniecione. w programach z praniem wstępnym i/lub w przypadku programowania czasu startu.
7. CENTRUM SERWISU TECHNICZNEGO I GWARANCJA W przypadku podejrzenia, że pralka nie działa poprawnie przeczytać poniższy krótki przewodnik zawierający kilka praktycznych sugestii, mających na celu pomóc w rozwiązaniu najczęstszych awarii. Problem Możliwe przyczyny i praktyczne rozwiązania Pralka nie działa / nie rozpoczyna pracy Sprawdzić, czy wtyk został poprawnie umieszczony w kontakcie. Upewnić się, że nie brakuje zasilania.
Gwarancja Urządzenie posiada gwarancję na warunkach i w granicach określonych w karcie gwarancyjnej, dostarczonej wraz z produktem. Karta gwarancyjna powinna być przechowywana i odpowiednio wypełniona, aby móc ją w razie potrzeby przedstawić w autoryzowanym Centrum Serwisu Technicznego Candy. - woda z płukania może być bardziej mętna: jest to wynik obecności zawiesiny zeolitów, która nie powoduje negatywnych efektów dla skuteczności płukania.
Σας ευχαριστούµε που επιλέξατε ένα πλυντήριο Candy, είµαστε σίγουροι ότι τώρα έχετε ένα πολύτιµο συνεργάτη που θα σας επιτρέπει να πλένετε χωρίς άγχος τη καθηµερινή µπουγάδα ακόµα και τον πιο ευαίσθητο ρουχισµό. Καταχωρείστε την συσκευή σας στο www.registercandy.com ώστε να έχετε γρήγορη πρόσβαση στις συµπληρωµατικές παροχές που αφορούν µόνο στους πιο πιστούς πελάτες.
l Η συσκευή αυτή προορίζεται αποκλειστικά για οικιακή και παρεµφερείς µε την οικιακή χρήσεις όπως: − Χώρους φαγητού καταστηµάτων, γραφείων και άλλων χώρων εργασίας; − Εξοχικές & αγροτικές κατοικίες; − Από τους πελάτες ξενοδοχείων, µοτέλ και παρεµφερών χώρων; − Από τους πελάτες των bed & breakfast. Χρήση διαφορετική από την κλασική οικιακή χρήση ,όπως επαγγελµατική χρήση από ειδήµονες ή επαγγελµατίες, δεν ενδείκνυται έστω και αν γίνεται στους προαναφερθέντες χώρους.
επιλογέα ή στον π ίνακα οργάνων l Μην τραβάτε το καλώδιο ή την είναι κάθετα. Σε κάθε άλλη ίδια τη συσκευή για να αποσυνδέσετε την πρίζα από την περίπτωση η συσκευή βρίσκεται σε λειτουργία (µόνο για µοντέλα µε παροχή ρεύµατος. επιλογέας προγράµµατος). l Μην αφήνετε το πλυντήριο εκτεθειµένο l Φροντίστε ώστε η πρόσβαση στο στην βροχή , τον ήλιο ή σε άλλους σηµείο σύνδεσης της συσκευής µε ατµοσφαιρικούς παράγοντες.
2. ΕΓΚΑΤΑΣΤΑΣΗ 1 EL 3 l Αφαιρήστε τις 4 βίδες "A" των δύο ορθογωνίων και τις 4 βίδες "B" (εικόνα 1). 4 2 l Επανατοποθετήστε τις 4 βίδες "A" και τα καπάκια που εφοδιάζονται "C" (εικόνα 2).
διάµετρο τουλάχιστον µεγαλύτερο από το σώληνα του πλυντηρίου, σε ύψο κατ’ ελάχιστο 50 cm. και 75 cm. κατά µέγιστο από το πάτω µα (εικόνα 4). l Σε αναγκαία περίπτωση, χρησιµοποιήστε το ειδικό εξάρτηµα κυρτωµένο σε µορφή U για καλύτερα στερέωση και στήριγµα του σωλήνα αποχέτευσης. 5 l Για τη σύνδεση του πλυντηρίου µε τη γραµµή νερού ρέπει να χρησιµοιοιείτε εναν καινούργιο σωλήνα, που εφοδιάζεται µαζί µε τη συσκευή (στο εσωτερικό του τυµπάνου). Μη χρησιµοποιείται προς το σκοπό αυτό τον σωλήνα παλιό.
Σύνδεση µε το δίκτυο νερού 6 l Συνδέστε τη σωλήνα νερού (αποκλειστικά εκείνη που συνοδεύει τη συσκευή ) µε την βρύση (εικ. 6). ΜΗΝ ΔΟΚΙΜΑΣΕΤΕ ΝΑ ΑΝΟΙΞΕΤΕ ΤΗ ΒΡΥΣΗ. l Ανάλογα µε το µοντέλο η συσκευή µπορεί l HOT&COLD (εικ. 7): πρόβλεψη για σύνδεση τόσο µε το δίκτυο ζεστού όσο και µε το δίκτυο κρύου νερού για µεγαλύτερη εξοικονόµηση ενέργειας. Συνδέστε τη γκρι σωλήνα στη βρύση του κρύου νερού και την κόκκινη σωλήνα στην βρύση του ζεστού νερού.
3.
l Αποσυνδέστε την σωλήνα αποχέτευσης από 4. ΚΑΘΑΡΙΣΜΟΣ ΚΑΙ ΣΥΝΤΗΡΗΣΗ ΡΟΥΤΙΝΑΣ την ταινία στήριξης και κατεβάστε προς το δάπεδο τη σωλήνα προκειµένου να αδειάσετε το νερό σε µια λεκάνη. l Στερεώστε τη σωλήνα αποχέτευσης στη θέση της. Για το καθαρισµό της εξωτερικής επιφάνειας του πλυντηρίου, αποφεύγετε τη χρήση λειαντικών ουσιών,αλκοόλης και η διαλυτικών, καθαρίζετε τις επιφάνειες µε ένα υγρό µαλακό ύφασµα.
5. ΓΡΗΓΟΡΟΣ ΟΔΗΓΟΣ ΧΡΗΣΗΣ 6. ΧΕΙΡΙΣΤΗΡΙΑ ΚΑΙ ΠΡΟΓΡΑΜΜΑΤΑ Το πλυντήριο αυτό προσαρµόζει αυτόµατα την στάθµη νερού στο είδος και την ποσότητα του ρουχισµού που πρόκειται να πλυθεί. Με αυτό το σύστηµα µειώνεται αισθητά τόσο η κατανάλωση όσο και η διάρκεια του κύκλου. A Επιλογή προγράµµατος l Ενεργοποιείστε το πλυντήριο και επιλέξτε το πρόγραµµα που θέλετε. E l Ρυθµίστε ανάλογα µε τις ανάγκες σας την θερµοκρασία πλύσης και πιέστε τα πλήκτρα των πρόσθετων λειτουργιών που θέλετε .
Ο επιλογέας προγράµµατος πρέπει να επαναφέρεται στη θέση OFF στο τέλος του κύκλου ή πριν να επιλέξετε το επόµενο κύκλο (διαδοχικές πλύσεις). ΠΡΟΣΟΧΗ: Μην ακουµπάτε την οθόνη ενόσω συνδέετε τη συσκευή στην παροχή, γιατί η συσκευή ρυθµίζει το σύστηµα κατά την διάρκεια των πρώτων δευτερόλεπτων: ακουµπώντας την οθόνη η συσκευή δεν µπορεί να λειτουργήσει σωστά. Σε αυτή την περίπτωση, αποσυνδέστε τη συσκευή από την παροχή και επαναλάβετε την διαδικασία.
l Για την ολική ακύρωση του στυψίµατος, Η ενεργοποίηση των πλήκτρων λειτουργιών πρέπει να γίνει πριν πιέσετε το πλήκτρο ΕΝΑΡΞΗΣ/ΔΙΑΚΟΠΗΣ. Εάν επιλέξετε κάποια λειτουργία που δεν είναι συµβατή µε το πρόγραµµα η αντίστοιχη λυχνία θα αναβοσβήσει και µετά θα σβήσει . αρκεί να βάλετε σε το ψηφίο που υποδεικνύει την ταχύτητα. l Μπορείτε να επιλέξετε την επιθυµητή ταχύτητα σε οποιαδήποτε στιγµή του προγράµµατος.
Πλήκτρο ΚΡΥΑΣ ΠΛΥΣΗΣ l Πιέζοντας αυτό το πλήκτρο µπορούν να εκτελεστούν όλοι οι κύκλοι πλυσίµατος χωρίς να πραγµατοποιήσουν το ζέσταµα του νερού ενώ παραµένουν χωρίς αλλαγές όλα τα άλλα χαρακτηριστικά (στάθµη νερού, χρόνοι, ρυθµοί πλύσης, κτλ.). l Τα EL προγράµµατα κρύας πλύσης συνιστούνται για την πλύση όλων εκείνων των ρούχων των οποίων τα χρώµατα δεν είναι ανθεκτικά αλλά και για την πλύση κουρτινών, κουβερλί, ιδιαιτέρως ευαίσθητων συνθετικών ινών, µικρών χαλιών ή πολύ βρόµικων υφασµάτων.
Πίνακας προγραµµάτων Θερµ.°C kg * (MAX.) ΠΡΟΓΡΑΜΜΑ Συνιστώµενη Max. Λευκά + Pre 1) 5 5.5 6 6.5 7 60° 90° Βαµβακερά ** 1) 5 5.5 6 6.5 7 30° 60° Μάλλινα 1 1 1 1 1 30° 30° Πλύσιµο στο χέρι 1 1 1 1 1 40° 40° Ξέβγαλµα - - - - - - - Στύψιµο - - - - - - - Άδειασµα νερού - - - - - - - 3 3 3 3 3 30° 50° EcoMix 20° 5 5.5 6 6.
** ΤΥΠΙΚΑ ΠΡΟΓΡΑΜΜΑΤΑ ΓΙΑ ΒΑΜΒΑΚΕΡΑ ΣΥΜΦΩΝΑ ΜΕ ΤΗΝ ΟΔΗΓΙΑ (EU) No 1015/2010 και No 1061/2010. Υπέρµετρη ποσότητα απορρυπαντικού µπορεί να δη µιουργήσει πολύ αφρό. Εάν η συσκευή καταγράψει την παρουσία µεγάλης ποσότητας αφρού µπορεί να ακυρώσει τη φάση στυψίµατος ή να επιµηκύνει την διάρκεια του προγράµµατος και να αυξήσει την κατανάλωση του νερού. ΠΡΟΓΡΑΜΜΑ ΓΙΑ ΒΑΜΒΑΚΕΡΑ ΣΤΟΥΣ 60°C. ΠΡΟΓΡΑΜΜΑ ΓΙΑ ΒΑΜΒΑΚΕΡΑ ΣΤΟΥΣ 40°C.
Επιλογή προγράµµατος Η συσκευή διαθέτει µια σειρά από ξεχωριστά προγράµµατα για το πλύσιµο ρουχισµού µε διαφορετική ένταση βρωµιάς προκειµένου να ανταποκριθεί σε όλες τις ανάγκες καθαρισµού (βλέπε πίνακα). Λευκά + Pre Σχεδιασµένο για πεντακάθαρο ρουχισµό. Το τελικό στύψιµο γίνεται στην µέγιστη ταχύτητα εξασφαλίζει αποτελεσµατική αποµάκρυνση του νερού.
Ο διανοµέας απορρυπαντικού έχει δύο ενδεικτικές γραµµές: l Συνιστώµενο (κάτω γραµµή). Δείχνει το συνιστώµενο επίπεδο για τις. θήκες πρόπλυσης και πλύσης. l Μεγ. Δείχνει το µέγιστο επίπεδο που δεν πρέπει να ξεπεραστεί. Προετοιµασία πλύσης Άνοιγµα/Κλείσιµο του τυµπάνου l Άνοιξτε την πόρτα του πλυντηρίου. l Για ν ’ ανοίξτε τον κάδο στηριχτείτε πάνω στο κουµπί (A), και τοποθετήστε ταυτόχρονα το άλλο χέρι πάνω στο καπάκι.
7. ΚΕΝΤΡΟ ΤΕΧΝΙΚΗΣ ΥΠΟΣΤΗΡΙΞΗΣ ΚΑΙ ΕΓΓΥΗΣΗΣ Στην περίπτωση που πιστεύετε ότι το πλυντήριο δεν λειτουργεί σωστά,συµβουλευθείτε το µικρό οδηγό που ακολουθεί. Ο οδηγός αυτός περιέχει κάποιες οδηγίες για να επιλύσετε τις πιο κοινές βλάβες. Πρόβληµα Το πλυντήριο δεν λειτουργεί / δεν ενεργοποιείται. Το πλυντήριο δεν τραβάει νερό. Το πλυντήριο δεν αποστραγγίζει το νερό. Διαρροή νερού στο δάπεδο κοντά στο πλυντήριο. Το πλυντήριο δεν στύβει. Κατά την διάρκεια του στυψίματος ακούτε κραδασμούς.
Η χρήση οικολογικών απορρυπαντικών χωρίς άλατα του φωσφόρου µπορεί να εµφανίσει τα εξής επακόλουθα: - το νερό που αποχετεύεται να είναι πιο θολό: αυτό οφείλεται στην ύπαρξη αιωρούµενων σωµατιδίων ζεόλιθων µε αρνητικά αποτελέσµατα στην ποιότητα του ξεβγάλµατος. - παρουσία άσπρης σκόνης (ζεόλιθοι, στο τέλος του κύκλου επάνω στα ρούχα: είναι φυσιολογικό ,η σκόνη δεν διεισδύει στις ίνες και δεν επηρεάζει το χρώµα τους.
Vă mulțumim că ați ales o mașină de spălat Candy! Suntem siguri că vă va ajuta să spălați în siguranță rufele, chiar ș i pe cele delicate, zi de zi. Reciclarea produsului Acest aparat este marcat în conformitate cu Directiva europeană 2012/19/UE cu privire la deşeurile de echipamente electrice şi electronice (DEEE). DEEE conţin atât substanţe poluante (care pot avea consecinţe negative asupra mediului) cât şi componente de bază (care pot fi reutilizate).
l Acest aparat electrocasnic este destinat utilizării în gospodării individuale sau în spații similare, cum ar fi: − Spațiile de bucătărie pentru angajați din magazine, birouri sau alte medii de lucru; − Ferme; − În hoteluri, moteluri sau zone rezidențiale; − În spații care oferă cazare și mic dejun.
l Mașina este pe poziția OPRIT când l Nu trageți direct de cablul de butonul pentru setarea programului alimentare pentru a îl deconecta este pe poziția vertical. Orice altă din priză, trageți de ștecher. poziție a butonului presupune funcționarea mașinii (numai pentru l Nu expuneți mașina de spălat în ploaie, lumina directă a modelele cu buton programator). soarelui sau alte intemperii.
2. INSTALARE 1 RO 3 4 l Îndepărtați cele 4 ș uruburi ”A” de pe ambele bare de prindere și cele 4 șuruburi ”B” (fig. 1). 2 l Înlocuiți cele 4 șuruburi ”A” cu capacele ”C” furnizate (fig. 2).
la o înălțime de minim 50cm și maxim 75cm față de pardoseală (fig. 4). 5 l Dacă este nevoie, utilizați accesoriul curbat pentru a atașa și a fixa furtunul de evacuare. Dacă modelul este prevăzut cu această funcție: l Pentru a deplasa mașina de spălat cu ușurință, rotiți mânerul către dreapta. După ce ați deplasat mașina, rotiți mânerul în poziția originală.
Conexiunea la rețeaua alimentare cu apă de 6 l Conectați furtunul pentru alimentare cu apă la robinet. Folosiți doar furtunul furnizat împreună cu mașina de spălat. (fig. 6). NU DESCHIDEȚI ROBINETUL. l Anumite modele au și una sau mai multe dintre următoarele funcții: la rețeaua de apă caldă sau rece pentru un consum redus de energie. Conectați furtunul gri la robinetul de apă rece și pe cel roșu la robinetul de apă caldă.
Avem nevoie de apă caldă? 3.
l Scoateți mașina de spălat din priză. l Desfaceți furtunul de pe dispozitivul de 4. ÎNGRIJIRE ȘI CURĂȚARE Pentru a curăța exteriorul mașinii de spălat, folosiți o cârpă umedă, evitând folosirea soluțiilor abrazive, alcoolul ș i/sau solvenții.
5. GHID DE UTILIZARE RAPIDĂ 6. REGLAJE ȘI PROGRAME Mașina de spălat poate seta automat cantitatea de apă necesară în funcție de tipul și cantitatea de rufe. Acest sistem permite reducerea consumului de energie și a timpului de spălare. A Selectarea programului E l Porniți mașina de spălat și selectați programul de spălare dorit. l Ajustați temperatura apei dacă este necesar și apăsați butonul "opțiuni". B C D F l Apăsați butonul START/PAUZĂ pentru a începe rularea programului de spălare.
Butonul pentru selectarea programului trebuie readus în poziţia OPRIT la finalul fiecărui program sau dacă doriţi să activaţi un alt program înaintea programului următor selectat şi activat. ATENȚIE: Nu atingeţi afişajul în timp ce introduceţi rufele, deoarece maşina calibrează sistemul în primele secunde: dacă apăsaţi afişajul, maşina nu va funcţiona corect. În astfel de situaţii, scoateţi ş techerul cablului de alimentare din priză ş i repetaţi operaţiunea.
l Puteți selecta viteza dorită în orice Butoanele pentru opţiuni trebuie apăsate înainte de a apăsa butonul START/PAUZĂ. Dacă este selectată o opţiune care nu este compatibilă cu programul selectat, atunci indicatorul corespunzător opţiunii va clipi şi apoi se va stinge. moment în timpul programului.
Tabel cu programe Recom. Max. Ţesături albe + Pre 1) 5 5.5 6 6.5 7 60° 90° Bumbac ** 1) 5 5.5 6 6.5 7 30° 60° Ţesături lână 1 1 1 1 1 30° 30° Manual 1 1 1 1 1 40° 40° Clătire - - - - - - - Centrifugare - - - - - - - Evacuare - - - - - - - 3 3 3 3 3 30° 50° EcoMix 20° 5 5.5 6 6.5 7 20° 20° Rapid 44 Min 3 3 3 3 3 30° 40° Rapid 30 Min 2 2 2 2 2 30° 30° Ţesături mixte 1) 67 DETERGENT II I ( ) RO TEMP.°C kg * (MAX.
Vă rugăm să citiţi aceste informaţii: * Capacitatea maximă de încărcare pentru rufe uscate depinde de modelul utilizat (vezi panoul de control). ** PROGRAME STANDARD PENTRU BUMBAC ÎN CONFORMITATE CU (EU) Nr. 1015/2010 şi nr. 1061/2010 PROGRAM PENTRU BUMBAC CU TEMPERATURA DE SPĂLARE DE 60°C. PROGRAM PENTRU BUMBAC CU TEMPERATURA DE SPĂLARE DE 40°C.
Evacuare + Centrifugare Acest program realizează evacuarea apei şi efectuează centrifugare la viteză maximă. Se poate renunţa la centrifugare sau se poate reduce viteza acesteia prin apăsarea butonului SELECTARE VITEZĂ CENTRIFUGARE. Selectarea programelor Maşina de spălat este prevăzută programe speciale care să vă permită curăţarea diverselor tipuri de ţesături, cu grade diferite de murdărire (vezi tabelul). Ţesături albe + Pre Program realizat pentru o spălare perfectă.
Pregătirea pentru spălare Dozatorul pentru detergent marcaje de referință: Deschiderea / închiderea cuvei l Deschideți capacul mașinii de spălat. l Recomandat (marcajul de jos). Acesta l Introduceți rufele în cuvă una câte una, fără a le înghesui. Nu depășiți limita maximă recomandată în tabelul cu programe. O mașină supraîncărcată nu va spăla corespunzător și va lăsa rufele șifonate.
7. CENTRUL DE RELAȚII CU CLIENȚII ȘI GARANȚIE Problemă Cauze posibile și soluții practice Mașina de spălat nu pornește/ nu funcționează Verificați dacă este corect conectată la priza de alimentare. Verificați dacă este pornită. Verificați dacă a fost corect selectat programul de spălare și dacă mașina a fost pornită corect. Verificați dacă nu a sărit siguranța din tabloul electric și că priza la care este conectată mașina funcționează, testând cu un alt aparat electric, de exemplu cu o lampă.
Folosirea detergenților ecologici fără fosfat poate cauza următoarele: Garanție Produsul este garantat în conformitate cu termenii și condițiile stipulate în certificatul furnizat împreună cu produsul. Certificatul de garanție trebuie să fie completat în mod corespunzător ș i păstrat, pentru a fi prezentat la Centrul Autorizat de Service Candy, în caz de nevoie. - Apa de clătire evacuată este tulbure: acest efect este legat de zeoliții în suspensie care nu au efecte negative asupra eficienței clătirii.
Köszönjük, hogy Candy mosógépet vásárolt. Biztosak vagyunk abban, hogy megbízhatóan segíti majd Önt a mindennapi mosás során, még a kényes ruhadarabok esetében is. Termékét a www.registercandy.com címen regisztrálhatja, hogy gyorsabban hozzáférhessen a kizárólag a leghűségesebb ügyfeleink részére fenntartott kiegészítő szolgáltatásokhoz. A készülék helyes és biztonságos használata, valamint az eredményes karbantartásra vonatkozó ötletek megismerése érdekében olvassa el figyelmesen ezt a kézikönyvet.
1. ÁLTALÁNOS BIZTONSÁGI SZABÁLYOK l A készüléket háztartásokban és hasonló környezetekben történő használatra terveztük, például: − üzletek, irodák és más munkakörnyezetek személyzeti konyháiban; − tanyaházakban; − szállodák, motelek és más lakókörnyezetek ügyfelei által; − „szoba reggelivel” típusú környezetekben.
l A telepítés után a készüléket úgy l Hiba és/vagy hibás működés kell beállítani, hogy a csatlakozódugó esetén kapcsolja ki a mosógépet, hozzáférhető legyen. zárja el a vízcsapot, és ne fogjon hozzá a készülék szakszerűtlen l A maximális száraz ruhaadag javításához. Vegye fel azonnal a az alkalmazott típustól függ kapcsolatot az Ügyfélszolgálattal, (lásd a kapcsolólapot). és kizárólag eredeti tartalék l A termék-adatlap a gyártó alkatrészeket használjon. weboldalán tekinthető meg.
2. TELEPÍTÉS 1 3 l Csavarja ki mindkét pántból a 4 „A” csavart és a 4 „B” csavart (1 ábrán). 4 2 l Helyezze vissza a 4 „A” csavart és tegye fel a mellékelt „C” takarókat. (2 ábrán).
l A mosógépet a készülékhez (a dob belsejében) mellékelt új csővel kell a vízelosztó rendszerhez csatlakoztatni. Ne használjon régi csövet erre a célra. l A vízbemeneti cső egyik (bevezető) végét csatlakoztassa az elektronikus szelephez (a gép hátsó részének felső részén), a cső másik végét pedig egy csaphoz vagy vízcsatlakozóhoz, 3/4" gáz csavarmenetes szájjal. l A mosógépet helyezze közel a falhoz ügyelve arra, hogy a cső ne csavarodjon vagy törjön meg.
A vízellátás csatlakoztatása 6 l Csatlakoztassa a vízcsövet a csapra, és kizárólag a mosógéppel együtt szállított elvezető csövet használja (6 ábra). NE NYISSA KI A VÍZCSAPOT. l Bizonyos típusok az alábbi egy vagy több funkcióval rendelkezhetnek:: l HOT&COLD (7 ábra): A nagyobb energiatakarékosság érdekében a vízhálózati csatlakoztatás meleg vagy hideg vízre állítható be. A szürke csövet a hideg vizes csapra , a piros csövet pedig a meleg vizes csapra kell csatlakoztatni.
Van-e szükség forró mosásra? 3. GYAKORLATI TANÁCSOK l A forró vizes program használatának elkerülése érdekében kezelje a foltokat folttisztítóval vagy áztassa be a rászáradt foltokat tartalmazó ruhákat a mosás előtt. A 60°C-os mosóprogram használatával 50% energia takarítható meg. Betöltési tanácsok FIGYELMEZTETÉS: A ruhák szétválogatásakor ügyeljen a következőkre: Az alábbi rövid útmutató ötleteket és javaslatokat tartalmaz a mosószer különböző hőmérsékleti értékeken történő használatához.
l Ezt követően rögzítse az elvezető csövet 4. KARBANTARTÁS ÉS TISZTÍTÁS a szíjjal. A mosógép külső részének tisztításához használjon nedves ruhát, és kerülje a dörzsölő hatású szerek, az alkohol és/vagy a hígítószerek használatát. A szokásos tisztítás tekintetében a mosógép nem igényel különleges gondozást: tisztítsa ki a fiók rekeszeit és a szűrőt. A mosógép mozgatásával és a hosszabb ideig tartó üzemszünettel kapcsolatban az alábbiakban adunk néhány ötletet.
5. RÖVID FELHASZNÁLÓI ÚTMUTATÓ 6. KAPCSOLÓK ÉS PROGRAMOK A mosógép automatikusan hozzáigazítja a vízszintet a szennyes ruha típusához és mennyiségéhez. Ez a rendszer csökkenti az energiafogyasztást, és érezhetően lerövidíti a mosási időt is. A Programválasztás l Kapcsolja be a mosógépet és válassza ki a kívánt programot. E l Szükség esetén állítsa be a mosási hőmérsékletet, és nyomja le a kívánt „opció” gombot.
A programválasztó gombot vissza kell állítani a KI helyzetbe minden egyes ciklus végén, vagy egy új mosási ciklus beindításakor a következő program kiválasztása és beindítása előtt. FIGYELMEZTETÉS: A csatlakozódugó behelyezésekor ne érintse meg a kijelzőt, mert az első másodpercekben a rendszerek beállítását végzi a gép: a kijelző megérintése esetén a gép nem képes megfelelően működni. Ebben az esetben húzza ki a csatlakozódugót, és ismételje meg a műveletet.
l Ahhoz, hogy a centrifugálás funkci ót Az opciógombokat a START/SZÜNET gomb lenyomása előtt kell kiválasztani. Ha olyan opciót választ, amely nem egyeztethető össze a kiválasztott programmal, akkor az opciójelző lámpa először villog, majd pedig kialszik teljesen kikapcsolja, tartsa benyomva a gombot, amíg a három sebesség kijelző ki nem alszik. l A program bármely fázisában ki tudja választani a kívánt sebességet.
HIDEG MOSÁS gomb l Ha megnyomja ezt a gombot, akkor minden mosási ciklusra a víz melegítése nélkül kerül sor, de a többi jellemző (vízszint, mosási idők, mosási ritmusok, stb.) nem változik. l A hideg vizes mosási programok nem színtartó ruhanem űk mosásához, valamint függönyök, ágytakarók, különösen kényes szintetikus anyagok, kisméret ű sz őnyegek vagy kevéssé piszkos anyagok mosásához javasoltak.
Programtáblázat HŐMÉRSÉKLET MOSÓSZER °C PROGRAM Ajánlott Max. Fehér + Pre 1) 5 5.5 6 6.5 7 60° 90° Pamut ** 1) 5 5.5 6 6.5 7 30° 60° Gyapjú 1 1 1 1 1 30° 30° Kézi 1 1 1 1 1 40° 40° Öblítés - - - - - - - Centrifugálás - - - - - - - Vízürítés - - - - - - - 3 3 3 3 3 30° 50° EcoMix 20° 5 5.5 6 6.5 7 20° 20° Gyors, 44 perces 3 3 3 3 3 30° 40° Gyors, 30 perces 2 2 2 2 2 30° 30° Vegyes 1) 85 II I ( ) HU kg * (max.
Kérjük, olvassa el az alábbi megjegyzéseket: * A maximális száraz ruhaadag alkalmazott típustól függ (lásd kapcsolólapot). az a ** SZABVÁNYOS PAMUTMOSÓ PROGRAMOK AZ 1015/2010/EU ÉS AZ 1061/2010/EU IRÁNYELVNEK MEGFELELŐEN PAMUTMOSÓ PROGRAM 60°C HŐMÉRSÉKLETEN. PAMUTMOSÓ PROGRAM 40°C HŐMÉRSÉKLETEN. Ezek a programok az átlagosan szennyezett pamutruhák tisztítására alkalmasak, és a pamutanyagok mosása terén a leghatékonyabb programoknak tekinthetők a kombinált energia- és vízfogyasztás tekintetében.
Vízürítés + Centrifugálás A program leüríti a vizet és maximális fordulatszámú centrifugálást végez. A CENTRIFUGA VÁLASZTÁS gombbal kiiktatható a centrifugálás vagy csökkenthető a centrifugálási sebesség. Programválasztás A mindennapi mosás elősegítése érdekében a mosógép speciális programokkal rendelkezik a különböző típusú anyagok tisztításához és a különböző mértékű szennyeződések eltávolításához (lásd a táblázatot). Fehér + Pre Tökéletes mosást biztosít.
A mosás előkészítése A dob nyitása/zárása l Nyissa ki a mosógép ajtaját. l A dobot az (A) gomb lenyomásával nyitjuk ki, miközben a másik kezünket a fedélre helyezzük. l A ruhadarabokat egyenként helyezze be a dobba anélkül, hogy összenyomná azokat. Ne lépje túl a “programtáblázatban” ajánlott tölteteket. Ha a mosógépet túltölti, az eredmény kevésbé kielégítő és a ruha összegyűrődik.
7. ÜGYFÉLSZOLGÁLAT ÉS GARANCIA Probléma Lehetséges okok és gyakorlati megoldások A mosógép nem működik/nem indul be Ellenőrizze, hogy be van-e dugaszolva a hálózati csatlakozódugó. Ellenőrizze, hogy be van-e kapcsolva a mosógép. Ellenőrizze, hogy megfelelően választotta-e ki a kívánt programot, és megfelelően indította-e be a gépet. Ellenőrizze, hogy nem égett-e ki a biztosíték, és működik-e a fali csatlakozóaljzat; ellenőrizze egy másik készülékkel, például egy lámpával.
A foszfátot nem tartalmazó, környezetbarát mosószerek használata az alábbi hatásokkal járhat: Garancia A termékre a mellékelt garanciajegyen található kikötésekkel és feltételekkel terjed ki a garancia. A garanciajegyet megfelelő módon ki kell tölteni és meg kell őrizni, hogy szükség esetén bemutathassa a Candy hivatalos Szervizközpontjának. - zavarosabb öblítővíz: ez a hatás a szuszpenzióban jelenlévő zeolitoknak tulajdonítható, amelyek nincsenek kedvezőtlen hatással az öblítés hatékonyságára.
fkhldsk
- #MODEL_DESC# - 15.