Washer Dryer GO 4 W Instructions for use
Introduction Contents Please read these instructions for use carefully and all other information enclosed with the washing machine. Keep all documentation in a safe place for future reference or for any future owners.
General delivery notes On delivery check that there is the following with the appliance: – Instruction manual – Certificate of guarantee – Caps – Inlet hose and check that no damage has occurred during transit, and if so, call your nearest Authorised Technical Support Service agent (see Customer Service) M) N.B! If the appliance is installed on a carpeted floor ensure that the ventilation holes on the base of the appliance are not obstructed.
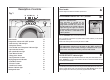
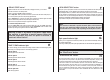
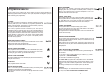
Description of controls Door handle Press the finger-bar inside the door handle to open the door. A Fig. 1 D C EM G Q F PROGRAMME selector with "OFF" position R H I L N O P B A B Rotates in both directions. The machine is turned on by selecting a programme via the programme selector. This status will be indicated by the "STOP" indicator light flashing, this light will continue to flash until the machine has started or the machine is returned to the "OFF" position.
D “DELAY START button” Appliance start time can be set with this button, delaying the start by 3, 6 or 9 hours. Proceed as follows to set a delayed start: Select a programme (“STOP” indicator light blinks) Press "Delay Start" button (each time the button is pressed the start will be delayed by 3, 6 or 9 hours respectively and the corresponding light will blink).
I “ALLERGY CARE” button By pressing this button you can activate a special new wash cycle in the Cotton and Mixed Fabrics programs, thanks to the new Sensor System. This option treats with care the fibres of garments and the delicate skin of those who wear them. The load is washed in a much larger quantity of water and this, together with the new combined action of the drum rotation cycles, where water is filled and emptied, will give you garments which have been cleaned and rinsed to perfection.
P START/PAUSE button When a programme is selecting, wait for the “STOP” indicator light to flash before pressing the "Start/Pause" button. Press to start the selected cycle (according to the selected cycle one indicator lights will go on) . NOTE: When the "Start/Pause" button has been pressed, the appliance can take few seconds before it starts working.
TABLE OF PROGRAMMES PROGRAMME SELECTOR ON: PROGRAM FOR: WEIGHT MAX kg TEMP.
Programme selector For the various types of fabrics and various degrees of dirt the washing machine has different programme bands according to: wash cycle, temperature and lenght of cycle (see table of washing cycle programmes). COTTONS The Cotton programme is designed for maximum washing and rinsing efficiency. With spin cycles in between, the programme guarantees the laundry is rinsed perfectly. The final spin cycle ensures laundry is spun dry as much as possible up to the maximum speed.
DRYING Note: Dispensers used for concentrated powders and liquid detergents must be removed from the drum before commencing the tumble drying programmes. The drum changes direction during the drying cycle to prevent the laundry from tangling and hence produce even drying. Cool air is used during the last ten minutes of the drying cycle to minimise creasing. LOW HEAT Low temperature drying programme for synthetics and mixed fibres, always refer to the care label.
Dosages Detergents, washing aids and amounts to use Choice of detergent General purpose detergents - - Powder detergents, for a thorough wash, with bleaching agent, particularly suitable for use in hot wash programmes (60°C and over), for heavily soiled and stained laundry. Liquid detergents, particularly suitable for grease stains, such as greasy skin marks, cosmetics and oil. These detergents are not suitable for washing stained laundry, as they do not contain bleach.
Useful advice for users Tips on using your domestic appliance in the most environmentally-friendly and economical way Do a full load in your washing machine Main wash Sorting the laundry - It is recommended you wash only items which are machine washable with water and detergent and not dry-clean items. - If you need to wash rugs, bedspreads or other heavy items, it is best not to spin them.
The correct way to wash DRYING Preparing the laundry A) Select the laundry. DON’T DRY GARMENTS MADE FROM FOAM RUBBER OR FLAMMABLE MATERIALS. Loading the laundry B) Open the porthole. C) Put the laundry in the washing machine. Close the porthole again, ensuring that no items of laundry are obstructing the lock. Putting detergent in machine D) Open the drawer, choose the detergent and put in the correct amount, according to the manufacturer’s instructions and the advice on page 20.
Automatic washing/drying Warning: only a maximum 4 kg of dry laundry can be loaded otherwise the dried laundry will be not satisfactory. WASHING: Open the drawer, choose the detergent and put in the correct amount. Refer to the list of washing programmes according to fabrics to be washed (e.g. very dirty cotton) and without pressing Start button, prepare wash as described: Turning the selector knob, the required programme is activated. Wait for the “STOP” indicator light to flash.
Table of drying times (in minutes): PROGRAMME COTTON MIXED Min 1 Kg Max 4 Kg Min 1 Kg Max 3 Kg from 30’ from 30’ from 30’ to 230’ to 220’ to 170’ from 30’ from 30’ from 30’ to 170’ to 150’ to 80’ Cleaning and routine maintenance Do not use alcohol-based scourers and / or thinners on the outside of your washing machine, just a wipe with a damp cloth will suffice. The washing machine needs very little maintenance: - Cleaning the drawer compartments. - Cleaning the filter. - Cleaning the door glass.
Attention: if the filter needs cleaning while there is washing still in the drum, follow the instructions on the following page to empty the water. This will prevent excessive loss of water via the filter. Cleaning the door glass Investigating malfunctions What might be the cause of… Defects you can remedy yourself MALFUNCTION CAUSE Regularly clean the door glass with a damp cloth. A build up of soiling and residues from the water may result in water leaking from the door.
Note: The use of environmentally-friendly, phosphate-free detergents can have the following effects: - waste water from rinsing may be cloudier because of the presence of zeolites held in suspension, without the rinse performance being adversely affected; - presence of white powder (zeolites) on laundry after washing, which is not absorbed by the fabric and does not alter the colour of the fabric. - The presence of foam in the final rinsing water is not necessarily an indication of poor rinsing.
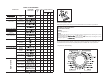
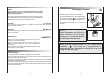
SETTING UP + INSTALLATION 1 Remove the polystyrene base and place the machine near its permanent position (diagram 1). Carefully cut through the hose retaining clip at the rear of the appliance (diagram 2). Remove the 3 fixing screws marked (A) and remove the 3 spacers marked (B) (diagram 3). 2 Remove the screw (C). A spacer will fall inside the machine. By tilting the machine, remove the above mentioned spacer. Cover the 4 holes using the caps provided in the instruction booklet pack (diagram 4).
Note: it is advisable to turn off the tap after each wash to isolate the washing machine from the water supply. The appliance must not be installed behind a lockable door, a sliding door or a door with a hinge on the opposite side to that of the washer dryer. For the washing machine to function properly the terminal end of the discharge hose (mouth) must be at a minimum of 50 cm and a maximum of 85 cm from the ground.
The manufacturer declines all responsibility in the event of any printing mistakes in this booklet. The manufacturer also reserves the right to make appropriate modifications to its products without changing the essential characteristics.
This appliance is marked according to the European directive 2002/96/EC on Waste Electrical and Electronic Equipment (WEEE). By ensuring this product is disposed of correctly, you will help prevent potential negative consequences for the environment and human health, which could otherwise be caused by inappropriate waste handling of this product. The symbol on the product indicates that this product may not be treated as household waste.