EN
EN Thank you for purchasing a Haier Product. Please read these instructions carefully before using this appliance. The instructions contain important information which will help you get the best out of the appliance and ensure safe and proper installation, use and maintenance. Keep this manual in a convenient place so you can always refer to it for the safe and proper use of the appliance.
EN 1-Safety information ......................................................................................................................... 4 2-Product description ...................................................................................................................... 7 3-Control panel .................................................................................................................................. 8 4-Programmes ...........................................................
1-Safety information EN !"#$!%&'()*+(,-%#,%)+!%.//0(.,*!%"#$%)+!%1$&)%)(2!%$!.3%)+!%"#00#'ing safety hints! WARNING! !"#$!%1$&)%4&! ▶ Make sure there is no transport damage. ▶ Make sure all transport bolts are removed. ▶ Remove all packaging and keep out of children´s reach. ▶ Handle the appliance always with at least two persons because it is heavy.
1-Safety information EN WARNING! Daily use ▶ 2!$)!,$%&.!@&$!%$()3&%,$,4&$/ -*$()$,4&$/%&3&)"&$!+$?#..#7 &$*#3 ▶ Do not hot wash foam rubber or sponge-like materials. ▶ 2!$)!,$A#34$#)'$ #-)8%'$A4("4$(3$/! -,&8$A(,4$?!-%1 ▶ Do not open detergent drawer during any wash cycle. ▶ Do not touch the door during the washing process, it gets hot. ▶ Do not open the door if the water level is visibly over the porthole.
1-Safety information EN WARNING! Installation ▶ Install or use the appliance only where the temperature is above 5 °C. ▶ Do not place the appliance directly on a carpet, or close to a wall or furniture. ▶ Do not install the appliance in direct sunlight or in the near of heat sources(e.g. stoves, heaters). ▶ Make sure that the electrical information on the rating plate agrees with the power supply. If it does not, contact an electrician. ▶ Do not use multi-plug adapters and extension cables.
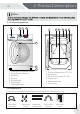
2-Product description EN Note: - 2.1 Picture of appliance 2 3 1 15’ 59’ 2-1 4 2-2 4 2 3 1 5 6 ECO 40 - 60 20°C Inver ter 1000 90°C 1400 60°C 1000 40°C 800 20°C 400 HW70-BP14636 HW80-BP14636 BLDC motor R 9 kg 1400 Rapid Cycles Easy Iron Temp. Temp.
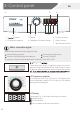
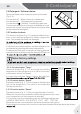
3-Control panel EN 3-1 3 4 1 “ 1 “ button 2 Programme selector 2 5 6 7 3 Display 5 Function buttons 4 Detergent /Softener drawer 6 “Delay” button 7 “Start/Pause“ button Note : Acoustic signal In following cases an acoustic signal sounds: at the end of programme when pressing a button in case of failures when turning the programme selector The acoustic signal can be deselected if necessary ; see DAILY USE. 3-2 on off Press this button (Fig.
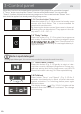
3-Control panel EN 3.4 Detergent / Softener drawer 3-5 Open the drawer, three compartments can be seen (Fig. 3-5): Compartment 1 : Water inlet only, no detergent Compartment 2 : Detergent for programme Compartment : Softener, Conditioning agent etc. The recommendation on the type of detergents is suitable for the various washing temperatures, please refer to the manual of detergent. 3.5 Function buttons The function buttons (Fig.
3-Control panel EN When the function is activated the temperature of the programme cannot be changed. If “Temp.” button is pushed the “Steam” function will be deactivated. You can activate “Steam” function only before to start any programme. You cannot activate “Steam” function while the appliance is already executing a programme. 3-10 3.5.4 Function button“Extra rinse“ Press this button (Fig. 3-10) to rinse the laundry more intense with fresh water. This is recommended for people with sensitive skin.
4-Programmes EN Detergent compartment for: 1 Water inlet only, no detergent 2 Detergent Softener or care product 2 1 * * STANDARD PROGRAMME ACCORDING TO (EU) No 2019/2023 The ECO 40-60 programme is able to clean normally soiled cotton laundry declared to be washable at 40°C or 60°C, together in the same cycle. This programme is used to assess the compliance with the EU Ecodesign legislation (environmentally friendly products design).
5-Consumption EN Scan QR code on energy label for energy consumption information. The actual energy consumption may differ from the declared one according to local conditions. Note: Auto Weight The appliance is equipped with a loading recognition. At low loading, energy, water and washing time will be reduced automatically in some programs.The display shows AUtO.
6-Daily use EN 6.1 Power supply 6-1 6-2 Connect the washing machine to a power supply (220V to 240V~/50Hz; Fig. 6-1). Please refer also to section INSTALLATION. 6.2 Water connection ▶ Before connecting check the cleanliness and clarity of the water inlet. ▶ Turn on the tap (Fig.6-2). Note: Tightness Before use check for leakage in the joints between the tap and the inlet hose by turning on the tap. 6.
6-Daily use EN Care chart Washing Washable up to 95°C normal process Washable up to 60°C normal process Washable up to 60°C mild process Washable up to 40°C normal process Washable up to 40°C mild process Washable up to 40°C very mild process Washable up to 30°C normal process Washable up to 30°C mild process Washable up to 30°C very mild process Wash by hand max.
6-Daily use GB 6.5 Selecting detergent W Use only machine wash approved detergent. ergents, e.g. for synthetic and woolen fabric. Mind always detergent manufacturer recommendations. Do not use dry cleaning agents such as trichloroethylene and similar products.
6-Daily use EN 6.6 Adding detergent 6-3 1. 2. 3. Slide out the detergent drawer. Put the required chemicals into corresponding compartments (Fig. 6-3) Push back the drawer gently. Note: Remove detergent residues before next wash cycle from the detergent drawer. Do not overuse detergent or softener. Please follow the instruction on the detergent package. Al Concentrated liquid detergent should be diluted before adding into compartment 2.
6-Daily use EN Press “Start/Pause“ button (Fig. 6-8) to start. The 6-8 lights up continuously. Appliance operates according to present settings. Changes are only possible by cancelling the programme. 6.11 Interrupt / cancel wash programme To interrupt a running programme press gently “Start/Pause“. The LED above the button To cancel a running programme and all its individual settings: 1. Press “Start/Pause” button to interrupt the running programme. 2. 3.
7-Eco-friendly washing EN @6)(-,68+6'*AA7$-+
8-Care and cleaning EN 8.1 Cleaning the detergent drawer Take always care there are no detergent residues. Clean the drawer regularly (Fig. 8-1): 1. Pull out the drawer until it stops. 2. Press the release button and remove the drawer. 3. Flush the drawer with water until it is clean and insert the drawer back in the appliance. 2 8-1 1 8.2 Cleaning the machine 8-2 - nance. - chine case (Fig. 8-2) and rubber components. Do not use organic chemicals or corrosive solvents.
8-Care and cleaning 8-6 8-7 EN 8.5 Long periods of disuse If the appliance is left idle for a longer period: 1. Pull out the electrical plug (Fig. 8-6). 2. =1+/$,>$ 0&(+$'155.2$LV"*?$WX\M? 3. Open the door to prevent formation of moisture and odours. Let door open while not used. Before next usage check carefully power cord, water inlet and drain hose. Make sure everything is properly installed and without leakage.
8-Care and cleaning EN 9. <.(0/$#0+(-1..2$5145$%.&(+^$(?*?$1'"/*$+1//"/*$ 0&(+$ (Fig. 8-14). 10. I(%_$"&$&!,+,1*!.2$LV"*?$WXZ`M?$ 11. <.,'($'(+N"#($A05? 8-14 8-15 CAUTION! ▶ B145$%.&(+$'(0."/*$!0'$&,$G($#.(0/$0/)$1/!1+&?$9-$&!($.")$"'$/,&$-1..$&"*!&(/()^$ water can escape. ▶ =!($%.&(+$41'&$G($"/$5.0#(^$,+$"&$402$.(0)$&,$.
9-Troubleshooting GB of a problem please check all shown possibilities and follow below instructions before you contact an after sales service. See CUSTOMER SERVICE. WARNING! ▶ Before maintenance, deactivate the appliance and disconnect the mains plug from the mains socket. ▶ improper repairs can cause considerable consequential damages.. ▶ A damaged power cable should only be replaced by the manufacturer, its service 9.
9-Troubleshooting EN E-,0A+8 Cause 5,A1'(,6 '2 • Temperature sensor error. • Contact the After sales service. '. • Heating error. • Contact the After sales service. '8 • Motor error. • Contact the After sales service. '9 • Water level sensor error. • Contact the After sales service. ':+ or ':3%or% • Abnormal communication error. ':;!< • @/G0.0/#()$.,0)$$(++,+? • Contact the After sales service. • Check and balance laundry load in the drum. F!#$H-,10A+('/,1'$.(
9-Troubleshooting EN Cause drum and/or detergent drawer. Automatic adjustment of washing time. Spinning fails. ing result. • Detergent is not a appropriate. • Check detergent recommendations. • Excessive use of detergent. • Reduce amount of detergent. • Washing programme duration will • This is normal and doesn‘t afbe adjusted. fect functionality. • - • • • • • Check machine load and laundry and run a spinning programme again. Degree of pollution does not agree • Select an other programme.
EN Remove all packaging material including polystyrene base, keep them out of children´s 10.2 Dismantle the transportation bolts The transportation bolts are designed for clamping anti-vibration components inside the appliance during transportation to prevent inner damage. 1. Remove all 4 bolts on the rear side and take out plastic spacers (Fig. 10-1)(Fig. 10-2). 2. Fill left holes with blanking plugs (Fig. 10-3)(Fig. 10-4).
EN 4 5 5 Tighten locknut (1) against the housing.
EN 10-8 . tion(Fig.10-8) . w 10-9 end to the appliance(Fig.10-9).Tighten the 3/4'' thread(Fig.10-10). 10-11 P T T Put the plug into the socket(Fig.
EN . 10-12 2x 2x 10-13 10.8 Noise reduction pads installation instructions (2.2 Accessories Sponge) 1. When opening the shrink package, you will find the noise reduction pads. These are used for reducing noise. (Fig. 10-12) 2. Lay the washing machine down to its side, porthole pointing upwards, bottom side towards operator. 3. Take out the noise reduction pads and remove the double-sided adhesive protective fi lm; the noise reduction pads under the washing machine cabinet as shown in (Figure 10-13).
11-Technical data EN 11.1 Additional technical data RCSS 149HMC-80 Voltage in V 220-240 V~/50Hz Current in A 10 Max power in W 2000 Water pressure in MPa 0.03≤P ≤1 74 Netto weight in kg 11.
- 2021.