RTT 2131WSZ-19 RTT 2151WSZ-19 0030516072
Contents Safety precautions.............................................................................. 2 Packing list .......................................................................................... ..... 4 Machine components ......................................................................................... 4 Installation and adjustment ..................................................................... 5 Pre-wash preparation ............................................................
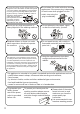
Safety precautions Meaning and description of the symbols WARNING FORBIDDEN Contents marked with this symbol relate to product and user safety. Please operate the machine in strict conformity to the contents of this manual to minimize the risk of personal injury and/or damage to the machine. Contents marked with this symbol describe actions prohibited to perform. If performed these actions will endanger the user’s personal safety and may result in injury.
Do not stretch hands into the workingmachine. It is dangerous even if the rotation is slow. Take special care of the children.This appliance is not intended for use by persons (including children) with educe physical, sensory or mental capabilities of, lack of experience and knowledge, unless they have been given supervision or instruction conceming use of the appliance by a person responsible for their safety. Do not share the outlet with other electric appliances.
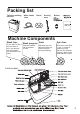
Packing list Twin-tub washing machine Water intake hose Gland Draining hose Bottom leg Machine Components Wash time Wash program Drain If you wish to set it Intensity can be for less than 2 set to mormal min, you should or soft. first turn past 6 min and then turn back. 45 Warning: do not set the switch on Drain position during washing. If to set to less than 1 min, in order to ensure a long service life, please first turn past 2 min and then turn back.
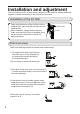
Installation and adjustment For your security and to ensure correct operation of the machine, please install and adjust the machine according to this manual’s instructions. Installation of the lint filter Place the bottom side of the lint filter into the overflow filter, then push the top side into the overflow filter. After installation, please double check to make sure that the lint filter is installed in the correct location; otherwise it may fall off during operation.
Change the direction of the drain hoses The drain hoses in the wash tub when out off factory ,before use the machine, please screw the drain hose on the drain valve parts , make sure the drain hose fixing as necessary. 2.Install the drain hose Drain valve parts 1.Remove the cover Install the washer legs 1.Carefully tilt the washing machine to the back and install the bottom legs at the front of the base.Make sure that the legs are installed in place.(Figure 1). 2.
Pre-wash Preparation Basic know-how The maximum capacity during washing and spinning cycles refers to the max weight of standard dry laundry that can be washed or spun at one time. The laundry quantity during one washing cycle should be lower than the rated capacity. Thickness, size, and the type of cloth will influence actual washing capacity. It is acceptable to put in a reasonable amount of laundry as the laundry will be mixed around during the washing process.
Detergent use How to add detergent: Method 1 - directly dissolving in the machine: 1.Add a small quantity of water to the machine. 2.Add the detergent powder. Run washing machine for 30 seconds to dissolve powder completely. 3.Place laundry into the washing machine and select a suitable water level. Method 2 - instantly dissolving the detergent powder: 1.Prepare warm water at 30 °C and a container. 2.Add the detergent powder while stirring until it dissolves fully.
Washing sequence Washing 1.Inlet selector Set the selector to “WASH”.(Figure1) TOR Figure 1 2.Add water Machine begins to dispense detergent uniformly.(Figure2) Figure 2 3.Put in the wash load. Add more water as necessary.(Figure3) 4. Select intensity. Select “SOFT ” or “NORMAL” water flow intensity according to the wash load.(Figure4) Figure 3 normal soft Figure 4 wash program 5.Select wash time. Select wash time according to the wash load.
Mid-wash spin cycle 1. Put the laundries into the spin tub evenly and smoothly. 2.Spin:(1) Distribute the laundry into the spin tub smoothly and evenly. Note: the gland must be inserted properly even if the laundry quantity is small. Push Gland Push Proper The laundry is slanted. Proper No gland (2)Close both the inner and outer covers of the spin tub. (3) Spin for 1-2 minutes. Outer cover of The spin tub Inner cover of The spin tub 3.Run the foam-removing spinning.
The rinse cycle Rinse with water-filling 1.Place laundry into the washing machine. Place laundry into the washing machine. Select the appropriate current according to the laundries. 2.Add water. Add the appropriate amount of water. 3.Rinse Adjust the wash timer to 5-7 minutes for the rinse cycle Rinsing with stored water (Repeat the mid-wash spin cycle and rinse cycle with stored water 2-3 times) 1.Place laundry into the washing machine. Select the appropriate current according to the laundries. 2.
Disposal after washing After each use, be sure to clean the lint and foreign materials from the lint filter and the overflow filter in a timely fashion. Removing lint is important for healthy operation of the machine. Please remove the plug from the power outlet first before cleaning. Cleaning the lint lter The lint filter should always be used during washing and should be cleaned after each use in a timely fashion. 1.
Cleaning the over ow lter Too much lint in the overflow filter will influence normal usage of the machine. Remember to clean it once every two months. Elastic fixing claw 1.Take off the over ow lter. Nip the elastic fixing claw and pull in the direction of the arrow to remove (as demonstrated in the figure to the right). 2.Clean the over ow lter. Clean the lint around the lter and ush with tap water. 3.Re-install the overflow filter. Hook 1) Install the corrugation pipe.
Troubleshooting When the remaining water is frozen Prevent the freezing Pour hot water below 50°C into the wash cycle compartment to soak it completely, then using your hands gently turn the pulsator. Confirm that the drainage function is operating normally before next use. (be sure to drain the water completely after each use) After completely draining, set the “DRAIN SELECTOR” to “OFF”. If it is set to “DRAIN”, it will be difficult for the frozen water to melt.
Speci cations Model RTT 2131WSZ-19 RTT 2151WSZ-19 230V~ 230V~ Rated Frequency 60Hz 60Hz Washing Capacity 13kg 15kg Spin-dry Capacity 10kg 14kg Rated Wash Power 420W 450W Rated Spin Power 280W 310W Total Input Power 700W 760W Rated Current of Fuse 10A 10A Degree of Water-Proof IPX4 IPX4 Rated Annual Energy Consumption 439kWh 506kWh Rated Annual Water Consumption 29480L 39380L 32kg 37.
60 IPX4 60 IPX4 2 0 6 www.candy.ae .
) ( 50 " " ( .( )" ( )" ) " . " . . . ( ) . . . . . .
. . 1 . ) .( 2 . . 3 . . (1 (2 . . (3 (4 . . . . . . . . . . / .
. . . . .1 . . .2 . .
. . . .1 .2 . .3 7-5 ( ) . . .1 .2 .3 . " " . )" .( 3 2 " . . ( ) .1 . .2 . .3 . . . . .
. .1 . (1) : .2 . : . (2) . (3) . . .3 (1) (2) .( " . . TOR . . .
.1 1 TOR .( )" " .2 . (2 ) .. ). (3 . ( )" " (4 0 45 .3 . ( )" ). .4 " 5 10 15 . (5 30 " " .5 ). (6 ) .( .
: : -1 . . 30 .1 .2 .3 . . : 30 . -2 .1 .2 . . . . : . . . . / . . .
/ . . . . . " " . . .
. .1 .(1 .2 . .(2 .RTT 2131WSZ-19 2 1 . .
. ( ) . . . 10 .1 . . .2 .3 . . .4 . 30 . .5 .
0 45 0 5 5 10 1 15 4 30 . 4 .
. . . ) . ( . . . ( ) ) .( . . . / : . . . .
. . / . . . . . . . . . . . . 2 .
2............................................................................... 4...................................................................................... 4.................................................................................. 5................................................................................ 7...................................................................... 9................................................................................... 12..................
RTT 2131WSZ-19 RTT 2151WSZ-19 . .