CANNON® D155 Density Meter Instruction & Operation Manual Version 1.
This page left intentionally blank CANNON® D155 Density Meter Instruction & Operation Manual Version 1.
Table of contents Page 1. Introduction ............................................................................................................................................................... 2 1-1. Overview of the instrument ........................................................................................................................... 2 1-2. About the manual .................................................................................................................................
5. Maintenance ............................................................................................................................................................ 32 5-1. Daily check .................................................................................................................................................. 32 5-1-1. Cleaning the measuring cell ............................................................................................................. 32 5-2.
2 1. Introduction 1-1. Overview of the instrument Please read this manual thoroughly in advance for the best performance of the equipment. Thank you for your patronage of CANNON products. The D155 Density Meter you have purchased is an oscillation-type density/specific gravity meter which can measure density, specific gravity and API degrees. This meter is equipped with thermal control, which enables you to set a measurement temperature.
3 1-2. About the manual Please keep this manual near your system so that you can easily access to the necessary information you are looking for while operating or preparing for measurement. The examples below represent the three types of messages (warning, caution, and note) encountered throughout the manual. 1. Where there exists a danger of physical injury or even possible death: Warning! There exists the danger of physical injury or even possible death if the instruction is disregarded. 2.
4 1-3. Safety symbols Always observe these signs and instructions. You must observe cautionary messages and warnings in order to protect yourself as well as prevent others from physical injury or property damages. CANNON® D155 Density Meter Instruction & Operation Manual Version 1.
5 WARNING! Wear safety glasses, gloves or protective mask if necessary,and well ventilate the room. Danger of injury on your skin or in the eyes by splashing chemical. Also your windpipe may get hurt if toxic gas is breathed in. CAUTION! Do not operate in a way other than specified in the manual. Danger of fire, electric shock or damage to the instrument. CAUTION! Do not open housing case or overhaul the unit for repair except by an authorized service person.
6 About place for installation Avoid the use of this instrument under the environment described below. (Failure can lead to the degradation of performance and reliability of the system.
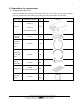
7 2. Preparations for measurement 2-1. Supplied parts with D155 Check the supplied parts referring to the following parts list. If any missing or broken parts including main unit, accessories or manual are found, contact your sales representative or local dealer. Part name CANNON Part Number Qty Sketch 9726-P10 D155 unit 9726-P15 1 unit (with peristaltic pump) 115V AC Power cord w/ ground 74.2110 1 pc. 95.0254 1 pc. 95.0297 1 pc. 95.0298 1 pc. Connection Tube with Union Red Tubing, 1.
8 Additional Parts supplied with optional peristaltic pump Part name CANNON Part Number Qty 95.0255 1 pc. 95.0256 1 pc. 95.0254 1 pc. 95.0253 1 pc. Sketch Peristaltic Pump (includes all tubing below) Peristaltic Pump Tube Gore400 Connection Tube with Union Drain Tube (L=2000mm) Additional Parts supplied with optional printer Part name CANNON Part Number Qty 95.0239 1 pc. 95.0240 1 pc. 82.0059 1 pc.
9 2-2. Installation and start-up 2-2-1. Power cable 1) Make sure the power switch is in the OFF position. 2) Plug in the supplied power cable on the back of unit. 3) Connect the power cable to the power outlet. < 3-pin plug > The 3 pins plug has an earth terminal and grounds to the AC Mains earth. Warning! The earth wire must be grounded. If not, there exists a danger of electric shock. CANNON® D155 Density Meter Instruction & Operation Manual Version 1.
10 2-2-2. Connecting the tube lines – D155 with Peristaltic Pump 1) The sampling inlet and outlet ports (1) and (2) are Luer friction-type fittings. See image below for connecting the tubing. 2) Insert and press the first Connection Tube with Union into the sample inlet Port (1) of the D155 as shown below. The free end of this tube will later be inserted into the sample container. 3) Connect the second Connection Tube with Union to the sample outlet Port (2).
11 2-3. Parts name and functions 2-3-1. Outward appearance and configuration < Front and Right side panel > 2 1 3 6 4 5 1) Measuring cell unit Internal to the instrument, this unit contains the oscillating U-tube measuring cell for sample measurement. 2) Cell viewport The sample can be seen through this window to check if the liquid contains air. The cell is illuminated for easy viewing of the sample in the glass U-tube.
12 < Rear panel > 9 14 10 13 12 7 11 8 7) Peristaltic pump “IN” (if equipped) The sample outlet is connected here. 8) Peristaltic pump “OUT” (if equipped) The tube for draining out the sample or solvent can be connected here. 9) Peristaltic pump (if equipped) This pump transfers sample liquid by peristaltic movement. 10) RS-232C port An optional printer or a personal computer (PC) can be connected here. 11) ∼ LINE The AC Mains power cord is connected with this receptacle.
13 2-3-2. Key functions (General description) Here is a brief description of function of each key: [][][][] key : Key to select menu options, settings, or enter numeric values. [MEAS] key : Key to start density measurement. [PUMP] key : Key to turn or off the optional peristaltic sampling pump. This key can be used during both calibration and measurement.
14 2-3-3. LCD Display Layout 1 0 / 3 0 / 1 2 0 9 : 5 0 D e n s i t y 0 . 9 9 8 5 g / c m ³ T e m p 2 0 . 0 0 ° C T e s t 0 1 P r e s s E N T E R t o P r i n t Highlighted Text Denotes Blinking Cursor or Characters 2-4. Display during initialization 2-4-1. The initial display upon power up The following display appears during power up. D 1 5 5 1 0 / 3 0 / C A N N O N D e n s i t y M e t e r V e r 2 . 0 0 1 2 0 9 : 2 9 2-4-2.
15 2-5. Preparation before measurements 1) Tools required for sampling 2 to 5 mL Syringe (for manual injection) and a beaker or bottle to hold the sample 2) Solvent for cleaning the cell Solvent (e.g. water for aqueous solution or heptane for oil) is necessary to clean the cell. Note, user is responsible for determining the appropriate solvent for the sample type being measured. 3) Lint-free towels or tissues Used for wiping the outside of the sampling tube or cell ports.
16 3. Basic procedure 3-1. Flow chart for the basic measuring procedure Power on Ready mode? No Yes Perform factor calibration with pure water Calibration No Calibrated properly? Yes Set sample and press [MEAS] [Meas.] button Measurement Drain out the sample and clean the measuring cell Measurement completed? No Yes Fill the measuring cell with pure water Turn off the unit CANNON® D155 Density Meter Instruction & Operation Manual Version 1.
17 3-2. Factor calibration with pure water For correct measurement, the meter needs to be checked and adjusted to the reference using the density standard of water. Prior to each day’s work, measure the water by pressing [MEAS] key to make sure the result of specific gravity (SG) shows a value within ± 0.0005 of the nominal value of pure water at the test temperature.
18 1) Make sure that the cell temperature is stable at the set temperature and that “Ready to Test” appears on the main display as shown below. 1 0 / R e a P l P r 3 0 / d y e a s e s s 1 2 t o T e s e L o a d M E A S t t 0 2 0 S a m o S 9 : 4 0 . 0 ° C p l e t a r t 2) Clean the cell with pure water a. Put the tube into water as shown on the left or inject the water with a 10 mL syringe. If using a syringe, inject two full syringes so that a total of 20 mL is flushed through the cell. b.
19 ↓ [ENTER] Press [ENTER] key. If the peristaltic pump is installed, the pump will run for the amount of seconds set in the Menu:2 Sampling Time. M e n u : 0 C a l i b r a t e C e l l 1 0 s S A M P L I N G : W a i t > > < < P l e a s e The above screen will only appear when using the optional peristaltic pump and the Sampling Time (Menu:2 Sampling Time) is set to a value greater than zero.
20 3-3. Measuring procedure Note: Prior to each day’s work, measure pure water by pressing [MEAS] key to make sure the result of specific gravity (SG) shows a value within ± 0.0005 of the nominal value of pure water at the test temperature. If the measuring cell and tube lines were filled with ethanol (for short-term storage), wash out the ethanol with as much pure water before measurement is started. If the result shows a SG (t/t) value outside of the ± 0.
21 5) After measurements are completed, the results will appear on the screen display. 0 9 : 5 0 1 0 / 3 0 / 1 2 0 . 9 9 8 5 g / c m ³ D e n s i t y 0 1 2 0 . 0 0 ° C T e s t T e m p P r e s s U p / D n U n i t s If a printer is connected, the results will automatically print. There are four results display windows. To change between these windows, press the [] [] keys. Below are the three additional results displays. 1 0 / 3 0 / 1 2 D e g r e e A P I T e m p 2 0 .
22 3-4. Clean measuring cell after measurements The measuring cell must be cleaned when a different type of sample is to be measured or when a series of measurement is complete. Follow the following steps: Instrument with optional peristaltic pump 1) Remove the sampling tube from the sample and wipe with tissue paper. 2) Put the sampling tube into the cleaning solution/solvent and draw the solution/solvent with [PUMP] key.
23 3-5. Procedure after a day’s measurements When the day’s work of measurement is completed, the measuring cell needs to be cleaned with the cleaning solution/solvent and be filled with pure water in order to avoid contamination on the glass measurement cell walls: 1) Clean the measuring cell according to the steps in Section 3-4. 2) When certain oily substances or deposits are adhered to the cell, follow the steps in Section 5-1-1. 3) Fill the measuring cell with pure water: a.
24 4. Menu Navigation 4-1. Menu:1 View Stored Results 1) Press [MENU] then press [] or [] to select Menu 1 as shown below M e n u : 1 V i e w S P r e s s t o r e d E N T E R R e s o r u l t s U p / D n 2) Press [ENTER] 3) Press [] or [] key to select the test result (numbered) 4) Press [] or [] to select the preferred data result screen. There are four results display windows. To change between these windows, press the [] [] keys. 1 0 / 3 0 / 1 2 0 9 : 5 0 D e n s i t y 0 .
25 4-2. Menu 2: Set Sampling Time Select sampling time adequate for the sample to be injected. The default is ‘10’ (seconds).
26 53D Lube Oils 15°C 59A Crude Oils 20°C 59B Refined Products 20°C 59D Lube Oils 20°C 4) Press [ENTER] to accept the selected table. 4-4. Menu 4: Set Test Temperature Measurement temperature can be set as follows: 1) Press [MENU] then press [] or [] to select Menu 4 as shown below M e n u : 4 S e t T e s P r e s s t T e m p e E N T E R o r r a t u r e U p / D n 2) Press [ENTER] M e n u : 4 T e s t T e m p . A r r o w K e y s E N T E R t o : t 2 0 .
27 3) Press [] or [] key to select the digit to change 4) Press [] or [] to increase or decrease the number. 5) Press [ENTER] to accept the date and time entered 4-6.
28 The last 10 measurement results are stored in memory. Subsequent data measurements will cause the D155 to delete the oldest stored result first. These data can be cleared using this function. Caution, data cannot be restored once it is cleared.
29 M e n u : E x p E N S T O P 9 o r t A L L D a t a ? T E R t o A c c e p t o r M E N U t o Q u i t Press [ENTER] to export stored results to USB device, or [STOP] or [MENU] to quit. 4-10. Menu 10: View Serial No. & Firmware Ver. You can check the serial number and firmware version of the unit. Such information will be necessary to identify your density meter when calling for help. 1) Press [MENU] then press [] or [] to select Menu 10 as shown below M e n u : 1 0 V i e w S e r i a l N o .
30 4-11.
31 4-12. How to connect the optional printer or a personal computer (PC) The optional printer can be connected to the D155 unit so that the measurement and calibration results together with the date and time of measurement can be printed out. Connect the supplied printer cable to the RS-232C port (DB-9M) on the back of D155 unit as shown. A personal computer (PC) can be connected instead of the printer so that data can be exported.
32 5. Maintenance 5-1. Daily check 5-1-1. Cleaning the measuring cell When the repeatability of measurements has degraded or measuring time is prolonged, the measuring cell is considered to be contaminated. Also, when the cell is apparently contaminated with a sample of such nature, the measuring cell must be cleaned with an appropriate solvent like household chlorine bleach, acid or alkali.
33 5-2. Other maintenance 5-2-1. Replacement of the power fuse If the power fuse should blow, replace it with a like size and power rating. Note the fuse size and rating is listed on the rear of the instrument immediately above the fuse holder. As shown below, turn the fuse holder cover by 90 degrees counterclockwise using a flat screw driver. After the fuse is replaced, turn the fuse holder cover back 90 degrees clockwise. Warning! Be aware of the danger of electric shock.
34 4) Loosen the screw with the provided wrench 5) Tighten the tube nozzles clockwise – hand-tighten only 6) Follow steps 1 thru 4 in reverse to tighten the Injection Adapter nut and remove the red PTFE tubing CANNON® D155 Density Meter Instruction & Operation Manual Version 1.
35 5-2-3. Replacement of optional peristaltic pump tubing If the pump tube is deteriorated, the tubing may fail causing sample liquid to leak. This may eventually lead to pump failure. Replace pump tubing as follows: 1) Disconnect the tubes connected to the pump tube cassette. 2) Turn the cassette counterclockwise to remove it. 3) Remove the tube joint from the cassette by pulling one of the ends, and then pull out the tube.
36 5) Fit in the new pump tube around the rotor as shown by pulling it out a little bit. Fix the tube joint securely to the groove as illustrated. Pump tube Rotor Pull out 6) Match the axle and rotor, and fix the Tube joint Match Axle cassette by turning clockwise until it stops. Pump tube Fix the cassette by turning clockwise until it stops. Caution! Some samples may shorten the life of the pump tubing. pump tubing when appropriate.
37 6. Troubleshooting 6-1. Error messages and remedies When the main unit is operated improperly, the following error messages will appear with a corresponding beep sound. Error message Description Remedy Check the window to see if air bubbles are trapped in the measuring Time Over Measuring time exceeds 10 minutes. cell. If this message persists while nothing wrong is observed, Contact CANNON or your local dealer. 6-2.
38 6-3. Troubleshooting 6-3-1. Cannot turn on the main unit with the power switch START No Is the line voltage conforming? Yes Use the correct line voltage Repairing by the manufacturer No Is everything O.K.? Yes END (Note 1) Specifications on power source AC Mains Voltage 100-240V Wattage Fuse Frequency 30 Watts T3.15A/250V 50/60Hz CANNON® D155 Density Meter Instruction & Operation Manual Version 1.
39 6-3-2. “Ready to Test” message does not appear and/or cell temperature is unstable. Follow the following steps if “Ready to Test” message does not appear after more than 1 hour or the cell temperature appears unstable after having reached the preset measurement temperature.
40 6-3-5. Key entry does not work If beep sound is not heard each time any keys are pressed or key entry itself does not function, Contact CANNON or your local dealer. 6-3-6. Air bubbles are easily trapped in the sample and visible in the measurement cell START Is the system leaking? Yes Check tube lines on any loosened joint. Also ensure the cross section of tube is upright. No Can the sample be degassed? No Yes Degas the sample (boil, stir or else) Contact our local dealer. No Is everything O.K.
41 6-3-7. There is poor repeatability on measured values START Is the sample homogeneous? No Stir to make it homogeneous. (No repeatability when the sample is unevenly mixed.) Yes Is the temperature of measuring cell stable? No Yes Are air bubbles found in the sample? Measure after temperature becomes stabilized. Yes No Is the measuring cell dirty? Repeat sampling. (When air bubbles appear again, refer to Section 6-3-6.
42 6-3-8. Sampling time is too long (optional peristaltic pump) START Is the tube peristaltic pump deteriorated? No Yes Replace the tube. Contact our local dealer. No Is everything O.K.? Yes END CANNON® D155 Density Meter Instruction & Operation Manual Version 1.
43 6-3-9. Measuring time is too long START Yes Is cell temperature stable? No Yes Are air bubbles found in the sample? Measure after the cell temperature becomes stabilized. Yes No Repeat sampling and measure again. (If air bubbles appear again, refer to Section 6-3-6.) Contact our local dealer. No Is everything O.K.? Yes END 6-3-10. Data cannot be stored in the memory The back-up battery needs to be replaced when the clock function does not work or preset parameters cannot be saved.
44 7. Others 7-1. Basic specifications Type and Model Discipline Measuring Range Measuring Temperature Range Precision Density Temperature Repeatability Resolution Density Density Temperature Specific Gravity Temperature Compensated Parameter API Degree Measurement Time Viscosity Correction Display Sampling Method Min.
45 7-2. Principle of measurement 7-2-1. Oscillating U-tube Cell When a measurement cell filled with liquid or gas is oscillated spontaneously, resultant oscillating cycle varies with the density of the sample in the measurement cell. The oscillating cycle T is expressed follows.
46 7-2-2. Density Tables Dried air density Density of dried air at t°C and 1013.25hPa is calculated according to the following formula. d ( g / cm 3 ) = P(hPa) 0.0012932 × 1 + 0.00367 × t ( C ) 1013.25 Density of air at 1013.25hPa of air pressure; Temp. (°C) 0 1 2 3 4 5 6 7 8 9 10 11 12 13 14 15 16 17 18 19 20 21 22 23 24 Density (g/cm3) 0.00129 0.00129 0.00128 0.00128 0.00127 0.00127 0.00127 0.00126 0.00126 0.00125 0.00125 0.00124 0.00124 0.00123 0.00123 0.00123 0.00122 0.00122 0.00121 0.00121 0.
47 Water density Temp. (°C) 0 1 2 3 4 5 6 7 8 9 10 11 12 13 14 15 16 17 18 19 20 21 22 23 24 Density (g/cm3) 0.99984 0.99990 0.99994 0.99996 0.99997 0.99996 0.99994 0.99990 0.99985 0.99978 0.99970 0.99961 0.99950 0.99938 0.99925 0.99910 0.99894 0.99878 0.99860 0.99841 0.99821 0.99799 0.99777 0.99754 0.99730 Temp. (°C) 25 26 27 28 29 30 31 32 33 34 35 36 37 38 39 40 41 42 43 44 45 46 47 48 49 Density (g/cm3) 0.99705 0.99679 0.99652 0.99624 0.99595 0.99565 0.99534 0.99503 0.99471 0.99438 0.99404 0.99369 0.
48 7-3. Warranty/Return Information 1. Products limited warranty In addition to other manufacturers’ warrantees, CANNON® Instrument Company (“the Company”) warrants all products (other than reagents and chemicals) delivered to and retained by their original purchasers to be free from defect in material and workmanship for one year from the date of the Company’s invoice to the purchaser.