PUB.
Important Usage Instructions Introduction WARNING! TO REDUCE THE RISK OF FIRE OR ELECTRIC SHOCK, DO NOT EXPOSE THIS PRODUCT TO RAIN OR MOISTURE. WARNING! TO REDUCE THE RISK OF ELECTRIC SHOCK AND TO REDUCE ANNOYING INTERFERENCE, USE THE RECOMMENDED ACCESSORIES ONLY. COPYRIGHT WARNING: Unauthorized recording of copyrighted materials may infringe on the rights of copyright owners and be contrary to copyright laws.
IMPORTANT SAFETY INSTRUCTIONS In these safety instructions the word “apparatus” or “product” refers to the Canon Digital Video Camcorder FS11 A/FS10 A/ FS100 A and all its accessories. magnetic radiation. They may cause picture interference, or permanently damage the camera. 16 Water and Moisture — Hazard of electric shock — Do not use this product near water or in rainy/moist situations. 17 Placing or Moving — Do not place on an unstable cart, stand, tripod, bracket or table.
of the type of power supply to your home, consult your product dealer or local power company. Regarding other power sources such as battery power, refer to instructions in this manual. 23 Lightning — For added protection of this product during a lightning storm, or when it is left unattended and unused for long periods of time, disconnect it from the wall outlet and disconnect the antenna. This will prevent damage to the product due to lightning and power-line surges.
Getting to Know the Camcorder What is so special about recording on flash memory? Your videos and photos are recorded in the built-in memory ( and only) or on a memory card (SD or SDHC card). Recording on flash memory means that there are no moving parts in the recorder unit of the camcorder. To you, it means a camcorder that is smaller, lighter and faster.
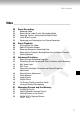
Table of contents Introduction ______________________________ 5 10 12 12 13 16 Getting to Know the Camcorder About this Manual Overview Supplied Accessories Components Guide Screen Displays Preparations _____________________________ 19 19 20 22 24 24 24 25 25 27 27 28 28 29 29 29 30 30 6 Getting Started Charging the Battery Pack Preparing the Wireless Controller and Accessories Adjusting the Position and Brightness of the LCD Screen Basic Operation of the Camcorder Operating Modes The Button: Mod
Table of contents Video ____________________________________ 32 32 33 33 35 35 36 36 38 39 40 41 42 42 43 44 45 45 46 47 48 48 49 50 51 51 52 52 53 Basic Recording Shooting Video Selecting the Video Quality (Recording Mode) Zooming: Optical, Advanced and Digital Zoom Quick Start Function Reviewing and Deleting the Last Scene Recorded Basic Playback Playing Back the Video Special Playback Modes Selecting Scenes by Recording Date Selecting the Playback Starting Point from the Movie Timeline Deleting Sce
Photos __________________________________ 54 54 54 56 56 56 58 58 59 59 60 60 61 62 62 62 63 65 Basic Recording Taking Photos Selecting Photo Size and Quality Erasing a Photo Right After Recording It Basic Playback Viewing Photos Magnifying Photos during Playback Erasing Photos Additional Functions Drive Mode: Continuous Shooting and Exposure Bracketing Histogram Display Protecting Photos / Copying Photos Other Functions You Can Use when Taking Photos Printing Photos Printing Photos Selecting the Pri
Table of contents Additional Information ______________________ 75 75 76 76 78 79 80 81 82 Appendix: Menu Options Lists FUNC. Menu Setup Menus Camera Setup (Digital Zoom, Image Stabilizer, etc.) Memory Operations (Initialization, etc.) Display Setup (LCD Brightness, Language, etc.) System Setup (Speaker Volume, Beep, etc.
Introduction About this Manual Thank you for purchasing the Canon FS11/FS10/FS100. Please read this manual carefully before you use the camcorder and retain it for future reference. Should your camcorder fail to operate correctly, refer to Troubleshooting ( 82). Conventions Used in this Manual • • • IMPORTANT: Precautions related to the camcorder’s operation. NOTES: Additional topics that complement the basic operating procedures.
Online product registration for U.S.A. Customers only. Register your product online at www.registercanon.com Protect your product We will keep the model number and date of purchase of your new Canon product on file to help you refer to this information in the event of an insurance claim such as loss or theft. Receive information on new products and promotions Upon your request, we will send you information on Canon new products and promotions.
Introduction Overview Supplied Accessories CA-590 Compact Power Adapter BP-808 Battery Pack Lithium Button Battery CR2025 for Wireless Controller WL-D88 Wireless Controller STV-250N Stereo Video Cable Yellow • Red • White plugs Software CD-ROM* and Installation Guide PIXELA ImageMixer 3 SE WS-30 Wrist Strap For saving, managing, editing and playing back movies. Software CD-ROM* and Installation Guide DIGITAL VIDEO Solution Disk For saving, managing, and printing photos.
Components Guide Left side view Right side view RESET button ( 84) button ( 24)/ (print/share) button ( 63, 72) DISP. (on-screen display) button ( 49, 60)/ BATT.
Introduction Back view Top view Bottom view Remote sensor ( 21) LCD screen ( 22) Mode dial ( 24) Start/Stop button ( 32) (stop) button ( 36)/ BLC (backlight correction) button ( 45) (fast forward) button ( 36)/ Zoom in T (telephoto) button ( 33) (fast reverse) button ( 36)/ Zoom out W (wide-angle) button ( 33) / (play/pause) button ( 36)/ START/STOP button ( 32) FUNC.
Wireless Controller WL-D88 START/STOP button ( 32) FUNC. button ( 26, 75) MENU button ( 26, 76) PLAYLIST button ( 51) Navigation buttons ( / / / ) (frame reverse) button ( 38) (fast reverse) button ( 38) (play) button ( 36) (pause) button ( 36) (stop) button ( 36) PHOTO button ( 54) Zoom buttons ( 33) SET button (frame advance) button ( 38) (fast forward) button ( 38) DISP.
Introduction Screen Displays Recording Movies Playing Movies (During Playback) 16 Operating mode ( 24) Recording program ( 42, 43) White balance ( 47) Image effect ( 48) Digital effect ( 48) Recording mode ( 33) Remote sensor off ( 80) Manual focus ( 46) Memory operation ( 18) Time code/Playback time (hours : minutes : seconds) Remaining recording time On the memory card / In the built-in memory Remaining battery time ( 18) Image stabilizer ( 76) Wind screen off ( 76) Backlight correction ( 45) Mini vid
Recording Still Images Viewing Still Images Zoom ( 33), Exposure ( 45) Recording program ( 42, 43) White balance ( 47) Image effect ( 48) Digital effect ( 48) Drive mode ( 59) Still image quality/size ( 54) Manual focus ( 46) Remaining battery time ( 18) Number of still images available ( 18) On the memory card / In the built-in memory Self timer ( 45) AF frame ( 77) Mini video light ( 44) Focus and exposure lock ( 54) Camcorder shake warning ( 77) Remote sensor off ( 80) Image number ( 18, 81) Current im
Introduction Memory operation Record, Record pause, Playback, Playback pause, Fast playback, Fast reverse playback, Slow playback, Slow reverse playback, Frame advance, Frame reverse Remaining recording time When there is no more free space on the memory, [ END] (built-in memory, / only) or [ END] (memory card) will be displayed and the recording will stop. , 75% 50% 25% 0% • The icon shows a rough estimate of the remaining charge as a percentage of the full charge of the battery pack.
Preparations This chapter describes basic operations, such as navigating the menus, and first time settings to help you learn more about your camcorder. Getting Started 3 Close the cover and slide it toward the lens until you hear a click. DC IN terminal CHG (charge) indicator Charging the Battery Pack The camcorder can be powered with a battery pack or directly using the compact power adapter. Charge the battery pack before use.
Preparations TO REMOVE THE BATTERY PACK voltage converters for overseas travels or special power sources such as those on aircraft and ships, DC-AC inverters, etc. NOTES Battery release latch 1 Slide the battery compartment cover away from the lens and open it. 2 Press the battery release latch and pull out the battery pack. 3 Close the cover and slide it toward the lens until you hear a click. IMPORTANT • Turn off the camcorder before connecting or disconnecting the compact power adapter.
1 Press the tab in the direction of Accessories the arrow and pull out the battery holder. 2 Place the lithium button battery with the + side facing up. 3 Insert the battery holder. TO USE THE WIRELESS CONTROLLER Fasten the grip belt. • Adjust the grip belt so that you can reach the zoom lever with your index finger, and the Start/Stop button with your thumb. • You can remove the grip belt and replace it with the supplied wrist strap.
Preparations TO ATTACH A WRIST STRAP You can also remove the grip belt and attach the shoulder strap directly to the rear bracket on the camcorder. TO REATTACH THE GRIP BELT Pass the attaching end of the wrist strap through the back bracket on the camcorder, thread the wrist strap through the loop and fasten. You can also attach the wrist strap to the strap mount on the grip belt to use both for extra convenience and protection. 1 Pass the end of the strap through the rear bracket on the camcorder.
- To allow the camcorder to be operated with the wireless controller from the front. LCD Backlight You can set the brightness of the screen to normal or bright. 180° 90° 180° While the camcorder is on, hold DISP. pressed down for more than 2 seconds. Repeat this action to toggle between the normal and bright settings. NOTES Subject can monitor the LCD screen NOTES About the LCD screen: The screen is produced using extremely high-precision manufacturing techniques, with more than 99.
Preparations camcorder settings, and flexible recording mode, which lets you change the camcorder's settings to your preference. Basic Operation of the Camcorder Operating Modes The camcorder's operating mode is determined by the position of the mode dial. In this manual, indicates that a function is available in the operating mode shown and indicates that the function is not available. When no operating mode icons are given, the function is available in all operating modes.
change settings to your preference. Even in flexible recording mode, the camcorder can help you with the settings. For example, you can use the Special Scene recording programs ( 42) to set at once all the optimal settings to match special recording conditions. NOTES In mode you cannot access the menus but you can change the following settings in advance, before setting the camcorder to mode.
Preparations Selecting a FUNC. Menu Option in Recording Mode Selecting an Option from the Setup Menus 1 Press FUNC. . 2 Select ( ) the icon of the 1 Press FUNC. . 2 Select ( , ) the function you want to change from the left side column. Menu items not available will appear grayed out. 3 Select ( ) the desired setting from the available options at the bottom bar. • The selected option will be highlighted in orange. • With some settings you will need to make further selections and/or press .
5 Select ( press ) the desired option and to save the setting. First Time Settings 6 Press FUNC. . You can press FUNC. to close the menu at any time. Abbreviation of Menu Selections in this Manual In this manual, the arrow is used to abbreviate menu selections. Below is an example of changing a setting using the setup menus. Setting the Date and Time You will need to set the date and time of the camcorder before you can start using it.
Preparations • The date appears in a year-month-day format only in the first setup screen. In subsequent screen displays the date and time will appear as month-day-year (for example, [JAN. 1, 2008 12:00 AM]). You can change the date format ( 81). • You can also change the date and time later on (not during the initial setup). To open the [DATE/TIME] screen: FUNC.
Using a Memory Card Recommended Memory Cards You can use commercially available SDHC (SD high capacity) memory cards and SD memory cards with this camcorder to record movies and still images. However, depending on the memory card, you may not be able to record movies on it. Refer to the following table. As of January 2008, the movie recording function has been tested using SD/SDHC memory cards made by Panasonic, SanDisk and Toshiba. camcorder) are backward compatible and support regular SD memory cards.
Preparations 2 Slide the memory card slot cover ( away from the lens and open it. 24) 3 Insert the memory card straight, with the label facing away from the lens, all the way into the memory card slot until it clicks. 4 Close the cover and slide it toward the lens until you hear a click. Do not force the cover closed if the memory card is not correctly inserted. TO REMOVE THE MEMORY CARD 1 Slide the memory card slot cover away from the lens and open it. 2 Push the memory card once to release it.
Options [INITIALIZE] • While the initialization is in progress, do not disconnect the power source or turn off the camcorder. Clears the file allocation table but does not physically erase the stored data. [COMPL.INIT.] Erases all data completely. FUNC. ( 26) / FUNC. [ MENU] [ MEMORY OPER.] [INITIALIZE] The memory you want to initialize Initialization method [YES]* [OK] FUNC. FUNC. [ MENU] [ MEMORY OPER.] [INITIALIZE] Initialization method [YES]* [OK] FUNC.
Video This chapter covers functions related to shooting movies, including recording, playback, menu options, and memory operations. WHEN YOU HAVE FINISHED RECORDING Basic Recording 1 Make sure that the ACCESS indicator is off. 2 Turn off the camcorder. 3 Close the LCD panel. Shooting Video IMPORTANT ( 24) Observe the following precautions while the ACCESS indicator is on or flashing. Failing to do so may result in permanent data loss or damage to the memory. - Do not open the memory card slot cover.
NOTES Selecting the Video Quality (Recording Mode) The camcorder offers 3 recording modes. Changing the recording mode will change the recording time available on the memory. Select XP mode for better movie quality; select LP mode for longer recording times. The following table gives approximate recording times. ( 24) FUNC. ( • The camcorder uses a variable bit rate (VBR) to encode video so the actual recording times will vary depending on the content of the scenes.
Video Selecting the Zoom Type ( Options [ 24) • The zoom range of the advanced zoom will change depending on the aspect 76). ratio of the scene ( [WIDESCREEN] set to [ OPTICAL] (37x) The zoom range is limited to the optical magnification ratio of the lens. 48x* * The picture angle will be wider at both full telephoto and full wide-angle.
NOTES • Keep at least 1 m (3.3 ft.) away from the subject. At full wide angle, you can focus on a subject as close as 1 cm (0.39 in.). • When [ZOOM SPEED] is set to [ VARIABLE]: - When you use the T and W buttons on the wireless controller or LCD panel, the zoom speed will be constant at [ SPEED 3]. - The zoom speed will be faster in record pause mode than when actually recording. Quick Start Function When you close the LCD panel with the camcorder on, the camcorder enters the standby mode.
Video Basic Playback 1 Press to display the joystick guide. If does not appear on the joystick guide, repeatedly push the joystick ( ) toward [NEXT] to display it. 2 Push the joystick ( ) toward Playing Back the Video ( 24) . The camcorder plays back the last scene (but without sound) and returns to record pause mode. Deleting a Scene After Recording It After recording a scene: 1 Review the scene as described in the previous section.
• Press to stop the playback and return to the scene index screen. TO SELECT WHICH SCENES TO PLAY BACK After creating a playlist ( 51), you can switch between the original movies and the playlist you edited according to your choice. / You can also switch between the scenes or playlist recorded in the built-in memory and those recorded on the memory card. 1 In the index screen, move ( ) the orange selection frame to the tabs on the top of the screen.
Video 2 Adjust ( ) the volume. • To turn off the volume, keep the joystick pressed ( ) toward until the volume icon changes to . • You can press again to hide the joystick guide during playback. ADJUSTING THE VOLUME 1 Press guide. to display the joystick Special Playback Modes Special playback modes To enter the special playback modes, you can use the buttons on the LCD panel or wireless controller ( 15). There is no sound during the special playback modes.
4 Change the other fields in the Selecting Scenes by Recording Date You can search for all the recordings you made on a particular date, for example, to find all the movies you shot during a special event. ( same way to select the desired date and press . The index screen will appear with the selection frame on the first scene recorded on the selected date. Selecting from the Calendar Screen 24) POINTS TO CHECK Selecting scenes by recording date is available only from the original movies index screen.
Video 4 Press to return to the index screen. The orange selection frame will appear on the first scene recorded on the selected date. • Press DISP. again to return to the index screen. Interval between frames Recording date and time Scene length Current scene / Total number of scenes NOTES • You can change on what day to start the week for the calendar display ( 80). • You can press FUNC. to return to the index screen at any time.
Deleting All Scenes Deleting Scenes You can delete original scenes that you are not interested in keeping. Deleting scenes also allows you to free up space on the memory. To delete scenes in the playlist, refer to Deleting Scenes from the Playlist ( 52). / Select in advance the memory from which you want to delete scenes ( 30). FUNC. [ MENU] [ MEMORY OPER.] [DEL.ALL MOVIES] [YES]* [OK] FUNC.
Video Advanced Functions Special Scene Recording Programs Recording in a very bright ski resort or capturing the full colors of a sunset or a fireworks display becomes as easy as selecting a Special Scene recording program. For details about the available options, refer to the sidebar on page 43. ( 24) FUNC. ( 26) FUNC. [ PROGRAM AE] [ PORTRAIT] Press to display the Special Scene (SCN) recording programs Desired recording program FUNC.
[ PORTRAIT] The camcorder uses a large aperture, achieving a focus on the subject while blurring other distracting details. [ BEACH] Use this mode to record on a sunny beach. It prevents the subject from being underexposed. [ SPORTS] Use this mode to record sports scenes such as tennis or golf. [ SUNSET] Use this mode to record sunsets in vibrant colors. [ NIGHT] Use this mode to record in dimly lit places. [ SPOTLIGHT] Use this mode to record spotlit scenes.
Video FUNC. [ PROGRAM AE] recording program Desired FUNC. TO SET THE SHUTTER SPEED When you select [ SHUTTERPRIO.AE], a numeric value will appear next to the recording program icon. 1 Press to hide the joystick guide. 2 Adjust ( ) the shutter speed to the desired value. Shutter speed guidelines Note that on screen only the denominator is displayed – [ 250] indicates a shutter speed of 1/250 second, etc. 1/2*, 1/4*, 1/8, 1/15, 1/30 NOTES [ SHUTTER-PRIO.
Self Timer Automatic Backlight Correction and Manual Exposure Adjustment ( 24) FUNC. ( 26) FUNC. [ MENU] [ CAMERA SETUP] [SELF TIMER] [ON At times, backlit subjects may appear too dark (underexposed) or subjects under very strong lights may appear too bright or glaring (overexposed). To correct this, you can manually adjust the exposure or use the automatic backlight correction. ( ] 24) FUNC. appears. mode: In record pause mode, press Start/Stop .
Video Manual Exposure Adjustment 1 Press to display the joystick guide. If [EXP] does not appear on the joystick guide, repeatedly push the joystick ( ) toward [NEXT] to display it. 2 Push the joystick ( ) toward [EXP]. The exposure adjustment indicator and the neutral value [±0] appear on the screen. Manual Focus Adjustment Autofocus may not work well on the following subjects. In such case, focus manually.
• During focus lock, press and push the joystick ( ) toward [FOCUS] again to return the camcorder to autofocus. Options [ Default value AUTO] Settings are automatically set by the camcorder. Use this setting for outdoor scenes. Infinity Focus [ Use this function when you wish to focus on faraway subjects such as mountains or fireworks. Instead of step 2 in the previous procedure: Push the joystick ( ) toward [FOCUS] and hold it for more than 2 seconds. • appears.
Video [ NOTES • When you select the custom white balance: - Set the custom white balance in a sufficiently illuminated place. - Select a zoom type other than [ DIGITAL] ( 33). - Reset the white balance when the lighting conditions change. - Depending on the light source, may keep flashing. The result will still be better than with [ AUTO].
[ ART], [ TO FADE IN MOSAIC] Select one of these digital effects to add “flavor” to your recordings. * Only these digital effects are available in mode. Setting TO FADE OUT FUNC. ( Activate the selected fader in record pause mode ( ), then press Start/Stop to start recording with a fade in. Activate the selected fader while recording ( ), then press Start/Stop to fade out and pause the recording. 26) FUNC. [ D.EFFECT OFF] Desired fader/effect* FUNC.
Video still image, all the data is displayed in the form of information icons. During movie playback you can select what to display with the [DATA CODE] setting ( 79). You can also turn most onscreen displays on or off. Using an External Microphone You can attach a commercially available microphone for recording movies. When recording in very quiet surroundings, the built-in microphone may pick up the sound of the camcorder's internal machinery. In such case, we recommend using an external microphone.
NOTES When an external microphone is connected to the camcorder, [WIND SCREEN] will automatically be set to [ OFF ]. Managing Scenes and the Memory Creating a Playlist Create a playlist to play back only the scenes you prefer and in the order of your choice. Moving or deleting scenes in the playlist will not affect the original recordings. Options [ALL SCENES (THIS DATE)] Adds to the playlist all the scenes that were recorded on the same day as the selected scene.
Video screen. Refer to To select which scenes to play back ( 37). NOTES • / The playlist is created on the same memory you are playing back from. Select in advance the location of the scenes to play back ( 37). You can also copy scenes from the built-in memory to the memory card ( 53) to include in your playlist movies recorded on both. • You may not be able to add scenes to the playlist if they were recorded or edited using another device or if there is not enough space available in the memory.
or a scene recorded on the date you want to copy. NOTES You may not be able to move scenes in the playlist if there is not enough space available in the memory. / Copying Scenes You can copy original movies or scenes in the playlist from the built-in memory to the corresponding location on the memory card. ( 24) Options for copying original movies [ALL SCENES] Copies all the scenes to the memory card.
Photos Refer to this chapter for details on shooting photos – from capturing and playing back images to printing them. 4 Press PHOTO fully. The ACCESS indicator will flash as the still image is being recorded. Basic Recording IMPORTANT Taking Photos ( 24) Observe the following precautions while the ACCESS indicator is on or flashing. Failing to do so may result in permanent data loss. - Do not open the memory card slot cover. - Do not disconnect the power source or turn off the camcorder.
Options NOTES Image size options and the approximate number of still images that can be recorded on memory cards of various sizes are given in the table below. • The camcorder retains the last setting used even if you set the camcorder to mode. • When printing still images, use the following guidelines as a reference for selecting the print size. FUNC. ( 26) Image size FUNC. [ 1152x864] Desired image size* Desired image quality* FUNC.
Photos Erasing a Photo Right After Recording It You can erase the still image recorded last while reviewing it within the time set for the [REVIEW] option or immediately after recording it, if [REVIEW] is set to [ OFF]. ( Basic Playback Viewing Photos ( 24) 24) While reviewing the image immediately after recording: 1 Push the joystick ( ) toward . 2 Select ( ) [ERASE] and press . 1 Set the mode dial to . 2 Turn on the camcorder. 3 Push the joystick ( ) to move between images.
2 Push the joystick ( ) toward . Index Screen 1 Move the zoom lever toward W. The still images index screen appears. 3 Select ( )[ IMAGES] or [ IMAGES]. JUMP 10 JUMP 100 4 Jump ( ) the number of images selected and press . You can press again to hide the joystick guide. IMPORTANT • Observe the following precautions while the ACCESS indicator is on or flashing. Failing to do so may result in permanent data loss. - Do not open the memory card slot cover.
Photos POINTS TO CHECK Magnifying Photos during Playback / Select in advance the memory from which you want to erase the still images ( 57). During playback, still images can be magnified up to 5 times. ( 24) Erasing a Single Image 1 Press to display the joystick guide. 1 Move the zoom lever toward T. • The image is magnified by 2 times and a frame appears indicating the position of the magnified area. • To further enlarge the image, move the zoom lever toward T.
Options Additional Functions [ Default value SINGLE] Records a single still image. [ CONT.SHOOT.] (Continuous Shooting), [ HISPEED CONT.SHOOT. ] (High-Speed Continuous Shooting) Drive Mode: Continuous Shooting and Exposure Bracketing Captures a series of still images as long as you hold PHOTO pressed down. For the number of shots per second, refer to the sidebar on page 59.
CONTINUOUS SHOOTING/ HIGH-SPEED CONTINUOUS SHOOTING 1 Press PHOTO halfway to activate the autofocus. 2 Press PHOTO fully and hold it pressed down. A series of still images will be recorded as long as you hold the button pressed. AUTO EXPOSURE BRACKETING Press PHOTO , first halfway to activate the autofocus and then fully to record the still images. Three still images in different exposures will be recorded.
4 Repeat steps 2-3 to protect additional images or press twice to close the menu. Copying Images from the Index Screen FUNC. Options [ALL IMAGES] IMPORTANT Copies all the still images. Initializing the memory ( 30) will permanently erase all recordings, including protected still images. / [ONE IMAGE] Copies only the selected still image. Copying Photos 1 Move the zoom lever toward W. You can copy still images from the builtin memory to the memory card and vice versa.
Photos NOTES • If there is not enough space on the destination memory, the camcorder will copy as many still images as possible before stopping the operation. • If the memory card slot cover is open, or the LOCK switch on the memory card is set to prevent writing, you will not be able to copy still images to the memory card. Other Functions You Can Use when Taking Photos You can also use the following functions...
• If the still image index screen is displayed, move the zoom lever toward T to display a single image. • appears and changes to . • The (print/share) button lights up and the current print settings will be displayed for approx. 6 seconds. IMPORTANT • If continues to flash (for more than 1 minute) or if does not appear, the camcorder is not correctly connected to the printer. In such case, disconnect the USB cable and turn off the camcorder and the printer.
Photos 2 Push the joystick ( ) toward Options . The print settings menu appears. [PAPER] [ PAPER SIZE]: Available paper sizes vary depending on the printer model. Paper settings Current paper settings (paper size, paper type and page layout) [ PAPER TYPE]: Select [PHOTO], [FAST PHOTO], [PLAIN] or [DEFAULT]. [ PAGE LAYOUT]: Select [DEFAULT], [BORDERED] or one of the following page layouts. [BORDERLESS]: The image is enlarged and may be slightly cropped at the edges to fit the paper.
PRINT ERRORS IMPORTANT If an error occurs while printing, an error message, for example [NO PAPER], will appear on the camcorder. Solve the problem referring to the error message list ( 90) and to the printer's instruction manual. • Canon's PictBridge-compatible printers: If printing does not resume automatically after you solved the problem, select [CONTINUE] and press to resume printing. If that option is not available, select [STOP] and press and then restart printing from the beginning.
Photos Selecting Still Images for Printing (Print Order) 2 Open the print settings menu. FUNC. [ MENU] [ PRINT] • The print settings menu appears. • If there are no still images marked with print orders, [SET PRINT ORDER] appears. POINTS TO CHECK Set the print orders before connecting the USB cable to the camcorder. 3 Select ( , ) [PRINT] and press . Printing starts. The print settings menu disappears when the printing is completed. 1 Open the image selection screen. FUNC.
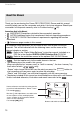
External Connections This chapter explains how to connect your camcorder to an external device such as a TV, VCR, or computer. Terminals on the Camcorder AV OUT Terminal Access: Open the LCD panel. Sound from the built-in speaker will be muted while the STV-250N Stereo Video Cable is connected to the camcorder. USB Terminal Access: Open the LCD panel. Connection Diagrams Connection Type: Analog Output only Connect to a TV or VCR with audio/video input terminals.
External Connections Playback on a TV Screen Saving and Backing Up Your Recordings Connect the camcorder to a TV to enjoy your recordings with family and friends. ( 24) 1 Turn off the camcorder and the TV. 2 Connect the camcorder to the TV. Refer to Connection Diagrams ( 67). 3 Turn on the connected TV. On the TV, select as the video input the same terminal to which you connected the camcorder. Refer to the instruction manual of the connected TV.
Saving your Recordings without a Computer If you prefer to save your recordings without having to use a computer, you can use the optional DW-100 DVD Burner to create DVD discs of your movies and Photo DVDs of your still images ( 69). You can also connect the camcorder to an external recording device (DVD or HDD recorder, VCR, etc.) to save copies of your movies ( 71). IMPORTANT Refer to this section along with the relevant sections in the instruction manual of the DW-100.
External Connections 2 Select the scenes or still images you want to add to the disc. FUNC. [ MENU] [ SYSTEM SETUP] [ADD TO DISC] Desired option FUNC. Connecting to the DVD Burner and Creating a Disc 1 Turn on the DVD burner. Refer to Creating DVDs. 2 Connect the camcorder to the DVD burner using the USB cable. • Connection . Refer to Connection Diagrams ( 67) and Connections. • If the device type selection screen appears, select [DVD BURNER] and press .
DVD players and computers that meet the following requirements: • Compatible with the discs you created (DVD-R/DVD-R DL/DVD-RW discs) • Compatible with DVD-Video specifications • DVD playback software that is installed and running (in the case of computers) Refer to the instruction manual of the external device and make sure it is compatible. IMPORTANT • While the camcorder is connected to the DVD burner, do not open the memory card slot cover and do not remove the memory card.
External Connections • The direct transfer menu appears on the camcorder screen and the button lights up. Transferring Photos to a Computer (Direct Transfer) With the software supplied on the DIGITAL VIDEO Solution Disk CDROM you can transfer still images to a computer simply by pressing . Refer also to the relevant sections in the “Digital Video Software” instruction manual (PDF file). ( 24) Preparations Install the software before you connect the camcorder to the computer for the first time.
[ NOTES • We recommend powering the camcorder using the compact power adapter. • Refer also to the computer’s instruction manual. • Users of Windows Vista, Windows XP and Mac OS X: Your camcorder is equipped with the standard Picture Transfer Protocol (PTP) allowing you to transfer still images (JPEG only) simply by connecting the camcorder to a computer using the USB cable without having to install the supplied software.
External Connections MANUAL TRANSFER OPTIONS 1 Select ( ) a transfer option and press . 2 Select ( ) the image you wish to transfer and press . • [ SELECT & TRANSFER]: Repeat this step to select other still images to transfer. • The button will flash while the images are being transferred. 3 Press FUNC. to return to the transfer menu. NOTES 1 Open the image selection screen. FUNC. [ TRANSFER ORDER] appears on the screen. 2 Select ( ) the still image you want to mark with a transfer order.
Additional Information This chapter contains troubleshooting advice, screen messages, handling and maintenance tips, and other information. Appendix: Menu Options Lists Menu items not available appear grayed out in the FUNC. menu or in black in the setup menus. For details about how to select an item, refer to Using the Menus ( 25). For details about each function, see the reference page. Menu options without a reference page are explained below the tables. FUNC. Menu FUNC.
Additional Information FUNC.
Menu item 3 [REVIEW] 1 2 3 Setting options [ [ OFF], [ 6 sec], [ 2 sec], [ 8 sec], [ 4 sec], 10 sec] – z – [ ADVANCED] when [WIDESCREEN] is set to [ OFF]. Option available only when the recording program is set to [ PROGRAM AE]. Option available only when the drive mode is set to [ SINGLE]. [IMG STAB]: The image stabilizer compensates for camcorder shake even at full telephoto. • The image stabilizer is designed to compensate for a normal degree of camcorder shake.
Additional Information [WIND SCREEN]: The camcorder automatically reduces the background sound of wind when recording outdoors. • Some low-frequency sounds will be suppressed along with the sound of wind. When recording in surroundings unaffected by wind or if you want to record low-frequency sounds, we recommend setting the wind screen to [ OFF ]. [REVIEW]: Selects the time to display a still image after it has been recorded to the memory. • If you press DISP.
Display Setup (LCD Brightness, Language, etc.
Additional Information [START WEEK]: Select the day on which the week starts for the calendar display ( 39). [DEMO MODE]: The demonstration mode displays the camcorder's main features. It starts automatically when the camcorder is powered with the compact power adapter if you leave it turned on for more than 5 minutes. • To cancel the demo mode once it has started, press any button or turn off the camcorder. System Setup (Speaker Volume, Beep, etc.
[QUICK START]: Select whether to activate the Quick Start function when you close the LCD panel in a recording mode ( 35) and the length of time after which the camcorder will end the standby mode and shut off automatically. [SPEAKER VOL.]: Adjust ( ) the volume of the playback. You can also adjust the volume using the joystick guide ( 38).
Additional Information Trouble? Troubleshooting If you have a problem with your camcorder, refer to this section. Sometimes what you think is a malfunction of the camcorder may have the simplest of solutions - please read the “CHECK THIS FIRST” box before going on to the more detailed problems and solutions. Consult your dealer or a Canon Service Center if the problem persists.
Recording Pressing Start/Stop will not start recording. - You cannot record while the camcorder is writing previous recording onto the memory (while the ACCESS indicator is on or flashing). - The memory is full or it already contains 999 scenes (the maximum number of scenes). Delete some recordings ( 41, 58) or initialize the memory ( 30) to free some space. The point where Start/Stop was pressed does not match the beginning/end of the recording.
Additional Information Indicators and Onscreen Displays lights up in red. - Battery pack is exhausted. Replace or charge the battery pack ( 19). appears on the screen. - The camcorder cannot communicate with the battery pack attached so the remaining battery time cannot be displayed. lights up in red. - A memory card error occurred. Turn off the camcorder. Remove and reinsert the memory card. Initialize the memory card ( 30) if the display does not change back to normal. - The memory card is full.
The picture is displayed correctly but there is no sound from the built-in speaker. - Speaker volume is turned off. Adjust the volume ( 38). - If the STV-250N Stereo Video Cable is connected to the camcorder, disconnect it. Memory Card and Accessories Cannot insert the memory card. - The memory card was not facing the correct direction. Turn the memory card over and insert it ( 29). Cannot record on the memory card. - The memory card is full.
Additional Information List of Messages (in alphabetical order) Following the list of messages for the camcorder you can find separate lists for printing-related messages ( 90) and for messages that appear only when using the optional DW-100 DVD Burner ( 89). ACCESSING THE CARD DO NOT REMOVE THE CARD - You opened the memory card slot cover while the camcorder was accessing the memory card or the camcorder started accessing the memory card as you opened the memory card slot cover.
CANNOT PLAY BACK CHECK THE CARD - There is a problem with the memory card. / CANNOT PLAY THE MOVIES IN THE BUILT-IN MEMORY INITIALIZE USING ONLY THE CAMCORDER - The camcorder's built-in memory was initialized using a computer. Initialize the built-in memory with this camcorder ( 30). CANNOT PLAY THE MOVIES ON THIS CARD - Movies cannot be played back from a memory card with a capacity of 64 MB or less.
Additional Information CHECK THE CARD - Cannot access the memory card. Check the memory card and make sure it is inserted correctly ( 29). - A memory card error occurred. The camcorder cannot record or display the image. - If after the message disappears, appears in red, perform the following: Turn off the camcorder and remove and reinsert the memory card. If turns back to green you can resume recording/playback. - Initialize the memory card ( 30).
READING THE CARD - Reading data from the memory card. SOME SCENES COULD NOT BE DELETED - Movies that were protected/edited with other devices cannot be deleted. TASK IN PROGRESS DO NOT DISCONNECT THE POWER SOURCE - The camcorder is updating the memory. Do not disconnect the compact power adapter or remove the battery pack. THE CAMCORDER IS SET TO STILL IMAGE MODE - You pressed Start/Stop while recording still images ( mode).
Additional Information CLOSE THE MEMORY CARD SLOT COVER - The memory card slot cover is open. Close the cover after correctly inserting the memory card ( 29). CONNECT THE COMPACT POWER ADAPTER - The camcorder is being powered by the battery pack. Connect the compact power adapter to the camcorder. DISC ACCESS FAILURE CHECK THE DISC - There was an error when reading the disc or attempting to write onto it. - This message can also appear if condensation has formed.
COMMUNICATION ERROR - The printer is experiencing a data transfer error. Cancel printing, disconnect the USB cable and turn off the printer. After a while, turn the printer back on and reconnect the USB cable. When you are printing using the button, check the print settings. Or, you attempted to print from a memory card that contains a large number of images. Reduce the number of images.
Additional Information PRINT ERROR - Cancel printing, disconnect the USB cable and turn off the printer. After a while, turn the printer back on and reconnect the USB cable. Check the printer status. - When you are printing using the button, check the print settings. PRINT ORDER ERROR - You attempted to set more than 998 still images in the print order. PRINTER COVER OPEN - Close the printer cover securely. PRINTER ERROR - A malfunction has occurred that may require repairs.
Do’s and Don’ts Handling Precautions Camcorder Be sure to observe the following precautions to ensure maximum performance. • Back up your recordings periodically. Make sure to transfer your recordings to an external device such as a computer or digital video recorder ( 68) and back them up on a regular basis. This will protect your important recordings in case of damage and create more free space on the memory. Canon shall not be liable for any data loss. • Do not carry the camcorder by the LCD panel.
Additional Information at temperatures not higher than 30 °C (86 °F). Battery Pack DANGER! Treat the battery pack with care. • Keep it away from fire (or it might explode). • Do not expose the battery pack to temperature higher than 60 °C (140 °F). Do not leave it near a heater or inside a car in hot weather. • Do not try to disassemble or modify it. • Do not drop it or subject it to shocks. • Do not get it wet. • Attach the terminal cover whenever a battery pack is not in use.
• Do not disassemble, bend, drop, or subject memory cards to shocks and do not expose them to water. • Check the direction before inserting the memory card. Forcing a memory card into the slot if it is not correctly oriented may damage the memory card or the camcorder. • Do not attach any labels or stickers on the memory card. • SD/SDHC memory cards have a physical switch to prevent writing on the card so as to avoid the accidental erasure of the card's content.
Additional Information Disposal When you delete movies or initialize the built-in memory ( / only) or memory card, only the file allocation table is altered and stored data is not physically erased. Take the necessary precautions when you dispose of the camcorder or memory card, for example by physically damaging it to prevent the leakage of private data. / If giving the camcorder to another person, initialize the built-in memory using the [COMPL.INIT.
Condensation may form in the following cases: Playback on a TV Screen • When the camcorder is moved quickly from cold to warm places • When the camcorder is left in a humid room • When a cold room is heated rapidly You can only play back your recordings on TVs compatible with the NTSC system.
Additional Information General Information System Diagram (Availability differs from area to area) SS-600/SS-650 Shoulder Strap TV WS-30 Wrist Strap VCR/DVD recorder WL-D88 Wireless Controller CG-800 Battery Charger STV-250N Stereo Video Cable DW-100 DVD Burner DVD discs BP-808 Battery Pack IFC-400PCU USB Cable CA-590 Compact Power Adapter PictBridgecompatible printers SD/SDHC memory card SC-2000 Soft Carrying Case 98 Card reader/writer Computer
Optional Accessories Call or visit your local retailer/dealer for genuine Canon video accessories. You can also obtain genuine accessories for your Canon camcorder by calling: 1-800-828-4040, Canon U.S.A. Information Center. Use of genuine Canon accessories is recommended. This product is designed to achieve excellent performance when used with genuine Canon accessories. Canon shall not be liable for any damage to this product and/or accidents such as fire, etc.
Additional Information Recording and Playback Times The recording and playback times given in the following table are approximate and vary according to recording mode and charging, recording or playback conditions. The effective usage time of the battery pack may decrease when recording in cold surroundings, when using the brighter screen settings, etc. Using the internal memory ( / only) Recording mode XP Usage time SP LP Maximum recording time 195 min. 195 min. 200 min.
Product Codes Provided Accessories CA-590 Compact Power Adapter BP-808 Battery Pack WL-D88 Wireless Controller STV-250N Stereo Video Cable IFC-400PCU USB Cable WS-30 Wrist Strap 1887B002AA 2740B002AA D83-0770-000 3067A002AA (D82-0590-002) 9370A001AA D81-1530-000 Optional Accessories CG-800 Battery Charger SS-650 Shoulder Strap SS-600 Shoulder Strap SC-2000 Soft Carrying Case 2590B002AA 3123A001AA 3122A001AA 9389A001AA 101
Additional Information Specifications FS11/FS10/FS100 System Recording System Television System Recording Media Maximum Recording Time (approximate figures) Image Sensor LCD Screen Microphone Lens Lens Configuration AF System Minimum Focusing Distance White Balance Minimum Illumination 102 Movies: SD-Video Video compression: MPEG-2 Audio compression: Dolby Digital 2ch (AC-3) Still images: DCF (Design rule for camera system), compatible with Exif1 Ver. 2.
Recommended Illumination Image Stabilization Size of Still Images 1 2 More than 100 lx Electronic 1152 x 864, 1152 x 648, 640 x 480 pixels This camcorder supports Exif 2.2 (also called “Exif Print”). Exif Print is a standard for enhancing the communication between camcorders and printers. By connecting to an Exif Print-compliant printer, the camcorder’s image data at the time of shooting is used and optimized, yielding extremely high quality prints.
Additional Information BP-808 Battery Pack Battery type Rated voltage Operating temperature Battery capacity Dimensions Weight Rechargeable lithium ion battery, compatible with Intelligent System 7.4 V DC 0 - 40 °C (32 - 104 °F) 890 mAh 30.7 × 23.3 × 40.2 mm (1.2 × 0.9 × 1.6 in.) 46 g (1.6 oz.) Weight and dimensions are approximate. Errors and omissions excepted. Subject to change without notice.
Index A Abroad, using the camcorder . . . . . . . .97 AEB - Auto exposure bracketing . . . . . .59 Aspect ratio of a connected TV (TV type) . . . . . . . . . . . . . . . . . . . . . . .80 Audio level indicator . . . . . . . . . . . . . . .79 Auto slow shutter . . . . . . . . . . . . . . . . .76 Autofocus (AF): AF frame (9-point AiAF/Center point) . . . . . . . . .77 AV OUT terminal . . . . . . . . . . . . . . . . . .67 B Backlight correction . . . . . . . . . . . . . . .
Additional Information Memory card . . . . . . . . . . . . . . . . . . . . . 94 MIC terminal . . . . . . . . . . . . . . . . . . . . . 50 Microphone . . . . . . . . . . . . . . . . . . . . . . 50 Mini video light . . . . . . . . . . . . . . . . . . . 44 N Night (recording program) . . . . . . . . . . . 43 O Onscreen display selection . . . . . . . 49, 60 Original recordings . . . . . . . . . . . . . . . . 51 P P (recording program) . . . . . . . . . . . . . . 43 Playback Movies . . . . . . . . . . . . .
Z Zoom Advanced zoom . . . . . . . . . . . . . . .33 Zoom speed . . . . . . . . . . . . . . .33, 76 Zoom type . . . . . . . . . . . . . . . . . . .34 Trademark Acknowledgements • The SD logo is a trademark. The SDHC logo is a trademark. • Microsoft, Windows and Windows Vista are trademarks or registered trademarks of Microsoft Corporation in the United States and/or other countries. • Macintosh and Mac OS are trademarks of Apple Inc., registered in the U.S. and other countries.
U.S.A. CANON CONSUMER DIGITAL VIDEO EQUIPMENT LIMITED WARRANTY FOR THE UNITED STATES The limited warranty set forth below is given by Canon U.S.A., Inc. (“Canon USA”) with respect to Canon Consumer Digital Video Equipment (the “Equipment”) purchased in the United States. This limited warranty is only effective upon presentation of your Bill of Sale or other proof of purchase.
CANADA CANON CONSUMER DIGITAL VIDEO EQUIPMENT LIMITED WARRANTY The limited warranty set forth below is given by Canon Canada Inc. (“Canon Canada”) with respect to Canon Consumer Digital Video Equipment (the “Equipment”) purchased in Canada. This limited warranty is only effective upon presentation of a bill of sale or other proof of purchase for this Equipment to a Canon Service Facility when repairs are required.
U.S.A. CANON U.S.A., INC. NEW JERSEY OFFICE 100 Jamesburg Road, Jamesburg, NJ 08831 USA CANON U.S.A., INC. CHICAGO OFFICE 100 Park Blvd., Itasca, IL 60143 USA CANON U.S.A., INC. LOS ANGELES OFFICE 15955 Alton Parkway, Irvine, CA 92618 USA CANON U.S.A., INC. HONOLULU OFFICE 210 Ward Avenue, Suite 200, Honolulu, Hl 96814 USA ❖ If you have any questions, call the Canon U.S.A. Information Center toll-free at 1-800-828-4040 (U.S.A. only). CANADA CANON CANADA INC.