
User Manual


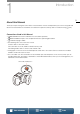

Table Of Contents
- Important Usage Instructions
- Highlights of the XC10
- Table of Contents
- 1. Introduction
- 2. Preparations
- 3. Recording
- Recording Video and Taking Photos
- Video Configuration: Movie Format (MXF/MP4), Resolution (4K/HD), Frame Rate and Bit Rate
- Shooting Modes
- Automatic Gain and ISO Limits
- Exposure
- Light Metering Mode
- White Balance
- Using Looks
- Zooming
- Adjusting the Focus
- Image Stabilizer
- Onscreen Markers and Zebra Patterns
- Setting the Time Code
- User Bit
- Recording Audio
- Using Commercially Available Microphones
- Audio Scenes (Built-in Microphone)
- Audio Recording Level
- Wind Screen (Built-in Microphone)
- Microphone Attenuator (Built-in Microphone)
- Audio Equalizer (Built-in Microphone)
- Microphone Directionality (Built-in Microphone)
- Microphone Attenuator (External Microphone)
- Low Cut Filter (External Microphone)
- Switching the Input
- Audio Limiter
- Audio Compressor
- Monitoring the Audio with Headphones
- Colors Bars/Audio Reference Signal
- Recording GPS Information (Geotagging)
- Slow & Fast Motion Mode
- Pre-recording Mode
- Interval Recording Mode
- Self Timer
- Orientation Detection
- Using an Optional Speedlite Flash
- 4. Customization
- 5. Playback
- Playback
- Playing Back Recordings
- Changing the Index Screen
- Onscreen Icons and Displays during Playback
- Playback Controls during Clip Playback
- Playback Controls during Photo Playback
- Adjusting the Volume
- Displaying Clip Information
- Playing an HD-sized Clip from a 4K Clip
- Capturing Photos from 4K Clips (4K Frame Grab) and HD Clips
- Magnifying Photos during Playback
- Deleting Recordings
- Playback
- 6. External Connections
- 7. Wi-Fi Functions
- 8. Additional Information

About this Manual
10
Menus
Table of Contents Index
Operating modes
A full icon (like ) indicates the function can be
used in the operating mode shown; an empty icon
(like ) means the function cannot be used. For
details, refer to the following.
Basic Operation of the Camcorder
(A 25)
Selecting the Movie Format (MXF/MP4) and
Resolution (Recording in 4K or HD)
(A 49)
When a function requires the use of the
menu, the quick reference shows the
submenus and, when applicable, the
default setting for the menu item. The
example illustration indicates that you
can find the function by selecting the
[ System Setup] menu and then the
[Fan] menu item.
The arrow > is used to abbreviate menu
selections. For a detailed explanation on how
to use the menus, refer to
Using the MENU
Button and Joystick
(A 29). For a concise
summary of all available menu options and
settings, refer to the appendix
Menu Options
(A 133).
When a procedure requires selecting an option,
the available options are listed within or after the
procedure. Brackets [ ] are used to refer to menu
options as they are displayed on screen.
The navigation bar at the bottom of the page offers buttons to
let you jump quickly to the information you want to find.
Takes you to the table of contents.
Takes you to the summary of menu options and settings.
Takes you to the alphabetical index.