
Owner's Manual

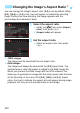
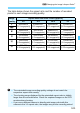
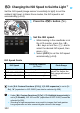
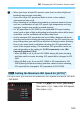
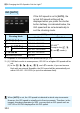
Table Of Contents
- Quick Reference Guide
- Basic Instruction Manual
- Introduction
- Compatible Memory Cards
- Instruction Manual and CD-ROMs
- Table of Contents
- Using This Manual
- Quick Start Guide
- Supplied Accessories
- Parts & Controls
- Getting Started
- Attaching the Strap / Eyepiece Cover
- Charging the Battery
- Installing / Removing the Battery
- Installing / Removing the Memory Card
- Using the LCD Monitor
- Turning On the Power
- Setting the Date, Time and Time Zone
- Selecting the Interface Language
- Attaching and Detaching a Lens
- Lens Image Stabilizer
- Basic Operation
- Quick Control
- Menu Operations
- Using the Touch Screen
- Formatting the Card
- Switching the LCD Monitor Display
- Displaying the Grid
- Feature Guide
- Basic Shooting and Image Playback
- Fully Automatic Shooting
- Full Automatic Techniques
- Disabling Flash
- Creative Auto Shooting
- Shooting Portraits
- Shooting Landscapes
- Shooting Close-ups
- Shooting Moving Subjects
- Special Scene Mode
- Shooting Children
- Shooting Food
- Shooting Candlelight Portraits
- Shooting Night Portraits
- Shooting Night Scenes (Handheld)
- Shooting Backlit Scenes
- Quick Control
- Image Playback
- Setting the AF and Drive Modes
- Image Settings
- Advanced Operations
- Shooting with the LCD Monitor (Live View Shooting)
- Shooting Movies
- Image Playback
- Viewing the CD-ROM Instruction Manuals / Downloading Images to Your Computer
- Instruction Manual
- About Instruction Manual and CD-ROMs
- Memory Card Compatibility
- Using This Manual
- Table of Contents
- Quick Start Guide
- Supplied Accessories
- Parts & Controls
- Introduction
- Getting Started
- Charging the Battery
- Installing and Removing the Battery
- Installing and Removing the Card
- Using the LCD Monitor
- Turning on the Power
- Setting the Date, Time, and Zone
- Selecting the Interface Language
- Attaching and Detaching a Lens
- Lens Image Stabilizer
- Basic Operation
- Quick Control for Shooting Functions
- Menu Operations
- Using the Touch Screen
- Formatting the Card
- Switching the LCD Monitor Display
- Displaying the Grid
- Displaying the Flicker Detection
- Feature Guide
- Basic Shooting and Image Playback
- Fully Automatic Shooting (Scene Intelligent Auto)
- Full Auto Techniques (Scene Intelligent Auto)
- Disabling Flash
- Creative Auto Shooting
- Shooting Portraits
- Shooting Landscapes
- Shooting Close-ups
- Shooting Moving Subjects
- Special Scene Mode
- Shooting Children
- Shooting Food
- Shooting Candlelight Portraits
- Shooting Night Portraits (With a Tripod)
- Shooting Night Scenes (Handheld)
- Shooting Backlit Scenes
- Quick Control
- Shoot by Ambience Selection
- Shoot by Lighting or Scene Type
- Image Playback
- Setting the AF and Drive Modes
- Image Settings
- Setting the Image-Recording Quality
- Changing the Image’s Aspect Ratio
- Changing the ISO Speed to Suit the Light
- Selecting a Picture Style
- Customizing a Picture Style
- Registering a Picture Style
- Matching the Light Source
- Adjusting the Color Tone for the Light Source
- Auto Correction of Brightness and Contrast
- Setting Noise Reduction
- Correction of Lens Peripheral Illumination and Aberrations
- Reducing Flicker
- Setting the Color Reproduction Range
- Advanced Operations
- Flash Photography
- Shooting with the LCD Monitor (Live View Shooting)
- Shooting Movies
- Handy Features
- Image Playback
- Searching for Images Quickly
- Magnified View
- Playing Back with the Touch Screen
- Rotating the Image
- Setting Ratings
- Quick Control for Playback
- Enjoying Movies
- Playing Back Movies
- Editing a Movie’s First and Last Scenes
- Slide Show (Auto Playback)
- Viewing Images on a TV Set
- Protecting Images
- Erasing Images
- Shooting Information Display
- Post-Processing Images
- Printing Images
- Customizing the Camera
- Reference
- Viewing the CD-ROM Instruction Manuals / Downloading Images to Your Computer
- Troubleshooting
- Specs
- Index
- Wi-Fi / NFC Function Basic Instruction Manual
- Wi-Fi / NFC Function Instruction Manual
- Table of Contents
- Introduction
- Getting Started
- Easy Connection
- Advanced Connection
- Wireless LAN Function Flowchart (Advanced Connection)
- Using a Wi-Fi Access Point
- Wi-Fi Connection to a Smartphone
- Wi-Fi Connection to a Wi-Fi Printer
- Viewing Images Using a Media Player
- Wi-Fi Connection to a Web Service
- Connecting to a Wireless LAN from a Playback Screen
- Managing Settings
- Troubleshooting Guide
- Reference
- Troubleshooting
- Specs
- Index
- Microphone Quick Start Guide
- Scans of Supplied CD-ROMs
- Do More with Macro Booklet
- Flash Classroom Booklet
- Lens Warranty
- Camera Warranty

A Customizing a Picture StyleK
128
g
Sharpness
Adjusts the sharpness of the image.
To make it less sharp, set it toward the E end. The closer it is to E,
the softer the image will look.
To make it sharper, set it toward the F end. The closer it is to F, the
sharper the image will look.
h
Contrast
Adjusts the image contrast and the vividness of colors.
To decrease the contrast, set it toward the minus end. The closer it is
to G, the more muted the image will look.
To increase the contrast, set it toward the plus end. The closer it is to
H, the crisper the image will look.
i
Saturation
Adjusts the color saturation in the image.
To decrease the color saturation, set it toward the minus end. The
closer it is to G, the more diluted the colors will look.
To increase the color saturation, set it toward the plus end. The
closer it is to H, the bolder the colors will look.
j
Color tone
Adjusts the color tone of skin.
To make the skin tone redder, set it toward the minus end. The
closer it is to G, the redder the skin tone will look.
To reduce skin redness, set it toward the plus end. The closer it is to
H, the more yellow the skin tone will look.
Parameter Settings and Effects