
Owner's Manual


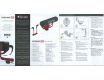
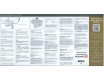


Table Of Contents
- Quick Reference Guide
- Basic Instruction Manual
- Introduction
- Compatible Memory Cards
- Instruction Manual and CD-ROMs
- Table of Contents
- Using This Manual
- Quick Start Guide
- Supplied Accessories
- Parts & Controls
- Getting Started
- Attaching the Strap / Eyepiece Cover
- Charging the Battery
- Installing / Removing the Battery
- Installing / Removing the Memory Card
- Using the LCD Monitor
- Turning On the Power
- Setting the Date, Time and Time Zone
- Selecting the Interface Language
- Attaching and Detaching a Lens
- Lens Image Stabilizer
- Basic Operation
- Quick Control
- Menu Operations
- Using the Touch Screen
- Formatting the Card
- Switching the LCD Monitor Display
- Displaying the Grid
- Feature Guide
- Basic Shooting and Image Playback
- Fully Automatic Shooting
- Full Automatic Techniques
- Disabling Flash
- Creative Auto Shooting
- Shooting Portraits
- Shooting Landscapes
- Shooting Close-ups
- Shooting Moving Subjects
- Special Scene Mode
- Shooting Children
- Shooting Food
- Shooting Candlelight Portraits
- Shooting Night Portraits
- Shooting Night Scenes (Handheld)
- Shooting Backlit Scenes
- Quick Control
- Image Playback
- Setting the AF and Drive Modes
- Image Settings
- Advanced Operations
- Shooting with the LCD Monitor (Live View Shooting)
- Shooting Movies
- Image Playback
- Viewing the CD-ROM Instruction Manuals / Downloading Images to Your Computer
- Instruction Manual
- About Instruction Manual and CD-ROMs
- Memory Card Compatibility
- Using This Manual
- Table of Contents
- Quick Start Guide
- Supplied Accessories
- Parts & Controls
- Introduction
- Getting Started
- Charging the Battery
- Installing and Removing the Battery
- Installing and Removing the Card
- Using the LCD Monitor
- Turning on the Power
- Setting the Date, Time, and Zone
- Selecting the Interface Language
- Attaching and Detaching a Lens
- Lens Image Stabilizer
- Basic Operation
- Quick Control for Shooting Functions
- Menu Operations
- Using the Touch Screen
- Formatting the Card
- Switching the LCD Monitor Display
- Displaying the Grid
- Displaying the Flicker Detection
- Feature Guide
- Basic Shooting and Image Playback
- Fully Automatic Shooting (Scene Intelligent Auto)
- Full Auto Techniques (Scene Intelligent Auto)
- Disabling Flash
- Creative Auto Shooting
- Shooting Portraits
- Shooting Landscapes
- Shooting Close-ups
- Shooting Moving Subjects
- Special Scene Mode
- Shooting Children
- Shooting Food
- Shooting Candlelight Portraits
- Shooting Night Portraits (With a Tripod)
- Shooting Night Scenes (Handheld)
- Shooting Backlit Scenes
- Quick Control
- Shoot by Ambience Selection
- Shoot by Lighting or Scene Type
- Image Playback
- Setting the AF and Drive Modes
- Image Settings
- Setting the Image-Recording Quality
- Changing the Image’s Aspect Ratio
- Changing the ISO Speed to Suit the Light
- Selecting a Picture Style
- Customizing a Picture Style
- Registering a Picture Style
- Matching the Light Source
- Adjusting the Color Tone for the Light Source
- Auto Correction of Brightness and Contrast
- Setting Noise Reduction
- Correction of Lens Peripheral Illumination and Aberrations
- Reducing Flicker
- Setting the Color Reproduction Range
- Advanced Operations
- Flash Photography
- Shooting with the LCD Monitor (Live View Shooting)
- Shooting Movies
- Handy Features
- Image Playback
- Searching for Images Quickly
- Magnified View
- Playing Back with the Touch Screen
- Rotating the Image
- Setting Ratings
- Quick Control for Playback
- Enjoying Movies
- Playing Back Movies
- Editing a Movie’s First and Last Scenes
- Slide Show (Auto Playback)
- Viewing Images on a TV Set
- Protecting Images
- Erasing Images
- Shooting Information Display
- Post-Processing Images
- Printing Images
- Customizing the Camera
- Reference
- Viewing the CD-ROM Instruction Manuals / Downloading Images to Your Computer
- Troubleshooting
- Specs
- Index
- Wi-Fi / NFC Function Basic Instruction Manual
- Wi-Fi / NFC Function Instruction Manual
- Table of Contents
- Introduction
- Getting Started
- Easy Connection
- Advanced Connection
- Wireless LAN Function Flowchart (Advanced Connection)
- Using a Wi-Fi Access Point
- Wi-Fi Connection to a Smartphone
- Wi-Fi Connection to a Wi-Fi Printer
- Viewing Images Using a Media Player
- Wi-Fi Connection to a Web Service
- Connecting to a Wireless LAN from a Playback Screen
- Managing Settings
- Troubleshooting Guide
- Reference
- Troubleshooting
- Specs
- Index
- Microphone Quick Start Guide
- Scans of Supplied CD-ROMs
- Do More with Macro Booklet
- Flash Classroom Booklet
- Lens Warranty
- Camera Warranty

S.curlng
the
able
Securing the cable will
help
to
eliminate undesired
noise caused
by
cable movement. The cable can
be
secured
to
the rear
of
the
VideoMic
GON,
for
added
strain relief between the microphone and
the
input
of
your camera.
To
secure the cable, first ensure
that
there
is
a small
amount
of
slack between the microphone
output
socket and
the
cable clip, then press the cable into
the
slot
on
the
base
of
the
suspension mount.
Arretieren
des
Kabels
Nur ein sachgemiiB arretiertes Kabel kann keine
unerwUnschten St6rgeriiusche erzeugen.
Das
Kabel kann
bei
Bedarf auch
an
der
RUckseite des
VideoMic
G0
1
"'
arretiert werden,
um
zu
vermeiden,
dass sich
die
Verbindung bei einer forschen
Bewegung
lOst.
Geben
Sie
dem
Kabel zwischen
dem
Mikrofonausgang und
dem
Kabelclip etwas
Spielraum
und
drUcken Sie
es
anschlieBend in
den
Schlitz ganz unten
an
der
Aufhiingungseinheit.
F
ixer
le
cible
La
fixation
du
clble
evite
tout
bruit
indesirable
cause par les mouvements
du
cable.
Le
cable
peut
etre
fixe a l'arriere du VideoMic
G0
1
"'
pour
reduire
encore les tractions entre
Ia
sortie
du
microphone
et
I' entree
de
Ia
camera.
Pour fixer
!e
cable, verifiez
d'abo
rd
qu'il
y a un peu
de
jeu entre
Ia
sortie du micro et
Ia
pince
du
ciible
puis enfoncez le cable dans
Ia
fente situee a
Ia
base
de
Ia
suspension.
Fi
jad
6n
del
ca~e
Fijando
el
cable
se
eliminan los ruidos
no
deseados
causados
por
el movimiento
del
mismo.
El
cable
puede fijarse
a
Ia
parte posterior del VideoMic
G0
1
"',
de
modo
que
no
que
de
demasiado tenso
entre el micr6fono
y
Ia
entrada
de
Ia
C<l.mara.
Para
fijar el cable, primero comprueba que el cable
no
quede
demasiado tense
ent
re
el conector
de
salida
del
micr6fono y el clip, y
luego
presi6nalo en
Ia
ranura
de
Ia
base del soporte suspendido
Push cable
in
from
bottom
Flssaggio del cavo
Fissando il cavo contribuirete ad eliminare i rumori
indesiderati causati
proprio
dal
movimento
del
cavo.
Per
una maggiore protezione contra
gli
strappi del cava tra microfono e ingresso della
videocamera, il cava puC essere fissato
al
retro del
VideoMic GO™.
Per fissare il cavo assicuratevi prima che
ci
sia
un
po'
di
gioco
nella
lungheua
trail
connenore
di
uscita
del microfono
ed
il
gancio del cava,
poi
spingete
in
cavo nella fessura che
si
trova alia base del supporto
elastica.
II!
IE
'I! II!
~~'1!111~~~~'1!1113~§~~~~~~-fi·
\t~tlCJ~:i:EJIJ
VideoMic
GO"'
li§ifiBJ..~.ia.-~~11*
i!llif1HilliUIA210J~Jill1J
·
~~l!''l!ll!
illliltli!ili!i!llilllt!llliD'IIl'l!ll!ll<21~
~~ffi~·~Fo~'I!II!~A~~ro~~k~lli··
7-7J1<1>111lE
7-:711-l'~lt~?><:c-,,
7-:711AJ)IIJl!ICJ:?
T~G?>~!I!r.l./..,-;(~m~~?>C:I:/:f-,l!;JO
l".
7-
:1Jt..~
VideoMic
G0"'~8fll;:l§lli;T~
.::C~,
1J:><5o:>At.t811CX-1~MI;:t.J'1J'QI\?ai~
lliOI:~<>c:c/:f-,l!>!O~.
7-:711-l'
~lt~<>=r~.
>~;'§""..,.?t!l1Jilll'i'c7
-::1JI/.JI)'Y:1M!;:AIJ{O)~Q#::ft:M~tt,
-ttlb'
67-:1JL-:tt-ttAI'\./:::.-3
::..-x.,::..-r.a8Po:>.Ao'.Y
HCJIIGi.!.ih>IO~.
'IOI.
:i!~0\71
71101.-i
.Jl~liP2!
~01-1-
*~2:1~~
<c.!~
!l!:tl &:E
~g*
WXI~E
CiiO!l
£¥01
~LJQ.
010
13.2/7101121
\l"'
AIOI"l
'PI"'\'!~"'
~"~•
!i-ltill.
VideoMic
GO"'~
"'-'i!!OI
?lOII-i-
..Jl~AI~
4-
~e4q.
71101•
.J!~-j-
~~A1E-
ij£!
0~0~~
-i-~
~~~
~01.
WEI
AfOI£1
OJ#
~-LI"-i
~CCJ"ts~.:i!
?JO
I
*i-
A1~@~
Of~§
Ot21~011
-1JXI~
W':!
<(!-££
WOI
\!ll!)LICI.
Setting
up
your
camera
for
use
with
th
e
VldeoMic
GO",.
The VideoMic
GO™
does
not
require batteries
for operation,
but
instead uses
the
plugin
power
supplied
via
your camera's microphone
input
.
For best results with the VideoMic
GO"",
set your
camera's audio
input
to
the
following settings where
possible.
Audio
Input: Microphone input.
Audio
Level/Gain
control:
Manual (when available)
Plug
in
Power
:
ON
Warning!
Do
not
supply
phantom
power
to
the
VideoMic
GOTM.
Phantom
power
is
the
24
or48
volt
powering
option
supplied through professional
XLR
microphone inputs on some cameras. The VideoMic
GOTM
requires Plugin power, which
is
typically
supplied
by default through your camera's 3.Smm
microphone
input
socket at around
2-
3 Volts.
Refer
to
the user manual
supplied
with your camera
for instructions on adjusting audio settings.
Notwen<Uge
Elnstellungen
auf
der
Kamera
Das VideoMic
GO™
wird Gber
die
Kabelverbindung
mit
dem
Mikrofoneingang gespeist (•Plug-In
Power
").
Urn
mit
dem
VideoMic
GO™
eine optimale
Audioqualitiit
zu
erzielen, sollten
Sie
auf
der
Kamera
folgende Einstellungen wiihlen.
Audio-Eingabe:
Mikrofoneingang.
Audiopegei/Trimmregelung
: Manuel I (falls
mOglich)
Kabelspeisung
:: An
Warnung! Das VideoMic
GOn'
darf auf keinen
Fall
mit
Phantomspeisung versorgt werden.
Phantomspeisung hat eine Spannung von 24V
oder
48'1.
die
in
der
Regel von prolessionellen
XLR-Mikrofoneingiingen ausgegeben wird.
Das
VideoMic
GOTN
funktioniert nur
mit
einer so
genannten •pJug-ln Power•-speisung von
2-"3>1.
Viele Kameras geben diese Uber ihren 3,5mm-
Mikrofoneingang
aus.
Sound
recording
Sound rec.
Rec. level
Input
Manual
,_!............
Microphone input
-
db40
12
0
l
----------------=----
---
~
R
•••••••••••••••••••••
----
Weitere Hinweise
fUr
die erforderlichen
Audio-Einstellungen entnehmen
Sie
bitte
der
Bedienungsanleitung lhrer Kamera.
Configurer
Ia
camera
pour
l'utiliser
avec
le
VldeoMic
G0
1
..
le
VideoMic
GO™
n'a pas besoin
de
piles
pour
fonctionner:
it
utilise I' alimentation
PIP
(·plug-in
power
•) fournie par I' entree micro
de
Ia
camera.
Pour
obtenir
un
resultat optimal avec
le
VideoMic
GO™,
utilisez,
si
possible, les regtages suivants
pour
I' entree audio
de
votre camera.
Entr
ie
audio:
Entree micro.
Riglage
du
niveau
audio/gain:
Manuel
(si
disponible)
Alimentation
PIP
('plug-in
power'):
Activee
Attention!
N'envoyez pas d'alimentation fant6me
au VideoMic GO""". l'alimentation fant6me a
une tension
de
24
ou
48V et est fournie par des
entrees
de
micro
XLR
professionnelles sur certaines
cameras.
Le
VideoMic
Gom
utilise une alimentation
PIP
t•ptug-in
power•)
d'environ
2-!V
fournie
generalement par defaut
par I' entree micro
de
3,5mm
de
Ia
camera.
Voyez
le
mode
d'emploi
de
votnt
camera
pour
nvoir
comment
effectuer
les
r&glages
audio.
Configurar
Ia
camara
para
utilizarta con el
VideoMicG0
1
M
El
VideoMic
G0
1
,.
no
necesita baterias para
funcionar, sino que utiliza
Ia
alimentaci6n
suministrada desde
Ia
entrada
de
micr6fono
de
Ia
ciimara.
Para obtener los mejores resultados con el
VideoMic GO™, configura
Ia
entrada
de
audio
de
Ia
ciimara con estos ajustes siempre que sea posible.
Entrada
de
audio: Entrada
de
micr6fono.
Nlvel
de
audio/control
del
gain:
Manual
(si
estii
disponible)
Atlmentad6n
mediante
conector
: ACTIVADA
jAtenci6n!
No
utilices alimentaci6n
phantom
en el VideoMic
GO™.
La
alimentaci6n
phantom
es
Ia
opci6n
de
alimentaci6n
de
24
6 48 voltios
suministrada desde
las
entradas
de
micr6fono
XLR
profesionaies
de
algunas ciimaras.
El
VideoMic
GO™
utiliza
Ia
alimentaci6n del conector; que
normalmente
se
suministra a traves del conector
de
entrada del micr6fono
de
3,5mm,
de
unos
2-3
voltios.
Consulta
las
instrucciones para definir los ajustes
de
audio
en
el
manual
del
usuario
que
se
entrega
conlaciimara.
lmpostare
Ia
videocamera
per
l'uso
con
il
VideoMic
GO'
..
Per
funzionare,
il
VideoMic
GO™
non
ha
bisogno
di
banerie,
ma
usa
l'alimentazione che viene fornita
dall'ingresso microfonico della vostra videocamera.
Per
ottenere i migliori risultati dal VideoMic GO™,
se
possibile, impostate l'ingresso audio della vostra
videocamera come indicate
qui
di
seguito.
lngreS5o
Audio:
lngresso microfonico.
Uvello
Audio/Contralto
Guadagno
(Gain):
Manuale
(se
disponibile)
Plug
in
Pow
er: Aniva (ON)
Attenzionel Non fornite alimentazione phantom
al
VideoMic
GOTM.
l'alimentazione
phantom
e
un'opzione che hanna alcune videocamere
per
fornire
24
o 48
volt
tramite ingressi microfonici
professionali
di
tipo
XLR.
II
VideoMic
G0
1
"'
richiede
l'alimentazione Plugin power; che, in genere, viene
fornita
di
default dall'ingresso microfonico minijad:
da 3,5mm della vostra videocamera
ed
e all'incirca
di2-3Volt.
Per
istruzioni o regolazioni riguardanti le
impostazioni audio, consultate
il
manuale
di
istruzioni della vostra videocamera.
ta•:KIM.Ifffl
VideoMic
GO"'
v;deoMk
GON
~~~~~'l!il!!!ilt'F
· iliil!i!lllllill'111
l'JltHIL~i!ll!lliAi!\'1!
•
~7~t8flffl
VideoMic
GO""'
~-ti~-
~~CJ
ll!*!l!llll~lf!llliiA~~ATi2•
•
fi!llliiA: lf!ll;l'llliA·
'1!'1'1!!11!/11~1!!11!:
-"~
(
IIDJI!~IIIi
l
1111'111'1!:
:lfl3
·~ !
~~Ia)
VideoMic
GO"'
11UUJa-ut~
•
£Ja
'l!liiJ!!IIjtffill\l!il'l~ll!
XLR
i!ll!lliAili!\~
24
§I
48
f:'<'l!lll
• v;deoM;c
GON
lllli!II'JIIiii'II\'I!Eilffilll
~
3.Smm
i!II!IIIAiliDJli!\ ·
111:111"
2-3
f:'<
•
~•~ml!lm~~~lllF-"OO~~~~•w!lli2•
·
VldeoMic
GO
""
fi:IVIT~Ja<01.J:;J.7Q)
••
VideoMic
GO''" (<J:.ff(;:J(-.y'TIJ-11'-f:Jio:>ftt.)
t'JC
tJ)I..5aYX..-f?A.t:tiMTb'SaY::I5-'J-1:.-J(
?-tJ'.elll!.,~
.
VideoMic
GO™o:>ttfiti:ft+)}l;:~tiCtt.Q:t::d)t;:
l<l.
tJ)I.50J;;:t-T--r
;;tA.:JJI;:~"""FOJiiit:~O't~5
·~<Blb/1;>(.,;10~
.
>l-7'·<>tJ..1J: "..,-?J,.1J
/f"-7-f;lf"V"'-JJ.../?"-f">:::J::..-t--O-JJ...: "X=.:I.Y
JJ...
(P}fttJ.II~)
-::17~-<::..-JC?-:;;t
::;....
·~!
VideoMic
GO~"I;:Icl:J7>9b.IUt~I@J1
(;:-ff}ijl..,.t~l.Yl"(~Cl.'
•
:JJ">9b.ttil!<l,
JJ
l!lOJ
XLR
"..,-?J,.1J~;!GT-ctl?>24
>101::
1<l4Bifvt..t--OJ.._;;:t:1>-3>~®tJ.
t:.tu;:~Jl;
L...ft.:JJ)I.
50JMUI:f:ifl-:::>b~l.tiJ:l".
VideoMic
GO'"
1~.
1JP50J3.5mm
"..,.?J..1Jilll'i'~;&G
TT:J/I"Jt..-t--Cl.tT~C.tl.Q.
~2
....
JJfVt..-t--OJ
75':/
..,./1
(?-tJ'<il!l!.,~.
:;:t-7---r
;;
f
1StlE:OJIIID1i$1;:-:::>t.
'L!<l,
<15~~0)
1J>'50J!II<l!UII~•~•!!«t..T<t.Occ'.
v;deoM;c
GON
AI&~
'lit!
•10121.11'!1
VideoMic GO"'£!
~~Ol-E
~EI2.J7~
i!.Ri~"f;r;.
l
~.£4.
Qlil
7~Dilct£l
0~013
~~~
-8-ti!l
~~
~a-i- ~o~ot
~LJq.
VideoMic
G0""£1
A~§OIA1
.!1-t:!£1
~~
'1!£i!l\!J,
•1012l"l.2CI.2
'11"1~
<Iff"!"'
'It!
"1£01~1
l!j~OftiAI.2.
.2.CI.2
'lJ~
:
o~OI3.
ogj~
.2!:1.2
~'l/7tlll!
~-It
:
9~
.?E~(7
~
%~
~.!f-01~
"'ff)
.i!l::>\'!~ti:
•HI
~~!
VideoMic
GO""OI
~!:I
~~i-
~.g.~l;r;.l
c~~AI.2..
~!:I
~~.g.
24
!f.E
48.;..§.£1
~~~£.
W.lf.
7~012{01
~-E
~~71-§
XLR
0~013.
~~
9";r;.~·
-*~
~a-SLjq.
VideoMic
GO"'E
'i!'t!-~.2.£
7~012{£J
3.5mm
c~Oj=t
~~
.:1:~-i
~~
~.g.£1~
2-3
.!§.
412121
-
~~~
~~~
'!lli£WLI<I.
.2CI.2l!l~
"'i!!i!
'II"IA1e
710121"1
Al
ff>l
~'l!A1•
~~a~~
..
q.2..
Thank you for
purchasing
the
VIDEOMIC
~
~
RODE.
MICROPHONES
•