
Owner's Manual


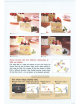
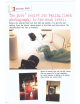
Table Of Contents
- Quick Reference Guide
- Basic Instruction Manual
- Introduction
- Compatible Memory Cards
- Instruction Manual and CD-ROMs
- Table of Contents
- Using This Manual
- Quick Start Guide
- Supplied Accessories
- Parts & Controls
- Getting Started
- Attaching the Strap / Eyepiece Cover
- Charging the Battery
- Installing / Removing the Battery
- Installing / Removing the Memory Card
- Using the LCD Monitor
- Turning On the Power
- Setting the Date, Time and Time Zone
- Selecting the Interface Language
- Attaching and Detaching a Lens
- Lens Image Stabilizer
- Basic Operation
- Quick Control
- Menu Operations
- Using the Touch Screen
- Formatting the Card
- Switching the LCD Monitor Display
- Displaying the Grid
- Feature Guide
- Basic Shooting and Image Playback
- Fully Automatic Shooting
- Full Automatic Techniques
- Disabling Flash
- Creative Auto Shooting
- Shooting Portraits
- Shooting Landscapes
- Shooting Close-ups
- Shooting Moving Subjects
- Special Scene Mode
- Shooting Children
- Shooting Food
- Shooting Candlelight Portraits
- Shooting Night Portraits
- Shooting Night Scenes (Handheld)
- Shooting Backlit Scenes
- Quick Control
- Image Playback
- Setting the AF and Drive Modes
- Image Settings
- Advanced Operations
- Shooting with the LCD Monitor (Live View Shooting)
- Shooting Movies
- Image Playback
- Viewing the CD-ROM Instruction Manuals / Downloading Images to Your Computer
- Instruction Manual
- About Instruction Manual and CD-ROMs
- Memory Card Compatibility
- Using This Manual
- Table of Contents
- Quick Start Guide
- Supplied Accessories
- Parts & Controls
- Introduction
- Getting Started
- Charging the Battery
- Installing and Removing the Battery
- Installing and Removing the Card
- Using the LCD Monitor
- Turning on the Power
- Setting the Date, Time, and Zone
- Selecting the Interface Language
- Attaching and Detaching a Lens
- Lens Image Stabilizer
- Basic Operation
- Quick Control for Shooting Functions
- Menu Operations
- Using the Touch Screen
- Formatting the Card
- Switching the LCD Monitor Display
- Displaying the Grid
- Displaying the Flicker Detection
- Feature Guide
- Basic Shooting and Image Playback
- Fully Automatic Shooting (Scene Intelligent Auto)
- Full Auto Techniques (Scene Intelligent Auto)
- Disabling Flash
- Creative Auto Shooting
- Shooting Portraits
- Shooting Landscapes
- Shooting Close-ups
- Shooting Moving Subjects
- Special Scene Mode
- Shooting Children
- Shooting Food
- Shooting Candlelight Portraits
- Shooting Night Portraits (With a Tripod)
- Shooting Night Scenes (Handheld)
- Shooting Backlit Scenes
- Quick Control
- Shoot by Ambience Selection
- Shoot by Lighting or Scene Type
- Image Playback
- Setting the AF and Drive Modes
- Image Settings
- Setting the Image-Recording Quality
- Changing the Image’s Aspect Ratio
- Changing the ISO Speed to Suit the Light
- Selecting a Picture Style
- Customizing a Picture Style
- Registering a Picture Style
- Matching the Light Source
- Adjusting the Color Tone for the Light Source
- Auto Correction of Brightness and Contrast
- Setting Noise Reduction
- Correction of Lens Peripheral Illumination and Aberrations
- Reducing Flicker
- Setting the Color Reproduction Range
- Advanced Operations
- Flash Photography
- Shooting with the LCD Monitor (Live View Shooting)
- Shooting Movies
- Handy Features
- Image Playback
- Searching for Images Quickly
- Magnified View
- Playing Back with the Touch Screen
- Rotating the Image
- Setting Ratings
- Quick Control for Playback
- Enjoying Movies
- Playing Back Movies
- Editing a Movie’s First and Last Scenes
- Slide Show (Auto Playback)
- Viewing Images on a TV Set
- Protecting Images
- Erasing Images
- Shooting Information Display
- Post-Processing Images
- Printing Images
- Customizing the Camera
- Reference
- Viewing the CD-ROM Instruction Manuals / Downloading Images to Your Computer
- Troubleshooting
- Specs
- Index
- Wi-Fi / NFC Function Basic Instruction Manual
- Wi-Fi / NFC Function Instruction Manual
- Table of Contents
- Introduction
- Getting Started
- Easy Connection
- Advanced Connection
- Wireless LAN Function Flowchart (Advanced Connection)
- Using a Wi-Fi Access Point
- Wi-Fi Connection to a Smartphone
- Wi-Fi Connection to a Wi-Fi Printer
- Viewing Images Using a Media Player
- Wi-Fi Connection to a Web Service
- Connecting to a Wireless LAN from a Playback Screen
- Managing Settings
- Troubleshooting Guide
- Reference
- Troubleshooting
- Specs
- Index
- Microphone Quick Start Guide
- Scans of Supplied CD-ROMs
- Do More with Macro Booklet
- Flash Classroom Booklet
- Lens Warranty
- Camera Warranty

0
flash
on
lett
6
Flash
at
rear
D
Flash
on
left
.
at
rear
&
Built-In
flash
Choose
the
best
shot
from
different
combinations
of
light
and
shadow.
first
mount
EOS
on
a
tripod
and
compose
the
shot.
Then
remove
the
external
flash
unit
and
use
Canon
's
unique
remote
release
shooting
to
shoot
using
the
flash
.
Vary
interplay
of
light
and
shadow
by
aiming
flash
in
different
directions
.
When
finished
shooting,
simply
choose
the
best
shot.
Give
it
a try
and
prepare
to
be
pleasantly
surprised!
How
remote
release
sh
.
ooting
works
0
Activate
remote
control
8
Point
flash
at
EOS
and
mode.
press
send
button
once.
8
Position
flash
as
desired.
0
fire
flash
to
release
shutter.
From
the
EOS
menu
,
enable
the
master selling
then
set
flash
to
SLAVE
.
Press
the
send
button
on
the
external
flash
umt
to
ronf1rm
that
no
obstacles
are
between
It
and
EOS
(Note:
Make
sure
the
camera's
built-in
flash
has
popped
up.)
Position
the
external
tlash
unit
to
Press
the
send
button
The
shutter
light
the
subtect
as
desired
releases
and
the
flash
!ires
two
second
later
I 08 I