Version 1 Software Instruction Manual This software is for use with Windows® XP only.
Read Carefully Before Using CANON SOFTWARE LICENCE AGREEMENT IMPORTANT: READ THIS AGREEMENT CAREFULLY BEFORE CLICKING “YES” AT THE BOTTOM OF THE SCREEN AND INSTALLING THE SOFTWARE. This agreement (“Agreement”) is a legal contract between you, either an individual or entity, and Canon Inc. (“Canon”) governing your use of this software program and “online” or electronic documentation, if any (collectively, the “SOFTWARE”). BY CLICKING “YES” BELOW, YOU AGREE TO BE BOUND BY THE TERMS OF THIS AGREEMENT.
Read Carefully Before Using regulations, or without all necessary approvals. 5. SUPPORT AND UPDATE Neither Canon, nor its subsidiaries, dealers or distributors will be responsible for providing maintenance or support for use of the SOFTWARE. No updates, fixes or support will be made available for the SOFTWARE. 6. LIMITED WARRANTY AND DISCLAIMER OF LIABILITY It is your responsibility to choose, maintain and match the hardware and software components of your computer system.
Read Carefully Before Using SELLER, SO THE ABOVE DISCLAIMERS AND EXCLUSIONS MAY NOT APPLY TO YOU. 7. TERM This Agreement is effective upon your acceptance hereof by clicking “YES” below and remains in effect until expiration of all copyright interests in the SOFTWARE unless earlier terminated. You may terminate this Agreement by destroying the SOFTWARE including any and all copies thereof.
Contents Read Carefully Before Using .............................................................................................. 2 Read This First .................................................................................................................... 6 Canon camcorder compatible with DV-PC Recorder.......................................................... 6 Required Accessories .........................................................................................................
Read This First DV-PC Recorder is a software that enables you to record on the tape in the camcorder and on the computer hard disk by connecting a camcorder equipped with the DV CONTROL function to a computer using a IEEE1394 (DV) cable. This allows you to start editing the video on the computer right after recording (optional editing software required).
System Requirements OS Microsoft Windows XP Home Edition or Professional (installation of Service Pack 1 recommended) Proper operation is not guaranteed on Windows XP that has been upgraded from a previous version. CPU Pentium III 800 MHz or more (Pentium 4 or later recommended) RAM 128 MB or more (256 MB or more recommended) Free Hard Disk Space For installation Free Hard Disk Space: 30 MB or more For video recording Free Hard Disk Space: 1 GB or more (1 minute of video recording uses 0.
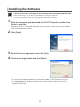
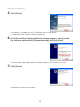
Installing the Software ❍ Do not connect the camcorder to the computer when installing DV-PC Recorder. ❍ You need to log in as an administrator before installing the software. ❍ Close any programs that are running before installing the software. 1. Start the computer and download the DV-PC Recorder installer from Canon's web site. Download the DV-PC Recorder following the instructions on the web site and doubleclick the downloaded installer. 2. Click [Next]. 3. Read the license agreement and click [Yes].
Installing the Software 5. Click [Finish]. • Installation is complete and DV-PC Recorder starts automatically. • A dedicated driver will be installed automatically. 6. If the [Found New Hardware Wizard] window appears, select [Install the software automatically (Recommended)] and click [Next]. If a warning message regarding the installation appears, click [Continue Anyway]. 7. Click [Finish]. Installation of the driver is complete.
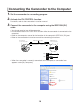
Connecting the Camcorder to the Computer 1. Set the camcorder to a recording program. 2. Activate the DV CONTROL function. For details, refer to the camcorder instruction manual. 3. Connect the camcorder to the computer using the IEEE1394 (DV) cable. • You do not need to turn off the computer. • Do not deactivate the DV CONTROL function while the camcorder is connected to the computer. • Refer to the computer manual for the location of the computer’s IEEE1394 (DV) port.
Starting DV-PC Recorder You need to log in as an administrator before starting DV-PC Recorder. 1. Double-click the [DV-PC Recorder] icon on the desktop (or select [DV-PC Recorder] from the [start] menu). DV-PC Recorder starts. 2. Confirm the target folder (video folder) of the video recording and click [OK]. • If you wish to change the target folder, click [Modify folder] and select another folder.
Starting DV-PC Recorder Main Panel 1 2 3 4 5 6 7 1 System menu Displays DV-PC Recorder’s system menu ( 13). 2 [Record] Displays the control panel for recording the camcorder picture on the hard disk ( 22). 3 [Playback] Displays the control panel for playing back recordings saved on the hard disk ( 25). 4 Camcorder information Shows the camcorder model name and the status of the tape in the camcorder.
Starting DV-PC Recorder System Menu Clicking on the upper left of the Main Panel (or right-clicking the [DV-PC Recorder] icon on the task bar) displays the system menu. The system menu cannot be displayed while a dialog is shown. 1 2 3 1 Close Closes DV-PC Recorder. 2 Help Topics Displays the help topics. 3 About DV-PC Recorder Displays the version of DV-PC Recorder.
Starting DV-PC Recorder Camcorder Screen Display The DV-PC Recorder status and the remaining recording time on the hard disk are displayed on the camcorder screen. Icon DV-PC Recorder Status Not started Stop mode Recording Frame dropping occurred ( 23). Cannot record ( 29) Check the setting of the video folder. ❍ If [ ] is not displayed, activate the DV CONTROL function of the camcorder. ❍ When the hard disk status does not allow recording (e.g.
Setting Video Folder, File Name and Recording Mode Select the settings such as target folder (video folder), file name and recording mode before recording the camcorder picture on the hard disk. 1. Click . 2. Click the [General] or [Record] tab. 3. Select the settings and click [OK]. The settings will be applied, and the [Option settings] window closes.
Setting Video Folder, File Name and Recording Mode [General] Tab 1 2 3 1 Select the video folder settings. [Video folder]: Shows the selected folder. [Performance check]: Checks whether the selected video folder can be used for saving the recordings ( 18). [Modify]: Selects a different folder. [Create sub-folder]: Creates a subfolder within the folder shown under [Video folder].
Setting Video Folder, File Name and Recording Mode [Record] Tab 1 2 3 1 Select the mode for recording on the hard disk. [Standard]: A new folder will be created each time you start recording a new scene. [Sequence]: The new scene will be added to the same folder. 2 Select the size of the preview that shows the camcorder picture on the computer screen. • When you select [No preview], the camcorder picture will not be shown on the computer screen during recording.
Setting Video Folder, File Name and Recording Mode Performance Check You can check whether the selected video folder can be used for saving the recordings before you start recording on the hard disk. 1. In the [Option settings] window, select the [General] tab, select the video folder, and click [Performance check]. 2. Click [Start]. • The performance check of the hard disk starts.
Setting Video Folder, File Name and Recording Mode • The performance check takes 30 seconds. • To cancel the performance check, click [Stop]. 3. When performance check is complete, review the result and click [Close]. • A bar below the red line indicates that frames may be dropped during recording (a part of the picture may not be written to the file). • Even if all bars are above the red line, frames may be dropped when a program accessing the hard disk (e.g. anti-virus software) is activated.
Recording on the Hard Disk You can record video and audio from a connected camcorder on the hard disk of the computer by operating the camcorder or the recording panel of DV-PC Recorder. ❍ Before you start recording: • Make a performance check ( 18) to make sure that the recording can be saved to the selected video folder. • Make sure that [ ] is displayed on the camcorder screen. If [ ] or [ ] is displayed, you cannot record on the hard disk. In such case, check the setting of the video folder ( 29).
Recording on the Hard Disk • Recording starts on both the tape in the camcorder and the hard disk. • changes to , and the indicator starts moving. • When the tape reaches the end, recording on the hard disk continues. • When no tape is inserted, or the tape is write-protected, recording is saved only on the hard disk. . • To stop recording, click • To save the next scene as another file in [Sequence] mode, finalize the file by clicking in recording or stop mode.
Recording on the Hard Disk Recording Panel 9 1 10 2 3 11 12 4 13 5 6 7 8 1 Preview Shows the camcorder picture. When you have selected [No preview] in the [Option settings] window, the preview does not appear during recording. When recording in [Sequence] mode, the preview starts when you restart recording or finalize the file by clicking . 2 Safe margin Indicates the active safe area and title safe area. Select this setting from the menu that appears upon right-clicking the preview.
Recording on the Hard Disk 8 Audio level indicator Indicates the audio level of the channels 1 and 2 of the camcorder. The audio level indicator can be turned on/off by clicking / . • The audio level indicator appears slightly later on the computer screen than on the camcorder screen. • You can monitor the audio with the computer’s sound function. If you do not wish to play back the audio on the computer, set the audio level to [Mute].
Recording on the Hard Disk Recording History When you stop recording in [Standard] mode, or when a file has been created upon finalizing in [Sequence] mode, the file information appears under [Recording history]. The recording history will disappear when you close DV-PC Recorder. When you wish to review the history after you have closed DV-PC Recorder, open the “DVPC.LOG” file in the video folder with a text editor.
Reviewing the Recorded Picture You can review the recorded picture by playing back the file. 1. Click the [Playback] tab. The playback panel appears. 2. Select the file you wish to play back from the [File list]. Click the thumbnail of the file you wish to play back. 3. Click (or double-click a thumbnail). • The selected file is played back. • To change the playback position, move the slider ( 26). • You cannot select multiple files for continued playback. • To pause playback, click .
Reviewing the Recorded Picture 5 [File list] Lists the AVI files. As the default settings, the files in the selected video folder are shown and the latest file is listed at the top. : Selects a different folder. : Changes the order of the files. Select an option from the displayed menu. • To delete a file, right-click the thumbnail and select [Delete] from the displayed menu. You can also press the [Delete] key on the keyboard after selecting the file.
Reviewing the Recorded Picture ❍ The slider moves to the end when pressing the [F12] and [End] key on the keyboard. ❍ During playback pause, pressing the [b] or [a] key on the keyboard after moving the slider with the mouse allows you to fine adjust the position of the slider. Frame droppings that occurred during recording are indicated in red. 1 2 1 The slider moves to the frame dropping point after the current position. The number of dropped frames is displayed at the right of this button.
Uninstalling the Software Uninstall the software if it has not been installed correctly, or if it is not required anymore. ❍ Close any programs that are running, and disconnect the IEEE1394 (DV) cable from the camcorder and the computer before uninstalling the software. ❍ You need to log in as an administrator before uninstalling the software. 1. From the [start] menu, select [All Programs] followed by [Canon Utilities], [DV-PC Recorder] and [DV-PC Recorder Uninstall]. 2.
Troubleshooting Camcorder will not be recognized. ➝ ➝ ➝ ➝ A camcorder not supported by DV-PC Recorder is connected. Check if your camcorder is supported by DVPC Recorder ( 6). Another device such as a CD-ROM drive or hard disk drive (or repeater/hub) is connected to the computer’s IEEE1394 (DV) terminal. Do not connect any devices to the computer’s IEEE1394 (DV) terminal other than the camcorder. More than one camcorder is connected to the computer’s IEEE1394 (DV) terminal.
Troubleshooting The preview will not be displayed. ➝ ➝ If the preview is not displayed during recording, it might be set to [No preview] in the [Option settings] window. Select a setting other than [No preview]. When recording in [Sequence] mode, the preview starts when you restart recording or finalize the file by clicking .
PUB. DIE-212-N © CANON INC.