
Owner's Manual
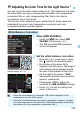
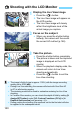

Table Of Contents
- Basic Instruction Manual
- Introduction
- Compatible Memory Cards
- Instruction Manual and CD-ROMs
- Table of Contents
- Using This Manual
- Quick Start Guide
- Supplied Accessories
- Parts & Controls
- Getting Started
- Attaching the Strap / Eyepiece Cover
- Charging the Battery
- Installing / Removing the Battery and Memory Card
- Turning On the Power
- Setting the Date, Time and Time Zone
- Selecting the Interface Language
- Attaching and Detaching a Lens
- Basic Operation
- Quick Control for Shooting Functions
- Menu Operations
- Formatting the Card
- Switching the LCD Monitor Display
- Feature Guide
- Basic Shooting and Image Playback
- Shooting with the LCD Monitor (Live View Shooting)
- Shooting Movies
- Image Playback
- Software Start Guide / Downloading Images to a Computer
- Index
- Instruction Manual
- Memmory Card Compatibility
- Table of Contents
- Supplied Accessories
- Parts & Controls
- Introduction
- Getting Started
- Charging the Battery
- Installing and Removing the Battery and Card
- Turning on the Power
- Setting the Date, Time, and Zone
- Selecting the Interface Language
- Attaching and Detaching a Lens
- Basic Operation
- Quick Control for Shooting Functions
- Menu Operations
- Formatting the Card
- Switching the LCD Monitor Display
- Feature Guide
- Basic Shooting and Image Playback
- Fully Automatic Shooting (Scene Intelligent Auto)
- Full Auto Techniques (Scene Intelligent Auto)
- Disabling Flash
- Creative Auto Shooting
- Shooting Portraits
- Shooting Landscapes
- Shooting Close-ups
- Shooting Moving Subjects
- Shooting Food
- Shooting Night Portraits
- Quick Control
- Shooting with Ambience Selection
- Shooting by Lighting or Scene Type
- Image Playback
- Creative Shooting
- Advanced Shooting
- Conveying the Subject’s Movement
- Changing the Depth of Field
- Manual Exposure
- Changing the Metering Mode
- Setting Exposure Compensation
- Auto Exposure Bracketing
- Locking the Exposure
- Locking the Flash Exposure
- Auto Correction of Brightness and Contrast
- Correcting the Image’s Dark Corners
- Customizing Image Characteristics
- Registering Preferred Image Characteristics
- Matching the Light Source
- Adjusting the Color Tone for the Light Source
- Setting the Color Reproduction Range
- Shooting with the LCD Monitor (Live View Shooting)
- Shooting Movies
- Handy Features
- Image Playback
- Post-Processing Images
- Printing Images
- Customizing the Camera
- Reference
- Software Start Guide / Downloading Images to a Computer
- Troubleshooting
- Specs
- Index
- Wireless Function Basic Instruction Manual
- Do More with Macro Booklet
- Lens Instruction Manual
- Flash Classroom Booklet
- Warranty

B: Matching the Light SourceN
134
4
Select [O (Custom)].
Press the <XB> button.
Select [O (Custom)], then press
<0>.
If the exposure obtained in step 1 differs greatly from the standard
exposure, a correct white balance may not be obtained.
In step 3, the following images cannot be selected: Images captured with
the Picture Style set to [Monochrome] (p.96), images processed with a
Creative filter, or images shot with another camera.
Instead of a white object, a gray chart or 18% gray reflector
(commercially-available) can produce a more accurate white balance.
The personal white balance registered with EOS Utility (EOS software,
p.314) will be registered under [O]. If you perform step 3, the data for
the registered personal white balance will be erased.