
Owner's Manual

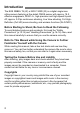
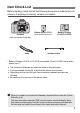

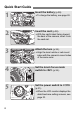

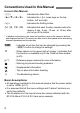
Table Of Contents
- Basic Instruction Manual
- Introduction
- Compatible Memory Cards
- Instruction Manual and CD-ROMs
- Table of Contents
- Using This Manual
- Quick Start Guide
- Supplied Accessories
- Parts & Controls
- Getting Started
- Attaching the Strap / Eyepiece Cover
- Charging the Battery
- Installing / Removing the Battery and Memory Card
- Turning On the Power
- Setting the Date, Time and Time Zone
- Selecting the Interface Language
- Attaching and Detaching a Lens
- Basic Operation
- Quick Control for Shooting Functions
- Menu Operations
- Formatting the Card
- Switching the LCD Monitor Display
- Feature Guide
- Basic Shooting and Image Playback
- Shooting with the LCD Monitor (Live View Shooting)
- Shooting Movies
- Image Playback
- Software Start Guide / Downloading Images to a Computer
- Index
- Instruction Manual
- Memmory Card Compatibility
- Table of Contents
- Supplied Accessories
- Parts & Controls
- Introduction
- Getting Started
- Charging the Battery
- Installing and Removing the Battery and Card
- Turning on the Power
- Setting the Date, Time, and Zone
- Selecting the Interface Language
- Attaching and Detaching a Lens
- Basic Operation
- Quick Control for Shooting Functions
- Menu Operations
- Formatting the Card
- Switching the LCD Monitor Display
- Feature Guide
- Basic Shooting and Image Playback
- Fully Automatic Shooting (Scene Intelligent Auto)
- Full Auto Techniques (Scene Intelligent Auto)
- Disabling Flash
- Creative Auto Shooting
- Shooting Portraits
- Shooting Landscapes
- Shooting Close-ups
- Shooting Moving Subjects
- Shooting Food
- Shooting Night Portraits
- Quick Control
- Shooting with Ambience Selection
- Shooting by Lighting or Scene Type
- Image Playback
- Creative Shooting
- Advanced Shooting
- Conveying the Subject’s Movement
- Changing the Depth of Field
- Manual Exposure
- Changing the Metering Mode
- Setting Exposure Compensation
- Auto Exposure Bracketing
- Locking the Exposure
- Locking the Flash Exposure
- Auto Correction of Brightness and Contrast
- Correcting the Image’s Dark Corners
- Customizing Image Characteristics
- Registering Preferred Image Characteristics
- Matching the Light Source
- Adjusting the Color Tone for the Light Source
- Setting the Color Reproduction Range
- Shooting with the LCD Monitor (Live View Shooting)
- Shooting Movies
- Handy Features
- Image Playback
- Post-Processing Images
- Printing Images
- Customizing the Camera
- Reference
- Software Start Guide / Downloading Images to a Computer
- Troubleshooting
- Specs
- Index
- Wireless Function Basic Instruction Manual
- 18-55mm Lens
- 75-300mm Lens
- Do More with Macro Booklet
- Flash Classroom Booklet
- Warranty

6
Quick Start Guide
1
Insert the battery (p.28).
To charge the battery, see page 26.
2
Insert the card (p.28).
With the card’s label facing toward
the back of the camera, insert it into
the card slot.
3
Attach the lens (p.36).
Align the lens’s white or red mount
index with the camera’s mount index
of the same color.
4
Set the lens’s focus mode
switch to <AF>
(p.36).
5
Set the power switch to <1>
(p.31).
When the LCD monitor displays the
date/time/zone setting screens, see
page 33.
White index Red index