
User Guide

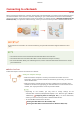
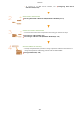
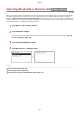


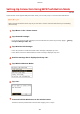

Table Of Contents
- Contents
- Important Safety Instructions
- Basic Operations
- Copying
- Faxing
- Configuring Initial Settings for Fax Functions
- Sending Faxes
- Receiving Faxes
- Sending and Receiving Faxes According to Your Purposes
- Checking Status and Log for Sent and Received Documents
- Importing/Exporting Address Book Data with the Supplied Software
- Sending Faxes from Your Computer (PC Fax)
- Using the Machine as a Printer
- Using the Machine as a Scanner
- Preparing to Use the Machine as a Scanner
- Scanning from the Machine
- Scanning from a Computer
- Convenient Scanning with a Machine-Based Operation
- Can Be Used Conveniently with a Mobile Device
- Network
- Connecting to a Network
- Viewing Network Settings
- Configuring the Machine for Printing or Faxing from a Computer
- Configuring Scan Settings (E-Mail/Shared Folders)
- Configuring the Machine for Your Network Environment
- Security
- Using Remote UI
- Setting Menu List
- Troubleshooting
- Maintenance
- Appendix
- SIL OPEN FONT LICENSE

Setting Up Connection Using WPS Push Button Mode
1469-066
If your wir
eless router supports WPS push button mode, you can easily set up a connection with a WPS button.
How to operate the wireless router may vary on each device. See the instruction manuals for your networking
de
vice for help.
1
Tap <Menu> in the <Home> Screen.
2
Tap <Network Settings>.
● If a scr
een for entering a PIN is displayed, enter the PIN with the numeric keys and tap <Apply>.
Setting
the System Manager PIN
(P. 397)
3
Tap <Wireless LAN Settings>.
● If the <Do you want to enable the wir
eless LAN?> message is displayed, tap <Yes>.
● If the <Direct Connection will be disabled. Is it OK?> message is displayed, tap <Yes>.
4
Read the message that is displayed, and tap <OK>.
5
Tap <WPS Push Button Mode>.
6
Tap <Yes>.
7
Press and hold the WPS button on the wireless router.
The button must be pressed within 2 minutes after tapping <Yes> in step 6.
Network
321