
User Guide


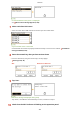
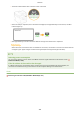
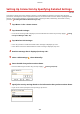

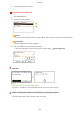

Table Of Contents
- Contents
- Important Safety Instructions
- Basic Operations
- Copying
- Faxing
- Configuring Initial Settings for Fax Functions
- Sending Faxes
- Receiving Faxes
- Sending and Receiving Faxes According to Your Purposes
- Checking Status and Log for Sent and Received Documents
- Importing/Exporting Address Book Data with the Supplied Software
- Sending Faxes from Your Computer (PC Fax)
- Using the Machine as a Printer
- Using the Machine as a Scanner
- Preparing to Use the Machine as a Scanner
- Scanning from the Machine
- Scanning from a Computer
- Convenient Scanning with a Machine-Based Operation
- Can Be Used Conveniently with a Mobile Device
- Network
- Connecting to a Network
- Viewing Network Settings
- Configuring the Machine for Printing or Faxing from a Computer
- Configuring Scan Settings (E-Mail/Shared Folders)
- Configuring the Machine for Your Network Environment
- Security
- Using Remote UI
- Setting Menu List
- Troubleshooting
- Maintenance
- Appendix
- SIL OPEN FONT LICENSE

7
Tap the WEP key you have edited.
Using WPA-PSK or WPA2-PSK
1
Tap <WPA/WPA2-PSK>.
2
Select an encryption method.
<Auto>
Sets the machine to automatically select AES-C
CMP or TKIP to match the setting of the wireless router.
<AES-C
CMP>
Sets AES-CCMP as the encryption method.
3
Enter the network key that you have written down.
● Enter the network k
ey using the numeric keys, and tap <Apply>.
Entering Text(P. 38)
8
Tap <Yes>.
If an error message is displayed during setup
T
ap <Close>, check whether the specied settings are correct, and return to step 5.
9
Check that the Wi-Fi indicator is blinking on the operation panel.
● The Wi-Fi indicator blinks when a wir
eless router is detected.
Network
331