
User Guide


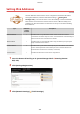

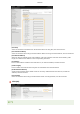
Table Of Contents
- Contents
- Important Safety Instructions
- Basic Operations
- Copying
- Faxing
- Configuring Initial Settings for Fax Functions
- Sending Faxes
- Receiving Faxes
- Sending and Receiving Faxes According to Your Purposes
- Checking Status and Log for Sent and Received Documents
- Importing/Exporting Address Book Data with the Supplied Software
- Sending Faxes from Your Computer (PC Fax)
- Using the Machine as a Printer
- Using the Machine as a Scanner
- Preparing to Use the Machine as a Scanner
- Scanning from the Machine
- Scanning from a Computer
- Convenient Scanning with a Machine-Based Operation
- Can Be Used Conveniently with a Mobile Device
- Network
- Connecting to a Network
- Viewing Network Settings
- Configuring the Machine for Printing or Faxing from a Computer
- Configuring Scan Settings (E-Mail/Shared Folders)
- Configuring the Machine for Your Network Environment
- Security
- Using Remote UI
- Setting Menu List
- Troubleshooting
- Maintenance
- Appendix
- SIL OPEN FONT LICENSE

2
Tap <DHCP>, <BOOTP>, or <RARP>.
If you do not want to use DHCP/BOOTP/RARP to assign an IP address
Select <Off>. If you select <DHCP>, <BOO
TP>, or <RARP> when these services are unavailable, the
machine will waste time and communications resources searching the network for these services.
3
Check that <Auto IP> is set to <On>.
● If <Off> is selected, change the setting to <On>.
4
Tap <Apply>.
IP addresses assigned via DHCP/BOOTP/RARP override the address obtained via Auto IP.
Manually entering an IP address
1
Check that <Auto Acquire> is set to <Off>.
● If <On> is displayed, tap <Auto Acquir
e>, and set both <Select Protocol> and <Auto IP> to <Off>.
2
Tap <Manually Acquire>.
3
Specify the IP address, subnet mask, and gateway address (or default gateway).
● Specify the settings in the following order: <IP Address>
<Subnet Mask> <Gateway Address>.
● Enter each setting using the numeric k
eys, and tap <Apply>.
Network
338