
User Guide


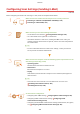


Table Of Contents
- Contents
- Important Safety Instructions
- Basic Operations
- Copying
- Faxing
- Configuring Initial Settings for Fax Functions
- Sending Faxes
- Receiving Faxes
- Sending and Receiving Faxes According to Your Purposes
- Checking Status and Log for Sent and Received Documents
- Importing/Exporting Address Book Data with the Supplied Software
- Sending Faxes from Your Computer (PC Fax)
- Using the Machine as a Printer
- Using the Machine as a Scanner
- Preparing to Use the Machine as a Scanner
- Scanning from the Machine
- Scanning from a Computer
- Convenient Scanning with a Machine-Based Operation
- Can Be Used Conveniently with a Mobile Device
- Network
- Connecting to a Network
- Viewing Network Settings
- Configuring the Machine for Printing or Faxing from a Computer
- Configuring Scan Settings (E-Mail/Shared Folders)
- Configuring the Machine for Your Network Environment
- Security
- Using Remote UI
- Setting Menu List
- Troubleshooting
- Maintenance
- Appendix
- SIL OPEN FONT LICENSE

4
Click [Add] [Finish].
5
Click [Close].
Changing the port type or number
If the printing pr
otocols (
Conguring Printing Pr
otocols and WSD Functions(P. 348) ) or port numbers
(
Changing Port Numbers (P. 409) ) have been changed on the machine, the corr
esponding settings on
the computer must also be congured. This change is only available for LPR or RAW ports.
1
Click [Congur
e Port].
2
Click the [LPR] or [RAW] radio button in [Protocol Type], change the number in the [Port Number] text box
as necessary, and then click [OK].
4
Click [Close].
LINKS
Setting Up Print Server(P. 354)
Network
353