
User Guide
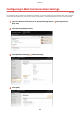
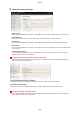
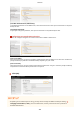

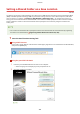
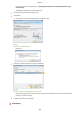
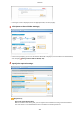
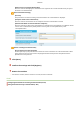
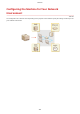
Table Of Contents
- Contents
- Important Safety Instructions
- Basic Operations
- Copying
- Faxing
- Configuring Initial Settings for Fax Functions
- Sending Faxes
- Receiving Faxes
- Sending and Receiving Faxes According to Your Purposes
- Checking Status and Log for Sent and Received Documents
- Importing/Exporting Address Book Data with the Supplied Software
- Sending Faxes from Your Computer (PC Fax)
- Using the Machine as a Printer
- Using the Machine as a Scanner
- Preparing to Use the Machine as a Scanner
- Scanning from the Machine
- Scanning from a Computer
- Convenient Scanning with a Machine-Based Operation
- Can Be Used Conveniently with a Mobile Device
- Network
- Connecting to a Network
- Viewing Network Settings
- Configuring the Machine for Printing or Faxing from a Computer
- Configuring Scan Settings (E-Mail/Shared Folders)
- Configuring the Machine for Your Network Environment
- Security
- Using Remote UI
- Setting Menu List
- Troubleshooting
- Maintenance
- Appendix
- SIL OPEN FONT LICENSE

Setting a Shared Folder as a Save Location
1469-070
The featur
e of scanning to shared folders is also called "Scan to SMB" because the feature uses Server Message Block
(SMB), a Windows-specic technology. SMB is a protocol for sharing resources, such as les and printers, with more
than one device in a network (
Conguring SMB (MF249dw / MF247dw)
(P. 382) ). To congure the machine for
saving your scanned documents into a shared folder in the network via SMB, specify the location of the shared folder
from a computer in advance. This section describes how to specify the save location by using the Send Function
Setting Tool.
● Y
ou can also use the Remote UI to specify the location of the shared folder as save destination by registering
the folder to the Address Book.
Registering Address Book from Remote UI(P. 467)
1
Start the Send Function Setting Tool.
Using a Web browser
Enter "http://<the IP addr
ess of the machine>/sendsupport_login.html" in the address eld of a Web browser,
and press the [ENTER] key.
Using the provided DVD-ROM
1
Insert the provided DVD-ROM into the drive on the computer.
● Select a language and click [OK] if you ar
e prompted to do so.
2
Click [Start Software Programs].
Network
368