
User Guide
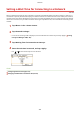

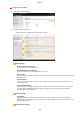
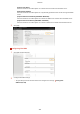
Table Of Contents
- Contents
- Important Safety Instructions
- Basic Operations
- Copying
- Faxing
- Configuring Initial Settings for Fax Functions
- Sending Faxes
- Receiving Faxes
- Sending and Receiving Faxes According to Your Purposes
- Checking Status and Log for Sent and Received Documents
- Importing/Exporting Address Book Data with the Supplied Software
- Sending Faxes from Your Computer (PC Fax)
- Using the Machine as a Printer
- Using the Machine as a Scanner
- Preparing to Use the Machine as a Scanner
- Scanning from the Machine
- Scanning from a Computer
- Convenient Scanning with a Machine-Based Operation
- Can Be Used Conveniently with a Mobile Device
- Network
- Connecting to a Network
- Viewing Network Settings
- Configuring the Machine for Printing or Faxing from a Computer
- Configuring Scan Settings (E-Mail/Shared Folders)
- Configuring the Machine for Your Network Environment
- Security
- Using Remote UI
- Setting Menu List
- Troubleshooting
- Maintenance
- Appendix
- SIL OPEN FONT LICENSE

[Acquire Host Name]
Select the check bo
x to enable Option 12 to obtain the host name from the DHCP server.
[DNS Dynamic Update]
Select the check box to enable Option 81 to dynamically update the DNS records through the DHCP
server.
[Acquire SMTP Server Address] (MF249dw / MF247dw)
Select the check box to enable Option 69 to obtain an SMTP server address from the DHCP server.
[Acquire POP Server Address] (MF249dw / MF247dw)
Select the check box to enable Option 70 to obtain a POP3 server address from the DHCP server.
3
Click [OK].
Conguring IPv6 DNS
1
Click [Edit] in [IPv6 Settings].
2
Congure IPv6 DNS settings.
● The [Use IPv6] check bo
x must be selected to congure the settings.
Setting IPv6
Addr
esses(P. 340)
Network
379