
User Guide
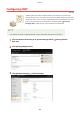
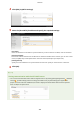

Table Of Contents
- Contents
- Important Safety Instructions
- Basic Operations
- Copying
- Faxing
- Configuring Initial Settings for Fax Functions
- Sending Faxes
- Receiving Faxes
- Sending and Receiving Faxes According to Your Purposes
- Checking Status and Log for Sent and Received Documents
- Importing/Exporting Address Book Data with the Supplied Software
- Sending Faxes from Your Computer (PC Fax)
- Using the Machine as a Printer
- Using the Machine as a Scanner
- Preparing to Use the Machine as a Scanner
- Scanning from the Machine
- Scanning from a Computer
- Convenient Scanning with a Machine-Based Operation
- Can Be Used Conveniently with a Mobile Device
- Network
- Connecting to a Network
- Viewing Network Settings
- Configuring the Machine for Printing or Faxing from a Computer
- Configuring Scan Settings (E-Mail/Shared Folders)
- Configuring the Machine for Your Network Environment
- Security
- Using Remote UI
- Setting Menu List
- Troubleshooting
- Maintenance
- Appendix
- SIL OPEN FONT LICENSE

4
Click [Edit] in [SNTP Settings].
5
Select the [Use SNTP] check box and specify the required settings.
[Use SNTP]
Select the check bo
x to use SNTP for synchronization. If you do not want to use SNTP, clear the check box.
[NTP Server Name]
Enter the IP address of the NTP or the SNTP server. If DNS is available on the network, you can enter a host
name (or FQDN) of up to 255 alphanumeric characters instead (example: ntp.example.com).
[Polling Interval]
Specify the interval between one synchronization and the next. Specify an interval from 1 to 48 hours.
6
Click [OK].
Testing communication with the NTP/SNTP server
● Y
ou can view communication status with the registered server by clicking [Settings/Registration]
[Network
Settings] [TCP/IP Settings] and then clicking [Check NTP Server] in [SNTP Settings] that appears. If a
pr
oper connection has been established, the result is displayed as shown below. Note that this operation
does not adjust the system clock.
Network
385