
User Guide


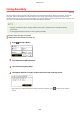


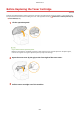

Table Of Contents
- Contents
- Important Safety Instructions
- Basic Operations
- Copying
- Faxing
- Configuring Initial Settings for Fax Functions
- Sending Faxes
- Receiving Faxes
- Sending and Receiving Faxes According to Your Purposes
- Checking Status and Log for Sent and Received Documents
- Importing/Exporting Address Book Data with the Supplied Software
- Sending Faxes from Your Computer (PC Fax)
- Using the Machine as a Printer
- Using the Machine as a Scanner
- Preparing to Use the Machine as a Scanner
- Scanning from the Machine
- Scanning from a Computer
- Convenient Scanning with a Machine-Based Operation
- Can Be Used Conveniently with a Mobile Device
- Network
- Connecting to a Network
- Viewing Network Settings
- Configuring the Machine for Printing or Faxing from a Computer
- Configuring Scan Settings (E-Mail/Shared Folders)
- Configuring the Machine for Your Network Environment
- Security
- Using Remote UI
- Setting Menu List
- Troubleshooting
- Maintenance
- Appendix
- SIL OPEN FONT LICENSE

Feeder
1469-0A0
Dust and gr
aphite powder may adhere to the roller inside the feeder and cause smudges to appear on printouts. To
clean the feeder, perform the following procedure.
1
Turn OFF the machine, and unplug the power cord from the AC power outlet.
● When you turn OFF the machine, data that is waiting to be printed is deleted. Fax documents that wer
e
received by using the Memory Reception function, faxes that are waiting to be sent, and reports that are
automatically printed after sending and receiving faxes are not deleted.
2
Open the feeder cover.
MF249dw MF247dw / MF236n
3
Wipe roller ( ) inside feeder.
● Clean the areas with a well-wrung-out cloth dampened with water. Then, wipe the area with a soft, dry cloth.
MF249dw MF247dw / MF236n
4
Gently close the feeder cover.
5
Reconnect the power cord and turn ON the machine.
Maintenance
594