
User's Manual

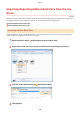
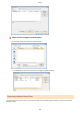
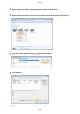
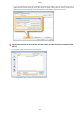
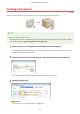
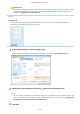
Table Of Contents
- Contents
- Important Safety Instructions
- Basic Operations
- Copying
- Faxing
- Configuring Initial Settings for Fax Functions
- Sending Faxes
- Receiving Faxes
- Sending and Receiving Faxes According to Your Purposes
- Checking Status and Log for Sent and Received Documents
- Importing/Exporting Address Book Data with the Supplied Software
- Sending Faxes from Your Computer (PC Fax)
- Using the Machine as a Printer
- Printing from a Computer
- Printing a Document
- Canceling Prints
- Checking the Printing Status
- Various Print Settings
- Enlarging or Reducing
- Switching 1-Sided and 2-Sided Printing (MF249dw / MF247dw)
- Collating Printouts by Page
- Printing Multiple Pages onto One Sheet
- Printing Posters
- Printing Booklet (MF249dw / MF247dw)
- Printing Borders
- Printing Dates and Page Numbers
- Printing Watermarks
- Selecting Document Type
- Saving Toner
- Combining and Printing Multiple Documents
- Configuring Print Settings to Your Needs
- Printing from a Computer
- Using the Machine as a Scanner
- Preparing to Use the Machine as a Scanner
- Scanning from the Machine
- Scanning from a Computer
- Convenient Scanning with a Machine-Based Operation (MF249dw / MF247dw)
- Can Be Used Conveniently with a Mobile Device
- Network
- Connecting to a Network
- Viewing Network Settings
- Configuring the Machine for Printing or Faxing from a Computer
- Configuring Scan Settings (E-Mail/Shared Folders) (MF249dw / MF247dw)
- Configuring the Machine for Your Network Environment
- Security
- Using Remote UI
- Setting Menu List
- Troubleshooting
- Maintenance
- Appendix
- SIL OPEN FONT LICENSE

[Output Size]
Select the size of paper on which the document will be actually printed. If the selected size differs fr
om the
one specied in [Page Size], the document is printed enlarged/reduced automatically according to the
selected size.
Enlarging or Reducing(P. 201)
Clickable UI
● Y
ou can easily specify the page layout, binding position, etc. intuitively on the preview image. For more
information, click [Help] on the printer driver screen.
4
In the [Page Setup] tab, select the paper type.
● Set [Paper T
ype] according to the type of paper to be used in the printing.
Loading Paper(P. 45)
5
Specify other print settings as necessary. Various Print Settings(P. 199)
● You can register the settings you specied in this step as a "prole" and use the prole whenever you
print. You can eliminate the need to specify the same settings every time you print. Registering
Combinations of Frequently Used Print Settings(P. 227)
6
Click [OK].
Using the Machine as a Printer
192