
User's Manual

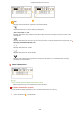
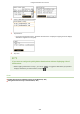

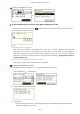

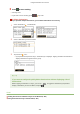
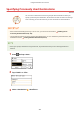
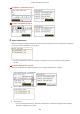
Table Of Contents
- Contents
- Important Safety Instructions
- Basic Operations
- Copying
- Faxing
- Configuring Initial Settings for Fax Functions
- Sending Faxes
- Receiving Faxes
- Sending and Receiving Faxes According to Your Purposes
- Checking Status and Log for Sent and Received Documents
- Importing/Exporting Address Book Data with the Supplied Software
- Sending Faxes from Your Computer (PC Fax)
- Using the Machine as a Printer
- Printing from a Computer
- Printing a Document
- Canceling Prints
- Checking the Printing Status
- Various Print Settings
- Enlarging or Reducing
- Switching 1-Sided and 2-Sided Printing (MF249dw / MF247dw)
- Collating Printouts by Page
- Printing Multiple Pages onto One Sheet
- Printing Posters
- Printing Booklet (MF249dw / MF247dw)
- Printing Borders
- Printing Dates and Page Numbers
- Printing Watermarks
- Selecting Document Type
- Saving Toner
- Combining and Printing Multiple Documents
- Configuring Print Settings to Your Needs
- Printing from a Computer
- Using the Machine as a Scanner
- Preparing to Use the Machine as a Scanner
- Scanning from the Machine
- Scanning from a Computer
- Convenient Scanning with a Machine-Based Operation (MF249dw / MF247dw)
- Can Be Used Conveniently with a Mobile Device
- Network
- Connecting to a Network
- Viewing Network Settings
- Configuring the Machine for Printing or Faxing from a Computer
- Configuring Scan Settings (E-Mail/Shared Folders) (MF249dw / MF247dw)
- Configuring the Machine for Your Network Environment
- Security
- Using Remote UI
- Setting Menu List
- Troubleshooting
- Maintenance
- Appendix
- SIL OPEN FONT LICENSE

If <File> is selected at step 2
4
Use the numeric keys to enter a three-digit number (001 to 100).
● If you enter the wr
ong characters, press
. (Press to delete each character one by one; press and hold to
delete all the input char
acters at once.)
If a conrmation scr
een appears
● When <One-Touch/Coded Dial TX Conrmation> is set to <On>, a screen is displayed that shows the
destination and the name for the number. (For Group Dial, the group name and the number of
destinations are shown.) Check the contents and if everything is correct, tap <OK>. To specify a different
destination, tap <Cancel> and then re-enter the three-digit coded dial number.
Displaying Destinations
in Addr
ess Book(P. 419)
If you want to specify multiple destinations (e-mail)
● Repeat steps 2 and 3. Up to 50 destinations can be specied.
To delete destinations (e-mail)
If you specied multiple destinations, you can delete destinations as necessary
.
1
Select <Destination> <Conrm/Edit>.
2
Select a destination you want to delete.
3
Tap <Remove>.
● If you select Gr
oup Dial in step 2, <Number of Destinations> is displayed. Tapping this item displays
destinations registered in the group.
Using the Machine as a Scanner
277