
User's Manual
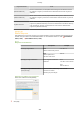


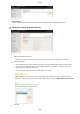


Table Of Contents
- Contents
- Important Safety Instructions
- Basic Operations
- Copying
- Faxing
- Configuring Initial Settings for Fax Functions
- Sending Faxes
- Receiving Faxes
- Sending and Receiving Faxes According to Your Purposes
- Checking Status and Log for Sent and Received Documents
- Importing/Exporting Address Book Data with the Supplied Software
- Sending Faxes from Your Computer (PC Fax)
- Using the Machine as a Printer
- Printing from a Computer
- Printing a Document
- Canceling Prints
- Checking the Printing Status
- Various Print Settings
- Enlarging or Reducing
- Switching 1-Sided and 2-Sided Printing (MF249dw / MF247dw)
- Collating Printouts by Page
- Printing Multiple Pages onto One Sheet
- Printing Posters
- Printing Booklet (MF249dw / MF247dw)
- Printing Borders
- Printing Dates and Page Numbers
- Printing Watermarks
- Selecting Document Type
- Saving Toner
- Combining and Printing Multiple Documents
- Configuring Print Settings to Your Needs
- Printing from a Computer
- Using the Machine as a Scanner
- Preparing to Use the Machine as a Scanner
- Scanning from the Machine
- Scanning from a Computer
- Convenient Scanning with a Machine-Based Operation (MF249dw / MF247dw)
- Can Be Used Conveniently with a Mobile Device
- Network
- Connecting to a Network
- Viewing Network Settings
- Configuring the Machine for Printing or Faxing from a Computer
- Configuring Scan Settings (E-Mail/Shared Folders) (MF249dw / MF247dw)
- Configuring the Machine for Your Network Environment
- Security
- Using Remote UI
- Setting Menu List
- Troubleshooting
- Maintenance
- Appendix
- SIL OPEN FONT LICENSE

5
Select the [Use Proxy] check box and specify the required settings.
[Use Proxy]
Select the check bo
x to use the specied proxy server when communicating with an HTTP server.
[HTTP Proxy Server Address]
Enter the address of the proxy server. Specify the IP address or host name depending on the environment.
[HTTP Proxy Server Port Number]
Change the port number as necessary. Enter a number between 1 and 65535.
[Use Proxy within Same Domain]
Select the check box to use a proxy server specied in the same domain.
[Use Proxy Authentication]
To enable authentication by the proxy server, select the check box and enter up to 24 alphanumeric
characters for the user name in the [User Name] text box.
[Set/Change Password]
To set or change the password for the proxy authentication, when it is enabled, select the check box and
enter up to 24 alphanumeric characters for the new password in the [Password] text box.
6
Click [OK].
Security
411