
User's Manual
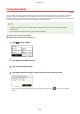
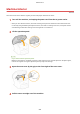
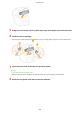

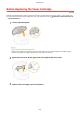
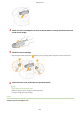
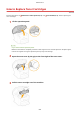
Table Of Contents
- Contents
- Important Safety Instructions
- Basic Operations
- Copying
- Faxing
- Configuring Initial Settings for Fax Functions
- Sending Faxes
- Receiving Faxes
- Sending and Receiving Faxes According to Your Purposes
- Checking Status and Log for Sent and Received Documents
- Importing/Exporting Address Book Data with the Supplied Software
- Sending Faxes from Your Computer (PC Fax)
- Using the Machine as a Printer
- Printing from a Computer
- Printing a Document
- Canceling Prints
- Checking the Printing Status
- Various Print Settings
- Enlarging or Reducing
- Switching 1-Sided and 2-Sided Printing (MF249dw / MF247dw)
- Collating Printouts by Page
- Printing Multiple Pages onto One Sheet
- Printing Posters
- Printing Booklet (MF249dw / MF247dw)
- Printing Borders
- Printing Dates and Page Numbers
- Printing Watermarks
- Selecting Document Type
- Saving Toner
- Combining and Printing Multiple Documents
- Configuring Print Settings to Your Needs
- Printing from a Computer
- Using the Machine as a Scanner
- Preparing to Use the Machine as a Scanner
- Scanning from the Machine
- Scanning from a Computer
- Convenient Scanning with a Machine-Based Operation (MF249dw / MF247dw)
- Can Be Used Conveniently with a Mobile Device
- Network
- Connecting to a Network
- Viewing Network Settings
- Configuring the Machine for Printing or Faxing from a Computer
- Configuring Scan Settings (E-Mail/Shared Folders) (MF249dw / MF247dw)
- Configuring the Machine for Your Network Environment
- Security
- Using Remote UI
- Setting Menu List
- Troubleshooting
- Maintenance
- Appendix
- SIL OPEN FONT LICENSE

Fixing Assembly
1469-0A1
Dirt may adher
e to the xing units inside the machine and cause black streaks to appear on printouts. To clean the
xing unit, perform the following procedure. Note that you cannot clean the xing unit when the machine has
documents waiting to be printed. To clean the xing unit, you need paper larger than plain A4 or Letter size paper. Set
the paper in the manual feed slot before performing the following procedure.
● Cleaning consumes the toner cartridge. Mak
e sure that there is sucient toner cartridge remaining
beforehand.
● It takes approximately 90 seconds to clean the xing assembly.
Checking Toner cartridge Level(P. 598)
Loading Paper in the Manual Feed Slot(P. 50)
1
Press
and tap <Menu>.
2
Tap <Adjustment/Maintenance>.
3
Tap <Clean Fixing Assembly>.
4
Load paper (A4/LTR or larger) in the manual feed slot, and tap <Start>.
● After cleaning is completed and the message <Finished.> appears, pr
ess
to return to the <Home>
Scr
een.
Maintenance
594