
User Manual


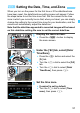
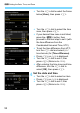
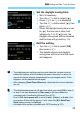
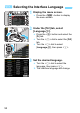

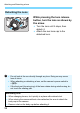

Table Of Contents
- Cover
- Camera Instruction Manual
- Introduction
- Getting Started and Basic Camera Operations
- Charging the Battery
- Installing and Removing the Battery
- Installing and Removing the Card
- Turning on the Power
- Setting the Date, Time, and Zone
- Selecting the Interface Language
- Attaching and Detaching a Lens
- Basic Shooting Operations
- Quick Control for Shooting Functions
- Menu Operations
- Operating the Camera with Touch Screen
- Before You Start
- Displaying the Grid in the Viewfinder
- Displaying the Electronic Level
- Setting the Viewfinder Information Display
- INFO. Button Functions
- Setting Multi Function Lock
- Help
- Basic Shooting
- Setting the AF and Drive Modes
- Image Settings
- Selecting the Card for Recording and Playback
- Setting the Image-Recording Quality
- Setting the Dual Pixel RAW Function
- Setting the ISO Speed for Still Photos
- Selecting a Picture Style
- Customizing a Picture Style
- Registering a Picture Style
- Setting the White Balance
- White Balance Correction
- Auto Correction of Brightness and Contrast
- Setting Noise Reduction
- Highlight Tone Priority
- Correction of Lens Aberrations due to Optical Characteristics
- Reducing Flicker
- Setting the Color Space
- Creating and Selecting a Folder
- Changing the File Name
- File Numbering Methods
- Setting Copyright Information
- GPS Settings
- Advanced Operations for Photographic Effects
- Program AE
- Shutter-Priority AE
- Aperture-Priority AE
- Manual Exposure
- Selecting the Metering Mode
- Setting the Desired Exposure Compensation
- Auto Exposure Bracketing (AEB)
- Lock the Exposure for Shooting (AE Lock)
- Long (Bulb) Exposures
- HDR (High Dynamic Range) Shooting
- Multiple Exposures
- Mirror Lockup
- Using the Eyepiece Cover
- Using a Remote Switch
- Remote Control Shooting
- Interval Timer Shooting
- Flash Photography
- Shooting with the LCD Monitor (Live View Shooting)
- Shooting Movies
- Image Playback
- Image Playback
- Shooting Information Display
- Searching for Images Quickly
- Magnifying Images
- Comparing Images (Two-Image Display)
- Playing Back with the Touch Screen
- Rotating the Image
- Protecting Images
- Setting Ratings
- Quick Control for Playback
- Enjoying Movies
- Playing Back Movies
- Editing a Movie’s First and Last Scenes
- Grabbing a Frame from 4K Movies
- Slide Show (Auto Playback)
- Viewing Images on a TV Set
- Copying Images
- Erasing Images
- Changing Image Playback Settings
- Post-Processing Images
- Sensor Cleaning
- Transferring Images to a Computer and Print Ordering
- Customizing the Camera
- Reference
- Downloading Images to a Computer / Software
- Wi-Fi (Wireless Communication) Function Basic Instruction Manual

49
If you turn on the power switch and the date/time/zone setting
screen appears, see page 51 to set the date/time/zone.
<1> : The camera turns on.
<2>: The camera is turned off and
does not function. Set the
power switch to this position
when not using the camera.
Whenever you set the power switch
to <1> or <2>, sensor
cleaning will be performed
automatically. (A small sound may be
heard.) During the sensor cleaning,
the LCD monitor will display <f>.
You can still shoot during sensor cleaning by pressing the shutter
button halfway (p.58) to stop cleaning and take a picture.
If you repeatedly turn the power switch <1>/<2> at a short
interval, the <f> icon may not be displayed. This is normal and
not a malfunction.
To save battery power, the camera turns off automatically after
approx. 1 minute of non-operation. To turn on the camera again, just
press the shutter button halfway (p.58).
You can change the auto power off time with [52: Auto power off]
(p.76).
Turning on the Power
Automatic Sensor Cleaning
3 Auto Power Off
If you set the power switch to <2> while an image is being recorded to
the card, [Recording...] will be displayed and the power will turn off after the
recording finishes.