
User Manual
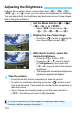
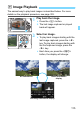
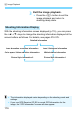
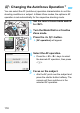
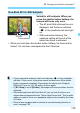
Table Of Contents
- Cover
- Introduction
- Getting Started and Basic Camera Operations
- Charging the Battery
- Installing and Removing the Battery
- Installing and Removing the Card
- Using the LCD Monitor
- Turning on the Power
- Setting the Date, Time, and Zone
- Selecting the Interface Language
- Attaching and Detaching a Lens
- Basic Shooting Operations
- Setting the Screen Display Level
- Quick Control for Shooting Functions
- Menu Operations and Configurations
- Operating the Camera with Touch Screen
- Formatting the Card
- Switching the LCD Monitor Display
- Displaying the Electronic Level
- Displaying the Grid
- Displaying the Flicker Detection
- Basic Shooting and Image Playback
- Fully Automatic Shooting (Scene Intelligent Auto)
- Full Auto Techniques (Scene Intelligent Auto)
- Shooting When You Cannot Use Flash
- Creative Auto Shooting
- Shooting Portraits
- Shooting Landscapes
- Shooting Close-ups
- Shooting Moving Subjects
- Special Scene Mode
- Shooting Group Photos
- Photographing Children
- Shooting Food
- Shooting Candlelight Portraits
- Shooting Night Portraits (With a Tripod)
- Shooting Night Scenes (Handheld)
- Shooting Backlit Scenes
- Shooting with Creative Filter Effects
- Quick Control
- Adjusting the Brightness
- Image Playback
- Setting the AF and Drive Modes
- Image Settings
- Setting the Image-Recording Quality
- Changing the Image’s Aspect Ratio
- Setting the ISO Speed for Still Photos
- Selecting a Picture Style
- Customizing a Picture Style
- Registering a Picture Style
- Matching the Light Source
- Adjusting the Color Tone for the Light Source
- Auto Correction of Brightness and Contrast
- Setting Noise Reduction
- Correction of Lens Aberrations due to Optical Characteristics
- Reducing Flicker
- Setting the Color Reproduction Range
- Advanced Operations for Photographic Effects
- Flash Photography
- Shooting with the LCD Monitor (Live View Shooting)
- Shooting Movies
- Handy Features
- Image Playback
- Searching for Images Quickly
- Magnifying Images
- Playing Back with the Touch Screen
- Rotating the Image
- Setting Ratings
- Setting Image Search Conditions
- Quick Control for Playback
- Enjoying Movies
- Playing Back Movies
- Editing a Movie’s First and Last Scenes
- Slide Show (Auto Playback)
- Viewing Images on a TV Set
- Protecting Images
- Erasing Images
- Digital Print Order Format (DPOF)
- Specifying Images for a Photobook
- Shooting Information Display
- Post-Processing Images
- Customizing the Camera
- Reference
- Software Start Guide / Downloading Images to a Computer

f: Changing the Autofocus OperationN
120
This AF operation is suited for moving subjects when the focusing
distance keeps changing. While you hold down the shutter button
halfway, the camera will keep focusing on the subject
continuously.
The exposure is set at the moment the picture is taken.
When the AF area selection mode (p.123) is set to Automatic
selection AF, focus tracking will continue as long as the Area AF
frame covers the subject.
AI Focus AF switches the AF operation from One-Shot AF to AI
Servo AF automatically if a still subject starts moving.
After the subject is focused in One-Shot AF, if the subject starts
moving, the camera will detect the movement, change the AF
operation automatically to AI Servo AF, and start tracking the moving
subject.
AI Servo AF for Moving Subjects
AI Focus AF for Switching the AF Operation Automatically
With AI Servo AF, the beeper will not sound even when focus is achieved.
Also, the focus indicator <o> in the viewfinder will not light up.
When focus is achieved with AI Focus AF with the Servo operation active,
the beeper will continue beeping softly. However, the focus indicator <o> in
the viewfinder will not light up. Note that focus will not be locked in this case.