
User Manual
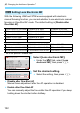

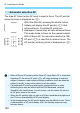
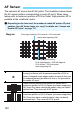
Table Of Contents
- Cover
- Introduction
- Getting Started and Basic Camera Operations
- Charging the Battery
- Installing and Removing the Battery
- Installing and Removing the Card
- Using the LCD Monitor
- Turning on the Power
- Setting the Date, Time, and Zone
- Selecting the Interface Language
- Attaching and Detaching a Lens
- Basic Shooting Operations
- Setting the Screen Display Level
- Quick Control for Shooting Functions
- Menu Operations and Configurations
- Operating the Camera with Touch Screen
- Formatting the Card
- Switching the LCD Monitor Display
- Displaying the Electronic Level
- Displaying the Grid
- Displaying the Flicker Detection
- Basic Shooting and Image Playback
- Fully Automatic Shooting (Scene Intelligent Auto)
- Full Auto Techniques (Scene Intelligent Auto)
- Shooting When You Cannot Use Flash
- Creative Auto Shooting
- Shooting Portraits
- Shooting Landscapes
- Shooting Close-ups
- Shooting Moving Subjects
- Special Scene Mode
- Shooting Group Photos
- Photographing Children
- Shooting Food
- Shooting Candlelight Portraits
- Shooting Night Portraits (With a Tripod)
- Shooting Night Scenes (Handheld)
- Shooting Backlit Scenes
- Shooting with Creative Filter Effects
- Quick Control
- Adjusting the Brightness
- Image Playback
- Setting the AF and Drive Modes
- Image Settings
- Setting the Image-Recording Quality
- Changing the Image’s Aspect Ratio
- Setting the ISO Speed for Still Photos
- Selecting a Picture Style
- Customizing a Picture Style
- Registering a Picture Style
- Matching the Light Source
- Adjusting the Color Tone for the Light Source
- Auto Correction of Brightness and Contrast
- Setting Noise Reduction
- Correction of Lens Aberrations due to Optical Characteristics
- Reducing Flicker
- Setting the Color Reproduction Range
- Advanced Operations for Photographic Effects
- Flash Photography
- Shooting with the LCD Monitor (Live View Shooting)
- Shooting Movies
- Handy Features
- Image Playback
- Searching for Images Quickly
- Magnifying Images
- Playing Back with the Touch Screen
- Rotating the Image
- Setting Ratings
- Setting Image Search Conditions
- Quick Control for Playback
- Enjoying Movies
- Playing Back Movies
- Editing a Movie’s First and Last Scenes
- Slide Show (Auto Playback)
- Viewing Images on a TV Set
- Protecting Images
- Erasing Images
- Digital Print Order Format (DPOF)
- Specifying Images for a Photobook
- Shooting Information Display
- Post-Processing Images
- Customizing the Camera
- Reference
- Software Start Guide / Downloading Images to a Computer

121
f: Changing the Autofocus OperationN
By default, the AF points light up in red when focus is achieved in low-
light conditions or on a dark subject. In Creative Zone modes, you can
set whether to have the AF points light up in red when focus is achieved
(p.394).
Under low-light conditions, when you press the shutter button halfway,
the built-in flash may fire a brief burst of flashes. This illuminates the
subject to help autofocusing.
AF Points Lighting Up in Red
AF-Assist Beam with the Built-in Flash
AF-assist beam will not be emitted from the built-in flash in <7>, <3>,
<5>, or <8: C> modes, or when [Built-in flash firing] is set to
<b> in <A>, <C>, <2>, <4>, <8: qPF>, or <v:
GWXZHc> modes.
The AF-assist beam will not be emitted with AI Servo AF operation.
The built-in flash makes a sound when firing continuously. This is normal
and not a malfunction.
The effective range of the AF-assist beam emitted by the built-in flash is
approx. 4 meters / 13.1 feet.
In Creative Zone modes, when you raise the built-in flash with the <D>
button, the AF-assist beam will be emitted as necessary. Note that
depending on the setting for [5: AF-assist beam firing] under [54:
Custom Functions (C.Fn)], AF-assist beam will not be emitted (p.392).