
User Manual
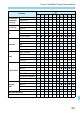
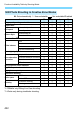
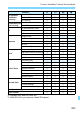
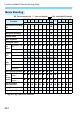
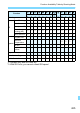
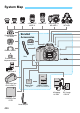

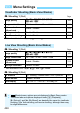
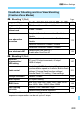
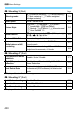
Table Of Contents
- Cover
- Introduction
- Getting Started and Basic Camera Operations
- Charging the Battery
- Installing and Removing the Battery
- Installing and Removing the Card
- Using the LCD Monitor
- Turning on the Power
- Setting the Date, Time, and Zone
- Selecting the Interface Language
- Attaching and Detaching a Lens
- Basic Shooting Operations
- Setting the Screen Display Level
- Quick Control for Shooting Functions
- Menu Operations and Configurations
- Operating the Camera with Touch Screen
- Formatting the Card
- Switching the LCD Monitor Display
- Displaying the Electronic Level
- Displaying the Grid
- Displaying the Flicker Detection
- Basic Shooting and Image Playback
- Fully Automatic Shooting (Scene Intelligent Auto)
- Full Auto Techniques (Scene Intelligent Auto)
- Shooting When You Cannot Use Flash
- Creative Auto Shooting
- Shooting Portraits
- Shooting Landscapes
- Shooting Close-ups
- Shooting Moving Subjects
- Special Scene Mode
- Shooting Group Photos
- Photographing Children
- Shooting Food
- Shooting Candlelight Portraits
- Shooting Night Portraits (With a Tripod)
- Shooting Night Scenes (Handheld)
- Shooting Backlit Scenes
- Shooting with Creative Filter Effects
- Quick Control
- Adjusting the Brightness
- Image Playback
- Setting the AF and Drive Modes
- Image Settings
- Setting the Image-Recording Quality
- Changing the Image’s Aspect Ratio
- Setting the ISO Speed for Still Photos
- Selecting a Picture Style
- Customizing a Picture Style
- Registering a Picture Style
- Matching the Light Source
- Adjusting the Color Tone for the Light Source
- Auto Correction of Brightness and Contrast
- Setting Noise Reduction
- Correction of Lens Aberrations due to Optical Characteristics
- Reducing Flicker
- Setting the Color Reproduction Range
- Advanced Operations for Photographic Effects
- Flash Photography
- Shooting with the LCD Monitor (Live View Shooting)
- Shooting Movies
- Handy Features
- Image Playback
- Searching for Images Quickly
- Magnifying Images
- Playing Back with the Touch Screen
- Rotating the Image
- Setting Ratings
- Setting Image Search Conditions
- Quick Control for Playback
- Enjoying Movies
- Playing Back Movies
- Editing a Movie’s First and Last Scenes
- Slide Show (Auto Playback)
- Viewing Images on a TV Set
- Protecting Images
- Erasing Images
- Digital Print Order Format (DPOF)
- Specifying Images for a Photobook
- Shooting Information Display
- Post-Processing Images
- Customizing the Camera
- Reference
- Software Start Guide / Downloading Images to a Computer

429
3 Menu Settings
z: Shooting 1 (Red) Page
z: Shooting 2 (Red)
* During Live View shooting or when [s: Shooting screen] is set to [Guided],
exposure compensation can be set up to ±3 stops.
Viewfinder Shooting and Live View Shooting
(Creative Zone Modes)
Image quality 73/83/74/84/7a/8a/b/1+73/1 146
Image review time
Off / 2 sec. / 4 sec. / 8 sec. / Hold 313
Release shutter
without card
Enable / Disable 312
Lens aberration
correction
Peripheral illumination correction: Enable /
Disable
173
Chromatic aberration correction: Enable /
Disable
Distortion correction: Disable / Enable
Diffraction correction: Enable / Disable
Lens electronic MF
Disable after One-Shot AF /
Enable after One-Shot AF
122
Exposure
compensation/
AEB setting
1/3- and 1/2-stop increments, ±5 stops*
(AEB ±2 stops)
197
Flash control
Flash firing / E-TTL II metering / Flash
synchronization speed in Av mode / Built-in flash
settings / External flash function settings /
External flash C.Fn setting / Clear settings
211
Red-eye reduction
Disable / Enable 205
zISO speed
ISO speed setting 152
zISO Auto
Max.:400 / Max.:800 / Max.:1600 / Max.:3200 /
Max.:6400 / Max.:12800 / Max.:25600
154
Auto Lighting
Optimizer
Disable / Low / Standard / High
169
Disable during manual exposure